Subscribe to stay up to date plus get 5 Free Home Productivity Printable Planners!
Decor & DIY

Bathroom Makeover Plans – One Room Challenge Week 1

I don’t usually post much on Thursdays except in the evening going into Friday whenever I do. But Linda from Calling It Home is hosting her yearly One Room Challenge (ORC) where a group of awesome bloggers take on the challenge to transform a space in their homes and show their progress over a period of six weeks. Guess participants (like you and me or whoever) can also link up our rooms via a link-up each Thursday until the end of the challenge. It is a way to stay motivated and get a project done, especially one that you may have been meaning to tackle for a while. If you are not familiar with this challenge, you can read more about it here.

ORC

I always love browsing through the transformations of various spaces from the challenge. Since we are in the process of doing a few makeovers around here, I thought it would be fun to show you the progress through one of them. Today I am stepping out of my comfort zone and showing you one of our bathrooms. It is our main bath that we all share since our other bathroom is only a half-bath. The kids still call it theirs because in our previous home they had their own. They’ve been wanting me to put back up their decorations from their previous bathroom but I did not think pretty purple shower curtains could make a not so pretty bathroom pretty. We may have gained other rooms in this home but we lost the privilege of having two full baths. 

This bathroom is not the prettiest and I am a little embarrassed to even show the space. When we bought this home, the space was already like this but we figured we’d eventually make it over. It is the number one space in our home that has bugged us especially when guests came over. See for yourself.

ORC wk1 Bathroom 4

I promise you, that while it may not look pretty, it is usually clean. I have a daily bathroom cleaning routine because I cannot stand a dirty bathroom. I always cringe when we go to a buffet type restaurant and one of the kids have to go the bathroom. My mind always think that I may not be able to eat if I see something gross. But it’s like you have to take the kids right then or else they may have an accident – one downfall of potty-trained little kids:) So our bathrooms are generally clean despite their overall makeup.

ORC WK1 Bathroom

This was my meager attempt to remove the wall paper. As you can see, I did not get very far. Once I peeled off the top layer and realized there was also a bottom layer, my desire to remove the rest of it quickly waned! Plus, while my husband would like to see the space transformed, I think he has just had it with removing wall paper!

ORC wk1 Bathroom 3

ORC wk1 Bathroom 6

At one point, there used to be some kind of a shelving on the wall over the toilet area. I removed it at the beginning of the year but the screws run deeper than they appear. And so, they are still on the wall.

ORC wk1 Bathroom 2

ORC wk1 Bathroom 5

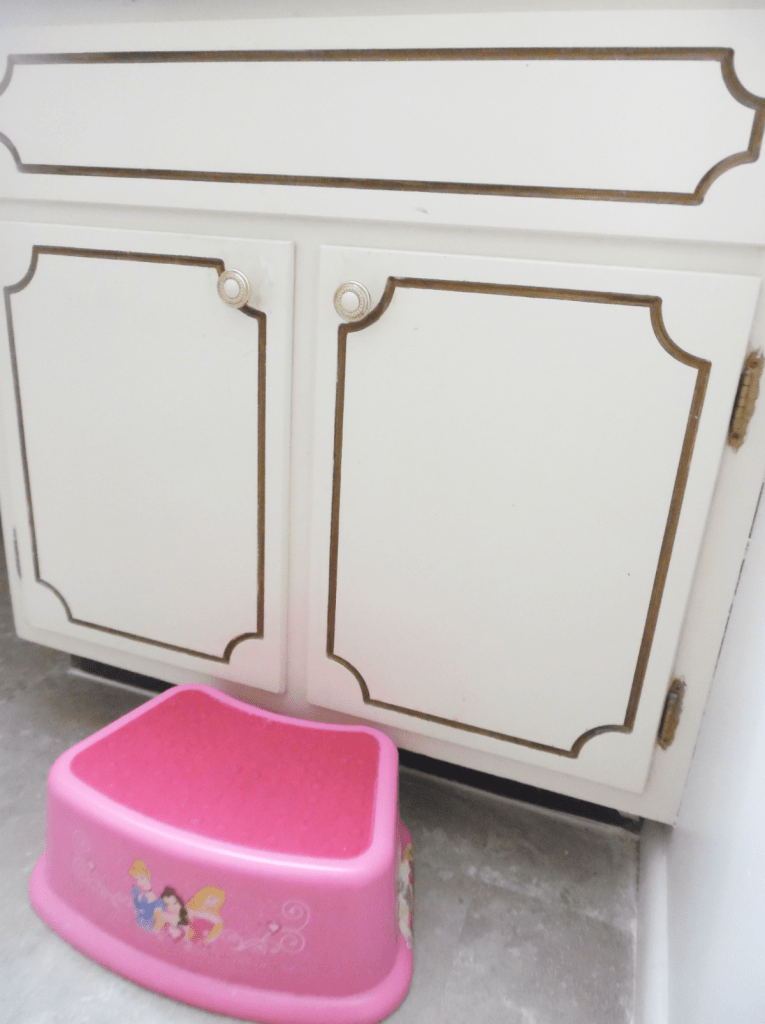
The cabinets have a vintage look to them which I don’t think is bad at all. But the inside is not the best looking.

ORC wk1 Bathroom 7

A look at the inside of the cabinet.

ORC wk1 Bathroom 8

And then finally, a look at the closet. Not at all organized. 

ORC wk1 Bathroom 9

What are our plans? This is not going to be a reap out the old design and construct a new one kind of makeover. But here are the changes as planned: 

  • Remove Wall Paper 
  • Remove Vanity and Mirror – Replace with two new medicine cabinets with mirrors included
  • Change out Lighting – Replace with brighter fancier lighting
  • Change faucets?
  • Paint the Bathroom
  • Paint inside Cabinet
  • Add new accessories
  • Organize Closet

I hope you are not judging our space. Some of us tend to have those kind of spaces staring us in the face daily, don’t we? But it is getting a makeover and I am excited to see how how it turns out. 

Don’t forget to pop on over at Linda’s blog to check out more not so pretty spaces that will be linked up for this first week. If you are presently working on something, you can always join in on the fun, too. It is opened for all!!!

Do you have one of those not so pretty spaces in your home? I’d love to know about it in the comments. 

Decor & DIY

Master Bedroom Makeover Plans

Do you love bedrooms that are clean and inviting? I always do. In the past, I was content with the bedrooms I have created, especially the one in our previous home. Unfortunately, I don’t have a photo of it. But since we moved to this current home, I feel like I have been struggling to get it together with this “room thing”.

master bedroom window

On a typical day it may look something like this next image. There is no rhyme or reason to the room; it’s just a room. I will explain the white spots on the wall further down this post.

Master bedroom makeover plans 5

When we moved from our previous home, we did not move with most of our bedroom items, except our king sized mattress which we invested in. Let me explain. We had purchased a new dresser set on the lower end (around $200) while we rented a town home then moved with it when we bought our first home. It looked nice and did the job although not very expensive. Plus the drawers were nice and very roomy. We’d had it for about 3 years. But when we bought our second home, my husband had this bright idea to give it away and start all over at our new home.  The previous owners were moving out of state and wanted to give us their set which seemed to have more drawers. The set included a 9 drawer horizontal dresser, a vertical 6 drawer dresser, and two 3 drawer night stands. Sounds good right? Immediately after we moved our king-sized in, I realized that the tall 6 drawer dresser look up too much space in the room. That had  had to go. I also realized how small the insides of the drawers were. They didn’t hold much clothing in each at all. Another thing that bothered me about them is that they had doors to open before getting to the dressers. When I was putting away clothing, I always had to caution the kids to keep away from the doors. In addition, I did not like the design at the bottom of this large dresser. Despite these issues, we kept the 9 drawer dresser and the night stands around because we did not have another set to use and our closets are not big.

This next image is a photo of the 9 drawer horizontal dresser. As you can see, one of the piece of laminated wood fell off from the drawer. We did not bother fixing it back because we intended to replace the set. While I like scoring stuff on Craigslist for steals, sometimes the search could be endless. At times it’s just better to save up and invest in something. So our plan was to save up until we could invest in a set that we love. Recently we gave away this set to someone on Craigslist. We have found a beautiful replacement which came a couple days after I put up this set for free on Craigslist. I guess we could have made a few bucks from the set but we were happy to bless a little teenager who has been long looking for a black dresser set to match her room. She and her mom drove over an hour away to pick it up. Our hearts were touched! Anyway, I’ll share more on the dresser set replacement in another post.Master bedroom makeover plans 3

Moving on to the mirror in this next image. While it was big and beautiful, it had to go since we gave away the dresser that matched its length. My husband was not a fan of the mirror anyway. And I did not like the dresser set. So they both had to go. Again, I was happy to pass it on to another family who could use it.

The cable around the bathroom door to the left is another story. We had cable installed in our room and since we do not have a designated TV spot, the installers gave us a long chord so we could place the TV where ever until we figure it out. I threw it up there to keep it out of the kids way.Master bedroom makeover plans 4

I mentioned earlier about the white spots on the walls. These are made from nail hole fillers. To say the least, there were so many holes around the window curtain rod areas (in all the rooms) when we moved into the home. The previous owners lived here for quite a number of years. So I am wondering if the holes are from them moving things around. To make matters worse, once I removed the old curtain rods that were hooked up more wholes were revealed. Sigh. At one point, I did not care anymore. I figured it was holy enough so I guess I could make some more. It needed a paint job anyway.

Master bedroom makeover plans 1

But then, all the holes began to bug me. So I had a brilliant idea to use some nail hole filler to block the holes. Well, hello? The walls are painted blue so when the stuff dried, it turned white. Now the last error seems to be worse than the first! I had used some nail hole filler on a few holes on our white walls in another room and did not stop to think that the filler would show up white on blue walls. I attempted to sand them down to make them look at least smoother but I ran out of patience. Let’s leave it for the one who is painting, shall we?!

Master bedroom makeover plans

And the closet space – super small! All the spots on the walls were there when we moved in.

Master bedroom makeover plans 7

So there you have it – a peek into my not so pretty bedroom after all. I am sure this is not the worst bedroom you have seen!! But I got to say though, that grey and red comforter is the softest and comfiest. My husband picked up the set for real cheap just as a second spare one a few years ago. The colors were not my favorite but the thing is so soft that I kept it around. And now we are using it as our main one because our previous pricier main one started to fall apart. Another bonus is that the kids love jumping and hanging out on our bed because they find it so comfi (I guess all kids  tend to love their parents bed)! Even this morning our three year old daughter expressed how much she likes our comfi bed. Keep in mind that this is a kid who has learned to sleep well in her own bed from since birth.

Master bedroom makeover plans 2

So what is all this talk about this room? So glad you asked! We are in the process of giving this room a makeover. It really does have the potential for a good makeover. Below is a shot of what it looked like last summer when I attempted to spruce it up just a little. I added new bedding and some artwork. But it was not my favorite. I was basically playing around with ideas to see what I would love. I have long taken down the decorations and using some of them elsewhere. And the comforter set was a cheap little one I found at Ross dress store. Not the best. Needless to say, my room is back to looking like the previous photo. But we are planning to give this room a good paint job and to make this space ours all on a not so large budget. Stay tuned; we’ll see how it turns out!!!

Master bedroom

We have also started doing a few more smaller projects around here, too. And I am excited to share them whenever they are completed. Do you have any pending projects up your sleeves? I would love to hear about them in the comments below.


Decor & DIY

Monogrammed Spring Wreath with Neutral & Bold Accents

Make a Welcoming Statement with an Easy DIY Spring Wreath.

Spring Wreath 21

Spring wreaths are so easy to make and their variation is just endless. So many sizes, so many shapes, so many colors, so many styles, it’s almost as if anything goes! Really. Why not spruce up your front door and make a statement with an easy DIY Spring wreath? Not only will your entrance look great but your guests will feel a sense of welcome. It will also bring a little smile and cheer every time you walk up to your front door. It is amazing how one little piece of decor could transform the look of and feel of a space be it negative or positive (positive in this case). Oh and are the neighbors looking at your space? You bet they are! 

In any event, you can add your own spin and style to concoct a Spring wreath and save some dough while doing so, too. The price of seasonal wreaths are OVERRATED. I tend to skip them at the store, no matter how beautiful they look. Or if I must, I find the ones on sale like at Christmas when I don’t feel like making them. I have never bought a Spring wreath. And last year was the only time I actually made a Spring one (See at the end of this post).

Spring wreath 23

Let me show you how easy this was to make. Plus, it was very frugal. Most (if not all) of my seasonal decor are always frugal. Keep in mind that frugal does not always mean low quality either. Shop sales, shop off season, think DIY, re-purpose, etc. I have a post to come on some of my most recent frugal finds.

For this project, I chose colorful and easy. At first, I thought I wanted to keep the wreath pretty natural with neutral colors and accents. But then I thought to myself, let’s brighten up and bring on some spring colors. I am not talented when it comes to making elaborate, odd shaped, and fancy-pancy wreaths so I stick to a simple ready-made wreath and add stuff to it:) If you are like me and want easy and frugal here is what I did to make mine. You will need:

  • One natural wooden wreath (I bought this from Jo-Ann’s Fabric in the Fall around $5). I have got to add, that I was a bit hesitant to spend the $5). But I loved the look and size and figured I could reuse it seasonally, if I decided to do so).
  • A few bunches of faux flowers from the Dollar Tree (I bought 2 bunches of glittered berries in pink and purple, 1 bunch of pink lilac, and a bunch of very light yellow something else, totaling $4).
  • Natural Raffia ($1 from the Dollar Tree – one pack goes a long way)
  • Letter “T” for our last name ($1.47 from Walmart)

Spring wreath 2

Spring wreath 5

Step 1: Decide where you want to place the flowers and berries. I wanted mine to be angled on one side so I used the left side of the wreath. Stick one flower (petals facing upward) through the wreath, making sure that the stem is not showing on the other side. 

Spring wreath 4

Do the same with the other flower with the petals facing downward. Again, make sure the stem is tucked neatly through the wreath.

spring wreath 8

Spring wreath 9

Step 2: Push a bunch of berries alongside each of the flowers making sure that the berries are facing in the same direction as the flower petals. See this next image below. 

Note: I used contrasting colors to make them pop more. Looks more spring-y, too!!

Spring wreath 10

Aren’t the flowers and berries gorgeous together? I am seriously loving the combo!

spring wreath 11

Step 3: Pull out some raffia from the bunch and gather them together.

spring wreath 13

Simply tie them in a bow where the stems of the flowers and berries connect.

spring wreath 14

The raffia adds a natural element to the wreath and really pulls it together.

spring wreath 17

Natural wooden wreath, flowers, berries, raffia and I thought my wreath was complete. Not quite totally. Because after all was said and done, I decided to pick up a monogrammed letter for a more personalized feel. I’d seen plenty of wreaths with letters so I thought, “why not add a little extra something”?.

spring wreath 15

This little “T” represents the beginning of our Last Name. It definitely adds a personalized look to the project!

spring wreath 18

They sell those in one of the craft isles at Walmart and they are not very expensive. Well, that is if you are only buying one or a couple. At the back of the letter is a little piece of transparent hard plastic with a hole. I used some natural looking jute string, ran it through the hole, and then attached it around a couple pieces of wood on the wreath. I wanted to use raffia to attach it but the color of the jute string blended better with the tone of the letter.

Spring wreath 19

And wallah! It looks beautiful and it is so easy and so very frugal. That puts a smile on my face:) What do you think?

Spring Wreath 21

Monogrammed Spring Wreath with Neutral and Bold Accents

See last year’s variation here or by clicking on the image below. 

I was about to use the one from last year but after seeing how small it looked against the door now I decided to do a bigger one. Plus I think I had removed the little flowers for something else. So this wreath is being used in the kitchen at the moment. 

5 Dollar Spring Wreath

Do you change out wreaths seasonally? Have you made a new one or do you use the same one yearly for as long as it is in good shape? Share your Spring wreath experiences with me!!

Home

Hot Cross Buns – A Traditional Easter Recipe

Raise your hand if you like hot cross buns!! I am raising mine because I truly love those little rolls that is typically made during the Easter season.

Hot Cross Buns

My love for hot cross buns go way back in high school Home Economics class where we made recipes every so often. I love the slightly sweet bread-like taste with raisins and a little spice mixed in. Also, my mom made similar raisin buns on a regular basis and we could not wait for them to be out of the oven! Hot cross buns have some significance to the crucifixion of Christ, hence the crosses and the spices. So much more than the taste, they are great little reminders as to what Christ did for us.

hot cross buns 13

I am no baking pro by any means. But I have been experimenting with with my own hot cross buns recipes lately and think I have found a keeper. Don’t worry that the icing looks a little messy – think about the taste. My one year old decided he wanted to be on me while I drizzled the icing so no perfect drizzle here! I really wanted to have the perfect drizzle but then I remembered that sometimes things do not have to look perfect to taste good. So I scooped up my little one after his consistent yanking at me and I used one hand to drizzle the icing. You can even see him trying to grab one in the next image while I was taking the photos. Oh well!!

hot cross buns 2

hot cross buns 7

While I would like to tell you that the recipe is going to be fast, I have to admit that the dough will need to rise for a while before baking. That is the only thing that gets me sometimes with bread when I am in a hurry!! So I tried to give myself an ample amount of time to allow the dough to rise well so the buns would not turn out as flat as the ones I made last year. 

Hot Cross Buns
 
Ingredients
  • For Buns:
  • 4 cups all-purpose flour
  • 1/2 cup white sugar
  • 1-1/4 cups milk
  • 1 tablespoon yeast
  • 4 tablespoons butter
  • 1 whole egg, slightly beaten
  • 1 teaspoon cinnamon
  • 1/4 teaspoon nutmeg
  • 1/2 teaspoon salt
  • 3/4 cup dark raisins
  • For Egg Wash:
  • 1 egg white
  • 1 teaspoon milk
  • For Icing:
  • 1 cup powdered sugar
  • 1 teaspoon butter, softened
  • 1 tablespoon milk
Instructions
  1. Combine 3-3/4 cups flour, salt, cinnamon, and nutmeg in a large mixing bowl. Set aside. Warm 1-1/4 cups milk and 3 tablespoons butter in a small skillet over low heat. Stir constantly until butter is melted and the milk reaches 110 degrees. If it is too hot allow it to cool down a bit. Add sugar and stir. Sprinkle yeast over the mixture and let it rest for 10 minutes. Stir in beaten egg. Add milk mixture to the flour mixture and mix into a sticky but manageable dough. Add in the rest of the flour and the raisins. Stir well. Roll out dough unto a generously floured surface. Grease a large bowl with remaining tablespoon butter. Place dough in the bowl and roll it around in the butter. Cover with a clean towel and allow to rise about 1 hour or until it has doubled in size. Punch dough down and roll out on a slightly floured surface. Cut into 16 rolls and place them on greased baking sheet. Cover and let rise 30 to 45 minutes more.
  2. Preheat oven to 400 degrees. To make the egg wash, mix 1 teaspoon milk with egg white and brush the top of each piece of dough. Bake 15 to 20 minutes or until nice and brown. Let cool completely.
  3. Mix icing ingredients together until the mixture reaches drizzling consistency. Add a little more milk if it is too stiff or a little more powdered sugar if it is too soft. Drizzle over buns in a cross shape.
  4. These buns are best if eaten on the same day. But they can be kept covered and used on the following day. Do not reheat because the icing will melt, of course.
 

I’d say they turned out real well except for the messy icing. But that did not stop us from gobbling down a few of these once they were ready. And of course, the kids were all crazy about the icing! They certainly are a nice addition to Easter brunch, breakfast, snack or anytime treat! And who says they only have to be made at Easter? I am sure if I remove the crosses and just drizzle regular icing over them they will be just as good!

hot cross buns 6

Hot cross buns 10

Do you like hot cross buns? Have you made them yourself or do you only eat them when someone else makes them? I would love to hear about it in the comments.


Home

Inspirational DIY Laundry Room Sign

This shop has been compensated by Collective Bias, Inc. and its advertiser. All opinions are mine alone. #SnuggleUpMoments #CollectiveBias

If you love doing laundry, raise your hand!! I, on the other hand, cannot lift a finger! Of all the household tasks that seem to fill my day as a homemaker, laundry is one of my least favorites. I am not sure which “step” in its process to love. Maybe the “step” when it is all folded and ready to be put away. And at times that could be another story in itself. Or maybe it is when it is all put away whenever we get to it. Having a non-practical laundry room does not help the situation either.

Laundry

But despite my negative feelings toward laundry, I still need to do it for a few reasons:

  • my family needs clean clothes to wear
  • towels and cleaning rags need to be washed and rewashed before reusing 
  • bedding needs to be washed regularly 
  • I have little kids who love to snuggle with their blankets – those need to be kept clean for them
  • and let’s not forget the healthy and sanity reasons behind clean laundry

Of all the reasons mentioned, Love covers them all! Because let’s face it. If we did not love the ones we were blessed with, we probably would not be doing any laundry for them. So despite my negative feelings about doing laundry, I still must do it for the sake of my family.

snuggle 3

To combat my laundry room blues, I have recently bought some really good Snuggle Scent Boosters®. Not only do they smell awesome but they make my family’s clothing so soft, too. Snuggle® Ultra Blue Sparkle fabric conditioner & blue iris bliss Snuggle Scent Boosters® at Sam’s Club are definitely providing more snuggle up moments for my family. Did I mention how good they smell and how soft they leave our clothes?!!!

snuggle 1

See this blanket below? This is one of my little girls favorite blankets. She is 3 years old and has had it since she was about 8 months old. She drags the thing all over the place and you can often find her snuggling with it in her bed or on the couch. She likes to keep it near her face and prefers not to use it as a cover. Whenever she comes to snuggle with me she often brings it along, too. She rarely lets anyone touch her favorite blanket. I almost always have to sneak it in the wash or bribe her and hope that it could wash and dry quickly before she remembers it. Our two other kids also love to snuggle up with blankets, especially when they are with me on the couch.

Laundry 2

I want them to enjoy their little blankets for as long as they can. I also want them to be nice, clean, and snuggly when the kids are using them. These snuggle scent boosters really add a wonderful smell to their blankets and to all our laundry. Even I cannot stop sniffing newly laundered clothing. They are really making a big Snifference™ in our family’s laundry by combining both cent boosters together. One cannot beat the smell and the Snuggly Softness® from their use. 

The Snuggle® Ultra Blue Sparkle fabric conditioner comes in a liquid form. It provides our family’s laundry with Snuggly Softness® and 30 Days of freshness. It is definitely perfect for more snuggly family moments!

snuggle 5

Paired together with blue iris bliss Snuggle Scent Boosters the effect is amazing. They come in convenient little single packaging which makes it super easy to use and provides lasting scent for my family’s clothing. Just follow the simple directions on the packaging for best results. Little Pac, Big Snifference™

PicMonkey Collage

To go along with the snuggle scents boosters, I have added an inspirational “Loads of Love” DIY laundry sign in the laundry room. Whenever I feel negative toward the laundry, I simply look at the sign and remember the purpose for which I am doing it – because I love my family. After all, love is what makes us desire more snuggles from each other.

laundry sign 17

I am thinking of adding a heart to the sign, but for now this is how it looks. It is really easy to make, too. I had a few pieces of wood I had picked up from Home Depot. I love purchasing a large piece of wood from Home Depot and have them cut it down to size for me. That way, I can have them ready if I decide to do a quick project. This piece is about 1-1/2 feet long and 11-3/4 inches wide. It was cut from an original 4 feet piece of wood that I bought for around $6 dollars. My first stop is to always search their scrap wood bin. If I don’t see something I want to work with then I search the isles for a better piece of wood, as it was with this one.

Laundry sign 1

I began by finding the center on the back of the piece of wood then added a picture hook to it. The back remained unpainted.

laundry sign 5

laundry sign 6

Then I moved on to painting. I gave the front and sides of it a coat of black paint. Just a quick coat – no need to polish it. I only did this because I wanted some of the black to show up under the top paint. 

laundry sign 2

After this was dried, I applied a first coat of white spray paint. Then allowed it to dry.

laundry sign 3

And then another coat of white and allowed it to dry fully. I did not do another coat because I wanted it to show just this way.

laundry sign 4

I sanded it to roughen it up just a little. And then it was time to write the words. It’s good to measure the spacing between the letters and the words to get them to look even. The pencil marks could always be erased when the letters are dried, if the lines were drawn lightly.

laundry sign 8

After searching a few stores, I found these letters at Jo-Ann Fabrics and Crafts store. I would have much rather bigger letters in a different style but I did not like the other options. And I really did not feel like driving all over the place with three little kiddos to find them. So I bought these.

laundry sign 7

I placed the letter of the first word on the wood and traced it. 

laundry sign 9

Then I allowed it to dry then moved on to the next letter. It is more tedious this way because you do not want the paint from the first letter to smear unto the board. So it has to dry. I have done a few other projects like this and used single letters. 

laundry sign 10

No worries that the letters look the way they do. Paint fixes everything! The hardest part is already done.

laundry sign 12

I used more paint to smooth and even out the letters. And I kept smoothing out until the desired look was achieved. A smaller, thinner paint brush for around the edges was very helpful, too.  

laundry sign 11

Here is a look at it when I was done smoothing out. I even made the words a little bigger during the smoothing process. 

laundry sign 13

While I wanted the colors to be soft for the room, I felt like I should have chosen a darker color for the words “Loads of”. But since I had already used white in the background, it was difficult to choose which color would work best. I decided I would repaint over these two words with black – even though it may not be a soft color. It definitely shows up much better with two coats of black paint.
laundry sign 16

The laundry scent boosters plus this DIY sign make for more meaningful snuggle up moments. While I am still not the biggest fan of doing the laundry, adding the scent boosters along with an inspirational laundry room sign makes the loads much lighter.  

laundry sign 17

Have you tried the Snuggle® Ultra Blue Sparkle fabric conditioner & blue iris bliss Snuggle Scent Boosters® at Sam’s Club yet? Through the month of March you can look through your Instant Savings Book for exclusive savings on featured Snuggle® laundry conditioners at Sam’s Club. How do you show your family your love through those laundry moments? I would love to know your thoughts in the comments.

Birthdays & Parties

5 Year Old Birthday Party

A few days ago, someone asked me how old is our first daughter. Hearing myself answer “five” sounded kind of weird. How in the world is she already five? Those little kids do grow up fast for sure!

s birthday 63

We celebrated her birthday back in November, a week before her actual birthday which is on the 29. With Thanksgiving just before her birthday, it sometimes makes it difficult to have her party on the actual day. Especially when friends are gone out of town for the holiday. Since she was turning 5, and actually understood what it was to have a birthday, I thought it would be nice to have a few of her friends come out to help her celebrate. This year, one friend was going to be out of town the day of her birthday. Hosting the party before not only got her friends to come out but it was a huge help to me, too, not having to do it right after Thanksgiving. It really was a breeze.

s birthday 26 - Copy

And of course, here we are with another princess themed party. My original intent was to do something with gold and black but little missy wanted pink and princess. We ended up going with a Princess Aurora theme. I think it turned out well. Everything ran so smoothly as was commented by the moms who brought their girls. We sure had a fabulous time!

birthday mantle

Rather than doing lots of decorations with Snow White photos on them, I opted for a few statement pieces and included shades of pink in the various shades of Princess Aurora’s gown. I decided to make most of the decorative pieces to cut down on cost. Plus, I thought it would be fun to just make them. I actually enjoyed making them and was happy to finish them almost a week before the party. I started early doing a little each day. I knew I needed to start early because with a baby on hand it would not have been possible if I did not start early.  By the way, Pinterest was a big help in helping me choose some of the decorative pieces. You can find my Kids Birthday board here.

And did I mention we had our very first snow of the season on that same day, too? And not just a little light flurry; I am talking snow storm and all. But nothing like this stops Chicago people – they certainly are used to it!

s birthday 54

The birthday girl and her sister even had time to play out in the snow in the morning of the party. Then they came in and drank hot tea and got ready for the party:)

s birthday 58

Here is a virtual tour of the party. I hope you enjoy the rest of the photos. One of the things I am most bummed out about is that the photos did not turn out so well. But at least I have something to show for it. Ps..Look out for the cake – I made it:)

s birthday 53

s birthday 52

I used a curtain from their room to decorate the window in the family room, and did a few decorative pieces for the area (AKA Princess Aurora’s crown and necklace). The curtain worked well as it has that two toned color similar to Princess Aurora’s costume.

s birthday 4

I bought the scrapbook paper from Jo-Ann Fabric, print out some stuff on the computer, traced them to paper, and used glitter and glue to finish the pieces.

s birthday 25 - Copy

s birthday 24 - Copy

Tulle seems to be used regularly when it comes to decorating a Sleeping Beauty birthday so you will see many items decorated with tulle. For instance, these pom-poms were made from tulle. Again, thanks to Pinterest, I was able to find some links and follow some simple instructions to make them. I think they turned out well for my first time plus I did not spend much time cutting them properly, either.

s birthday 3

I decorated the mantle with tin cans the kids already had, a few boxes I bought from Walmart, a photo I already had and a happy birthday banner. I bought the circles on sale from Target and wrote the letters on them. The circles, boxes, and pink letter “S” together cost around $5.

s birthday 5

The vase, mirror, and furry things were already at home. The rest of the decor were nick-nacks I bought for the party.

S Birthday table

s birthday 10

And my favorite DIY yet is this tutu dress I made for her. She absolutely loved it and still does. Although, we found it easier to just remove the shoulder straps and just were it as a skirt. You’ve got to love Pinterest. My intent was to make this dress a little longer but I cut them the tulle too short and did not feel like spending more money. The tulle itself was very inexpensive at Jo-Ann Fabric. I believe it was a few cents per yard.

DIY tu tu skirt

s birthday 2

OK….moving on to the order of events. I made me a little reminder of how I wanted the party to flow and stuck it on the fridge. It really helped my husband, too, who was in charge of the games.

s birthday 17

The little invitees were asked to wear a princess dress for the party. Since my girls have a bunch of dress-up dresses, I put some out in a box so if a kid did not have a dress, she could put one on when she came.

s birthday 11

The first activity on the list was to make crowns. I found these foam crowns with lots of stickers and letters at Amazon. I used this large coffee table and set up throw pillows all around it for the girls to sit.

s birthday 6

I wrote each child’s name on a crown and set it on the table. I also set some stickers beside each crown.

s birthday 7

The kids then finished decorating their crowns however they liked. It was great to have two moms who stayed to help out. Last year, I babysat Sophia (in the blue) for a few months. This is her mom.

s birthday 38 - Copy

s birthday 19 - Copy

s birthday 21 - Copy

After the crows were made, we did some games. They were really short games which probably took around 20-25 minutes altogether. My husband helped me decide on the type of games to play as I was stumped for ideas!!!!

The first game was a “Treasure Hunt”. I set up a treasure box with little princess items (found mainly at the dollar store and some at Walmart). I hid some of these little chocolate candies that look like coins for the kids to find them. I also wrote numbers 1, 2, & 3 on the coins and coordinated them with matching gifts (see next image).

s birthday 8

These pink boxes have the gifts in them. If you look closely, you will see a candy coin next to each box. The numbers on them coordinate with the hidden coins. When the kids find the coins, they would chose a gift from the box that matches with the number on their coin. And of course, they can eat their chocolate candy coin, too. They were a big hit!!!

birthday mantle

Next game was called “Crystal carry”. The idea was to place a small pink block of ice on a spoon and have the kids carry it and place it in a bowl without dropping it. They love it so we did a couple rounds of it.

s birthday 41 - Copy

s birthday 39 - Copy

s birthday 40 - Copy

The final game we called “Musical Shoes”. It was played like musical chairs only we had the kids sit in a circle and pass a slipper around. They had fun with this one too. It is like every next game was an even bigger hit. So much fun!

s birthday 34 - Copy

And of course, a princess has got to eat right? So let’s talk about the food! We decided to serve the girls a light snack as the party was from 2-3:30. While we would have preferred an earlier time like around 10 or so, my husband was not going to be home during this time. He coaches basketball and already had some games scheduled before we decided on a party date.

s birthday 36 - Copy

So what’s on the menu: Ham & Swiss cheese sandwiches (I used Hawaiian rolls), Strawberry yogurt, popcorn, watermelon, cookies & pink lemonade.

s birthday 15
s birthday 31 - Copy

s birthday 32 - Copy

s birthday 27 - Copy

I DIY-ed the glittered little drinking glasses, the centerpieces, and the spray painted the Mason jars, too.

s birthday 28 - Copy

s birthday 12

I loved adding a touch of glitter to several pieces.

s birthday 16

Those cookies were so good! I made them using a cookie mix from Betty Crocker and use princess inspired cookie cutters to shape them. I am no cookie decorator but they tasted better than they look. Trust me!!!

s birthday 14

I put some of them in favor bags for the girls to take home. And we had a ball eating the rest!

s birthday 22 - Copy

And don’t even ask about my not-so-well DIY decorated cupcakes. Just remember, the taste was great!!

s birthday 18

s birthday 20

And this 5 layer cake – oh my! My secret? Use box mixes and to bake the cakes. Check. Decorate with whipped cream. Check. Place in fridge until the day of the party. Check. Bring out an hour or so before eating. Check!

s birthday cake

s birthday 50

I used some strawberry cake mixes for the pink ones. Yum is the word to describe this cake!

s birthday 47

s birthday 42

s birthday 44

And thanks to the lovely kiddos who brought our daughter a gift. All princess inspired. This girls was happy!!

s birthday 51

s birthday 45

I did her a pre-gift just for the party as I was waiting until later to get her bigger gift. I really loved this birthday gift in a jar idea. I bought a bunch of stuff she would like such as underwear, socks, necklaces, kids nail polish, hair accessories, and even a gift card and placed it all in a large Mason jar. Yes, they all fit in there.

s birthday 46

s birthday 23 - Copy

Here are some of the gifts she received from the jar and from her friends. She still loves every one of them!

s birthday 57

s birthay 56

And of course, we cannot forget party favors for the little ones who were so kind to come out and support. I tied each bag with a piece of tulle.

s birthday 30 - Copy

Here is what’s in each bag: a tutu skirt (I did not make them), necklaces, a mini wand, cookies, and a “Thank You” card.

s birthday 56

The following day, after church, we had our family photo shoot for Christmas and then we took her to the mall to Claire’s store to pick out some things. Then we celebrated with a meal at a restaurant. Long day, but it was all good.

s birthday 60

Sporting a glasses and a Rapunzel purse filled with some stuff she chose. I so love her choices. She also chose a few items for her sister, too, which was really nice of her (mom prompted, of course).

s birthday 59

Proudly wearing that DIY tutu dress and having some of that delicious cake.

s birthday 62

Whooooo, that was way too many photos. Hope you all enjoyed them!!

So tell me, do you have little girls who seems to always want a princess themed party? I would love to know in the comments!!

Decor & DIY

Organizing & Decorating Your Home on a Budget

So now that our home is somewhat decluttered, I am on a roll to get this place organized and decorated. There are still some areas I need to tackle but generally speaking, we are making headway. Again, our home was not totally filled with all kinds of unnecessaries. And I tend to have a place for everything. But there are always the stuff that tend to accumulate in a lived-in home and needs to either be organized or decluttered. You can find my free decluttering checklist printable here.

front porch 17

Since we moved into this house over a year ago, I have been trying to figure out my colors and style. The layout is a lot different and a tad bigger than our previous home. In fact, there are a few bits and pieces of the home that could use a little renovation. Before we moved into our previous home, we had a two week slot to do some renovation and made it ours. As of this one, we moved in the day we closed so we are still working our way around it. It is not in terrible condition but it definitely could use some updating in some areas.  The only major update we have done so far is to change out the carpeting in the bedrooms and the family room. It was a mix of red, maroon, and beige. We chose a lighter and more consistent color throughout the home.

This is an old photo that shows my decor dilemma – wall decor widely spaced apart and wall art missing. I have since moved everything from the space to create a more functional entryway. One lesson I have to constantly remember though is to give myself some grace. I have been in baby mode since we moved in. Those little ones sure keep us busy. Don’t they? Yet, it never ceases to amaze me when someone walks into our door and proclaims that we have a beautiful home. I’ll take the compliment. But wait until you step into one of our bathrooms and see all that ugly wall paper half torn out from their placement. Well, it probably is not the worse but definitely not the best either.

living room 12

Anyway, as you may have already seen from some of my previous posts, I tend to decorate on the budgeted side. Yep, I shop for sale pieces from well-loved stores such as At Home Stores, Target, Kohl’s, Home Goods, Ross, Hobby Lobby, etc. But every once in a while, I have got to get to IKEA. And yes, you can definitely find sale pieces there, too. Like this coffee table I snagged for 1/2 off because of two missing screws which my husband put back in less than 2 minutes. The original price was $44 which in itself was not a high price for a coffee table (especially coming from IKEA). I just love their stuff! And let’s not forget my online fave – Amazon! 

coffee table from IKEA

Lately, I have been trying to spend intentionally, rather than just purchasing whatever for the save of purchasing. What ends up happening is usually a quick return of the items to the store or me using them for a little while then selling or donating them to the thrift store. 

Another lesson I am trying to teach myself is that less is more. The less stuff we have coming in is the less stuff we would have to deal with. No, our home is not empty of stuff. We have lots of it. But I am definitely being more intentional in purchasing only what I think we need. And of course, I want our home to look pretty. So yes, I do shop for pieces to make the home beautiful. I believe as women, we love beauty. We want to see our homes looking somewhat put together. And there is nothing wrong with that. Learning to control our stuff is what really counts. Oh who am I kidding, I probably need to declutter some more! But you get the point.

So I will be starting to show you more of my home organizing and decorating progress on the blog. I may not be the most extravagant decorator out there but I sure love simple elegance. And I tend to like practical. I have shared some small DIY posts and of course, showed our home quite a few times. But I think it will be great to post more about the “said” areas here. I will also be sharing $15 or less updates for the home.

So what is my style of decorating you may ask. Thanks for asking. I tend to gravitate toward a mixture of the old and new as in rustic and modern. It all depends on the area in view. While I like seeing a smooth clean look I also love seeing old shabby rustic items mixed in. I think they add some character to a space. So you’ll see how I use both.

This was a shot from a previous home tour. Since then, everything has already been moved around (as is my constant state). But as you can see, I used a mix of modern and rustic items in this space.

HT living room 5

What do you all think? Would you like to see more home decor & organizing related posts here? And what are your favorite places to purchase your most cherished finds? I would love to know your thoughts in the comments. 

Home

Three Ingredient Valentines Chocolate Heart Fudge

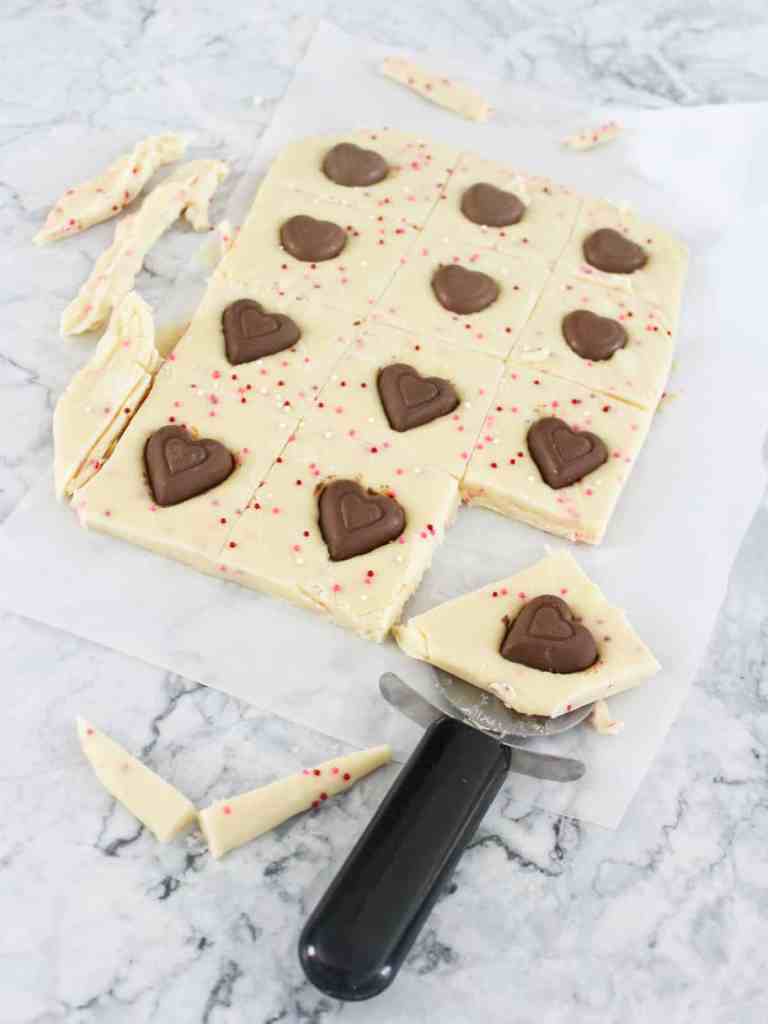
Creamy, chunky, pretty, and delicious are my words for describing these Valentine’s Chocolate Heart Fudge goodies! They will make a sweet little treat for any Valentines!!! This post was updated February 10, 2021 to add clearer photos.

Valentines-Heart-Fudge-Recipe-Fudge-Valentines-Fudge-White-Chocolate-Fudge-athomewithzan.com

Two ingredient fudge are my favorite to make. (Do we say fudges with an “s”? Blame it on Webster OK. I had to look it up). I know the title says three ingredients (but, hey the heart shape candy and sprinkles are just an add-ins)! Growing up, my mom made lots and lots of fudge, not sure if that was a good thing or not. But we sure enjoyed it. But although mom liked making fudge, she always made them using a loooong process – add milk, coconut, sugar, cook some, beat some by hand, cool, cut………You get the gist. I never knew otherwise.

Valentines-Heart-Fudge-Recipe-Fudge-Valentines-Fudge-White-Chocolate-Fudge-athomewithzan.com

So a couple years ago, at Christmas time actually, I was watching the Rachael Ray show and found out that there are easier ways to make fudge…. LOL! I also stumbled upon a cookbook with simpler fudge recipes, too. So, since those discoveries, I have been creating two ingredient fudge and adding mix-ins according to the season of the year. It has been a while though, since I made fudge, at least a year. But we did purchase some in the Fall during our annual apple picking trip at an orchard. They’ve got some good fudge in one of the little shops on the farm. So yummy!

Valentines-Heart-Fudge-Recipe-Fudge-Valentines-Fudge-White-Chocolate-Fudge-athomewithzan.com

The other day, when I told the girls I was going to make fudge, they acted like they had already forgotten what a fudge was. Good thing, because we don’t want to overload them with too much sweet. These slices here are huge, but they could be cut smaller for the kids.

Anyways, enough with my ramblings…unto the fudge recipe. Doesn’t it look delish?! You know it!!! These Valentine inspired fudge (s) are just a great little sweet treat. They have a creamy taste without being too soft – the consistency is just perfect!!!! For just a few ingredients and less than 5 minutes of prep and cook, you really are going to love them! I love how all the Valentine colors go together. So vibrant and pretty!!!

Valentines-Heart-Fudge-Recipe-Fudge-Valentines-Fudge-White-Chocolate-Fudge-athomewithzan.com

Three Ingredient Creamy Valentine’s Heart Fudge

Cook time:
Total time:
Ingredients
  • 1 pk white baking chocolate chips
  • 1/2 a 14 oz can sweetened condense milk (the whole can makes it too soft)
  • 1 teaspoon vanilla (optional)
  • Heart shaped chocolate pieces
  • Sprinkles (optional)
Instructions
  1. Line a (8×8) square baking pan with wax paper or aluminum foil.
  2. Grease with butter or spray with cooking spray. Set aside.
  3. Grease a large saucepan with butter or cooking spray.
  4. Pour chocolate chips and milk in saucepan and melt over very low heat. Make sure the heat is very low to prevent browning. Remove from heat and add optional vanilla and sprinkles.
  5. Once the chocolate has melted, remove from heat and stir in vanilla (optional).
  6. Pour mixture in lined baking pan and quickly smooth out evenly.
  7. Immediately add heart shaped chocolate pieces, about 1 inch apart from each other. Sprinkle with extra sprinkles, if using.
  8. Place in the refrigerator to harden about 30 minutes. (The longer it’s in the fridge, the firmer it will become).
  9. To cut, remove fudge from the refrigerator and slice between the hearts.
  10. If the fudge is too hard to cut, let it thaw until able to slice through easily. It will not get soggy; it will hold the perfect shape as shown in the photos.
  11. Store any uneaten fudge in the fridge.
  12. Makes about 8 large fudge. Or double the amount if smaller sized pieces of chocolate are used.

Valentines-Heart-Fudge-Recipe-Fudge-Valentines-Fudge-White-Chocolate-Fudge-athomewithzan.com

Valentines-Heart-Fudge-Recipe-Fudge-Valentines-Fudge-White-Chocolate-Fudge-athomewithzan.com

Valentines-Heart-Fudge-Recipe-Fudge-Valentines-Fudge-White-Chocolate-Fudge-athomewithzan.com

Valentines-Heart-Fudge-Recipe-Fudge-Valentines-Fudge-White-Chocolate-Fudge-athomewithzan.com

Pin This Post

Valentines-Heart-Fudge-Recipe-Fudge-Valentines-Fudge-White-Chocolate-Fudge-athomewithzan.com

Do you like making fudge? Do you use a two-ingredient version or do you make them using the long way? Please share your thoughts in the comments!!

Decor & DIY

8 Weeks to a Decluttered Home Checklist – FREE Printable

One of the things that brings me happiness, is having a decluttered home. Oh, the joy of being able sit in a clutter-free room and enjoy a cup of coffee or tea; or cook in a clutter-free kitchen; or sleep in a clutter-free room! Just think about the space you have after you rid your house of all the Christmas decorations. Doesn’t your home feel so much lighter, brighter, and less cluttered? It’s nice to have all the sparkly decorations up for Christmas but it is always a relief when the decorations come down. It is like a “breath of fresh air” has swept through our home!

Free Checklist to Declutter Your Home - Print It!

But while I love the feeling of “declutter”, I also understand that a well lived-in home will probably never really be totally free of clutter. Especially when a home is shared with multiple people of different personalities, likes, and dislikes. Everyone brings their own special tastes to the clutter (if so to speak). But we do not have to let the clutter control us now, do we? Nope! We are into January and it is always a great time to do some decluttering – sort of starting with a clean slate. For the past few weeks I have been diligently working to clear our home of clutter.  Let me add that clearing a home of the smaller clutter should be done as frequently as possible, but a major decluttering will require time that is set aside. It could be done anytime of the year – not just January. It really depends on your time and schedule and what works for your family. And it would not happen overnight, either. It takes discipline. A lot of discipline. In addition, it will take a lot of work, depending on how much clutter you have accumulated. 

When you free your home of clutter, you are not only freeing your physical space but also your mental space. Here is what I like about it:

  • it brings mental peace (when your space is clean, your mind will also be refreshed)
  • it gives physical space in the home (the less stuff, the more room/space)
  • less time is spent looking for stuff (it is easier to find things when you need them)
  • it helps save money (no going out and buying what you already have, but did not know you had it because it was covered in the clutter)
  • more time is spent with family (less time cleaning, more time enjoying family and things you love)
  • it is easier to evaluate and see what you really need (not want)

This subject can be intimidating for some. And that is OK. I totally get it. Trust me. I do not have it all-together on this one either. The struggle is truly real. I think two of the biggest challenges I face when it comes to decluttering are where to begin and what to declutter. These alone could allow me to lose my motivation and prolong the progress. Ever being there? Yes, I have. But you know what works for me? Small steps. Diligently working room. by. room.  While I feel like I declutter daily, it is always great to set aside some time to do a major decluttering. Now I don’t think our home has tons of stuff to declutter. But there are always some things that make their way to our home that we end up not using or that we really don’t need.

Side note: I was just talking to my mom (miles and miles away) and she mentioned that she was in the process of decluttering. First of all, I was thrilled to know that we were both doing the same thing without discussing this before hand. And second, I was really impressed that mom was decluttering – stuff that she has been holding on to for years and years . . . and years that is no longer working. Way to go mom!

Anyway, if you are like me, and need to free up some space in your home and life, I have created an extensive decluttering checklist to help give me some guidance. It took me forever to finish it but it is done!!! I think it will be a big help to you, too, if you decide to use it. You can download a PDF version for free when you sign up to be a part of the Flourishing At Home community. I also share some tips and tricks and 10 decisions that help me through the dreaded process. Print it out and use it as a guide, if you wish. Don’t let it intimidate you. You can always work at your own pace, depending on your schedule. Just remember to be diligent because it won’t happen unless you make it happen. We can do this!!

Subscribe to our mailing list

* indicates required


So how about you? Do you take time to declutter your space? Let me know in the comments below.

Home

30 General Ways to Save Money On Family Needs

Hello again friends! Hope your weekend was wonderful! Hopefully, you were not snowed-in on Saturday due to the heavy snow storm that some experienced. And if you were, hopefully, you took some time off from the busyness of the outside and were able to relax get some home projects done:) I was not snowed in but my driveway had some ice that kept me from going to the store. My husband eventually cleared it off but by then, I decided it was best to just hang out at home. It probably was a good thing, because I am sure I would have spent more money than I needed to.

Speaking of money, we are all looking to save a little money right? What family doesn’t? I know we are! But sometimes knowing how to start could be puzzling for some. So today we are taking about ways to save money on family needs. In the past, I have included low cost ideas on some of my home decorating items but I would like to discuss more family-friendly budget ideas on here. While I may not solely write about budgeting, this blog is home and family related and I think budget friendly ideas are always great to discuss. This post will definitely help me get started!

Are you on a tight budget? Here are 30 ways to save money on your family's needs from At Home with Zan

There are so many ways to save money on family needs but I am only zeroing on a few general ideas. Many of them (actually all of them) we have tried within our own family and have seen so much improvement. It will be great to keep a tally on how much of a difference each one helps us save per month but I have not gotten down to the dollar for dollar amount yet. What I do know, is that I am spending way less on household products (for example) by making most of my own. This is not a get rich scheme, but every little extra helps. We have been able to use the little extra in other needed areas of our lives and at times, help meet smaller needs of other people.

If you are looking to save a penny here and there, hopefully, this list will give you some direction. Don’t let it overwhelm you. Commit to one or two until you feel you have mastered them, then move on. And really, once you get into the habit of doing them they will come naturally to you and become a part of your life.

So here are 30 Ways to save money on family needs. They are not written in any particular order – just randomly as I thought of them.

  1. Create a working family budget and TRY to stick to it: Notice I wrote the word “try” in caps. Because sometimes sticking to a budget is not the easiest thing to do. But the more you stick to it the more you will see where your money is going. Bills are being paid and allotted money is used or allotted reasons.
  2. Re-purposing and Reusing: No, don’t keep your place junky with all kinds of old stuff but there are so many different items that could be re-purposed into something new (if you can) or re-used for something else. As an example, an old dresser could be repainted and used as a console table or an empty food jar, to store food in the fridge. Even ziplock bags could be washed out (depending on what was in them) and reused again. I usually throw out the ones I store meat in but if it is dry food like cereal or so, then they could be reused.
  3. Using homemade household cleaners: Not everyone likes making their own cleaners but if you do, it will save you tons of money.
  4. Using homemade remedies for minor illnesses: There are some great home remedies out there that are good for minor illnesses. Honey mixed with lemon juice is always a great way to sooth a sore throat rather than quickly purchasing cough drops.
  5. Kids clothing swap: If you are comfortable, a great way to save money on little kids clothing is to swap with a friend or relative who has a kid that has outgrown some of his or her clothing. And vice versa, considering that they do not have other siblings who need it. Clothing can always be returned later.
  6. Cooking and eating at home: The more meals you cook at home, the less money you will spend eating out.
  7. Buying food staples in bulk: There are many food staples that could be purchased in bulk for a reasonable price. A 25 pound bag of flour may last about 3 months but 25 pounds of flour bought in 2 pound bags at a time may only result in 2 months of use. Hope that makes sense.
  8. Turning off light switches when lights are not in use: My husband used to remind me to turn of the lights when we are not using them. I don’t always remember to turn them off but I have come a long way.
  9. Purchasing household items in bulk such as toilet paper: I find that when we purchase toilet paper in bulk it lasts us longer than if we purchased the same amount but in increments. A 36 pack of toilet paper costs for $25 lasts our family of 5 (with two toddlers included) about 3 months.
  10. Homemade laundry detergent: Again, not everyone is a fan of making their own laundry soap. But this is another great way to save tons of dollars.
  11. Homemade dry mixes: I love having dry mixes on hand for making food such as pancakes and waffles. Making dry mixes at home is a great alternative to store bought mixes.
  12. Using cleaning rags: I have been purchasing less paper towels and using more cleaning rags instead. A good wash, dry, and they are ready to use again.
  13. DIY decor: If you are cut-out for this one, then you can save money by making some of your own decorations.
  14. DIY skin care products: Some skin care products does not have to be pricey. In fact, products such as face masks or dry skin care could be made using items from the pantry (think coconut oil, avocado, or dry powdered milk).
  15. Take inventory of home items before going shopping: I usually shop my pantry before going to make huge grocery purchases.
  16. Menu planning: This one saves us from buying random grocery items in hopes that we could put a meal together with them.
  17. Laundering and ironing your own clothes: Cleaners are not cheap. In the past, my husband took his work clothing to them because I was busy with little babies and could not seem to find time to iron his clothes. I am still busy, but we have tried to cut this out and go there only if he absolutely needs something ‘special‘ done to a piece of clothing.
  18. Decluttering and organizing: This is a big one! It is amazing how much stuff we may not know we even have because they are somewhere where we cannot find them. Keeping a clutter-free and organized home as much as possible will allow us to know where things are and keep us from buying duplicates that we don’t kneed.
  19. Fixing leaky pipes immediately: The longer we let leaky pipes go unfixed, the more water is wasted. It may seem like a small thing for a day or two, but it will add up after a while.
  20. Use natural air during the hotter months as much as possible (AKA as in opening windows rather than popping on the AC everytime): I know, the comforts of the AC is nice but so is natural cooling. If your home has tons of windows, you can save money by opening up some and allowing some fresh air into your home.
  21. Growing a garden: Nothing tastes better than food you have grown YOUR self! Think about how much beans, peas, corn, tomatoes, peppers, etc. you can get from a few seeds you have planted. Tasty homemade food, fresh from your garden.
  22. Freezer Cooking: I do not always do this but making meals in bulk and freezing some is a great way to save money on meals.
  23. Using Green bags: Green bags? Places like Walgreen’s and Walmart and other maybe stores, too, have those green bags that will keep fruits and veges longer in the fridge. The key is to make sure the food is dry before placing them in the bags so they would not get soggy.
  24. In-home date nights: Date nights does not always have to be done outside of the home. A simple dinner and movie at home is a great way to spend sometime with your spouse.
  25. DIY gifts: While I love receiving store-bought gifts, I also love receiving hand-made gifts. They are a great way to show someone that you really care. After all, you spent time making something from them rather than purchasing it already made. Plus you can definitely save some money by using items you already have on hand or making things in big batches (think cookies)!
  26. Drinking more water rather than juice: Not only will it be better for you but it will save you tons of money, too. Imagine if you have a large family and you drink juice with every meal. That is a lot of juice to go around. Water may not be the most desirable but it will help save so much money. In our home, we sometimes drink juice after breakfast (depending on the type of breakfast). I admit, there are mornings when I feel like a having a hearty glass of really cold orange juice. But we pretty much drink water with the rest of our meals. Every once in a while, we may do juice with dinner.
  27. Swapping babysitting with a relative or friend: It’s nice to have friends who are willing to watch your kids so you can get stuff done. You can return the favor to them when they need it, too.
  28. Investing in a good printer: If you print regularly, printing at home will save way more money than going to Fedex or some other printing place to print them.
  29. Bundling services: In this day and age of internet, everyone desires to have it. In our family, not only do I need it for blogging but my husband is in school online, and of course, he cannot do online school without the internet. One of the reasons we have not gotten rid of our cable, is because it costs us cheaper to bundle cable and internet than just having internet by itself. Those companies are smart. If you get just the one, they charge you a higher fee just to have it. Not everyone may agree with me on this one, but for us, bundling is better than keeping just the internet and then purchasing Netflix (which is cheaper than cable in itself).
  30. Save the random pennies: This may sound like a no-brainer, but save those pennies. When you get home from a shopping trip, remove those change from your pocket or purse and drop them into a savings jar or so. There are times, I like to keep just a few pennies, dimes, or quarters in my purse for another store use. You know those times when your items add up to $20.01 and you hate to break another $10 just to get a penny? Having a few loose change in my purse do come in handy for those times. But my general rule is to remove most of the extra change and dump them in a jar. They really add up to a few dollars over time. Don’t let them wash away in some laundry or mysteriously disappear in think air.

So these are some ways we have been or have been trying to save money on our family’s needs. Like I mentioned earlier, there are so many others ways to save. I can think of a bunch more as I write. I may look into elaborating on some of the ones mentioned and may even update this list sometime. But for now, I am kind of sleepy and I think my mind is going blank. You can always subscribe to receive more budget-friendly posts and many other posts via your inbox.


How have you being saving money lately? I would love to know so we could help each other out in this area:=)

Home

Wow Your Big Game Fans with Tasty Beef Empanadas

This shop has been compensated by Collective Bias, Inc. and its advertiser. All opinions are mine alone. #VivaLaMorena #CollectiveBias

Football season always brings back fond memories of my college years. Groups of students were welcomed into the homes of dedicated football fans (AKA our professors) for a big game day party! We used to have so much fun watching the game and making memories together! But just because I have graduated does not mean that there is no more football fun. I married a guy who is a huge football fan! And we have a group of friends who cannot allow a big game to go by without some sort of celebration. We typically celebrate game day by having a grand old time together. On a Sunday evening , after church and everyone is rested, we gather up our kids and head to the designated friend’s home. There we meet with them and some other friends to watch the game.

 And of course, one cannot watch the big game without having something to eat! So we always have plenty of food to go around. We like foods that are quick, tasty, and that everyone will enjoy. These Beef Empanadas (meat pies) are definitely crowd pleasing – a perfect appetizer or finger food for the game day! They are delicious and are very easy to make. In addition, they remind me of living in Puerto Rico and watching football there.

beef empanadas 7

Want to know my secret ingredient in this recipe? La Morena Sliced Green Pickled Jalapeno Peppers, of course! It gives the emapanadas a tasty little kick that the fans are sure to enjoy. That combined with the ground beef and a crunchy pastry dough is sure to be a big hit! I have a husband who cannot seem to eat enough of these. Hopefully, they will make it to our friend’s home before he devours them all! 

beef empanadas La Morena

To make these empanadas, I first take a little trip to Tony’s Finer Foods, which is only a mile down the street from my home. Then I head to the Hispanic isle and pick up some La Morena Jalapeno peppers.

beef empanadas La Morena2I like these peppers because I do not find them super hot and over-powering. But of course, the more peppers added, the hotter the empanadas will be.

beef empanadas 3So I added a couple tablespoons to the ground beef to give it that little kick.

beef empanadas 4

Once the meat was cooked through, I went ahead and added about a 1/4 cup of the mixture to rolled out pieces of unbaked pie crust. Then brushed the edges of the dough with a beaten egg before and after sealing. It really adds a nice color to the finished product.

beef empanadas

beef empanadas 2

Then I baked them at 400 degrees for 20 minutes and they were ready to serve. These taste better warm so no need to let them cool completely before eating. They can also be kept frozen and reheated for a few minutes when ready to serve.

beef empanadas 5And as you can see, the pickled peppers are really addicting. I had to have some more with the empanadas because

they really work great for this recipe. La Morena products are a great way to add some spice to game day recipes. Find lots of inspiring recipes here.

beef empanadas 6

Wow Your Big Game Fans with Tasty Beef Empanadas
 
Ingredients
  • 1 pound ground beef
  • 2 to 3 tablespoons La Morena Pickled Jalapeno Peppers, chopped
  • 1 8oz can tomato sauce
  • 1 tablespoons olive oil
  • 1 teaspoon garlic powder
  • 2 teaspoons onion powder
  • 1/2 teaspoon cumin powder
  • 1 tablespoon taco seasoning
  • 1 egg, beaten
  • 1 box refrigerated pie crust, softened as directed on the box
Instructions
  1. Preheat oven to 400 degrees. Line a baking sheet with foil, spray with cooking spray then set aside.
  2. Heat olive oil in a large skillet over medium heat.
  3. Add ground beef, onion powder, and garlic powder.
  4. Brown meat until no longer pink, stirring constantly.
  5. Add peppers, tomato sauce, cumin, and taco seasoning.
  6. Cook about 2 minutes until all the ingredients have been fully combined.
  7. Remove meat from heat. Set aside.
  8. Separate pie crust into 8 pieces of dough (for larger empanadas) or 16 tiny pieces (for smaller empanadas).
  9. On a lightly floured surface, roll out each piece of dough into a circle.
  10. Add 1/4 cup ground beef in the middle of each circle for larger empanadas or 2 tablespoons for smaller ones.
  11. Brush the edges lightly with beaten egg, then press together. Seal with a fork.
  12. Brush each empanada with extra beaten egg.
  13. Place on baking sheet and bake 18-20 minutes or until done.
  14. Serve warm.
 

Do you celebrate game day with your family or friends? What is one of your favorite game day foods. I would love to know your thoughts in the comments.


Home

Crock Pot Cheesy Chicken & Potato Casserole

I have to confess that when it comes to casseroles, I am not very creative and I do not cook them often. Maybe it is because I did not grow up on casseroles. We usually had our meals with individual sides unless it was a soup or some other dish (not considered a casserole). But being in a different country, one adopts to the food. So every once in a while, when I am in need of a quick all in one dinner, a casserole is what usually comes to mind. Especially on a cold winter day, when a cozy comforting meal is most desirable, a good cheesy dish will definitely hit the spot. Further, cooking it in a Crock Pot will save time and retain all the wonderful flavors. Just throw everything in the Crock Pot and you will have a delicious all-in-one dinner that the entire family will love.

crock pot cheesy chicken and potato casserole

A couple years ago, I found this Crock Pot Country Scalloped Potato recipe in a stack of recipe cards that I got from  my husband’s grandma. The recipe is truly delicious but it has been a while since I made it. It got a lot of raves although I should probably redo the photos. When I was thinking about my menu plan for this week, I thought I would turn this delicious scalloped potato recipe into a casserole and include some chicken. Don’t forget to check it out here.

Anyway, if you are in need of a tasty comforting Winter dinner this Crock Pot Cheesy Chicken & Potato Casserole would definitely be a good pick.

potato casserole 3

Here is how I made it.

Cheesy Potato & Chicken Crock Pot Casserole
 
Ingredients
  • 1-1/2 pounds white potatoes peeled and sliced thinly
  • 2 cups cut-up cooked chicken
  • 2 cups crushed yellow Cheez-It crackers
  • 1-1/2 cups Cheddar or Velveeta cheese
  • 1-1/4 cups milk
  • 1/4 cup plus 2 Tablespoons butter
  • 1 teaspoon salt
  • 1/2 teaspoon black pepper
  • Dried crushed parsley
  • Cooking spray
Instructions
  1. Heat Crock Pot on low setting and spray with cooking spray (or grease with butter) while you prepare the recipe.
  2. Melt 1/4 cup butter in a medium saucepan, over low heat.
  3. Add milk, cheese, salt, and pepper. Stir constantly until the cheese melts.
  4. Remove from heat.
  5. Layer half of the potatoes in the Crock Pot.
  6. Add all the chicken evenly over the potatoes.
  7. Pour half of the cheese sauce over the potatoes and chicken. Top with a sprinkle of parsley and 1/2 cup of crushed Cheez-It crackers.
  8. Add the remaining potatoes and then remaining cheese sauce.
  9. Mix 2 Tablespoons butter with remaining crushed Cheez-It crackers. Evenly spread the mixture over the potatoes. Sprinkle with a dash of parsley.
  10. Cover Crock Pot and cook on low about 2 hours.
  11. Turn setting to warm until ready to serve. A side salad, hot rolls or biscuits are a few good sides to go with this.
  12. Note: My Crock Pot works really well and this was done in an hour and half. But I let it go 15 minutes longer for additional browning.
 

potato casserole 2

What is one of your favorite Winter dinners? I would love to know in the comments. Thanks and happy cooking!