Subscribe to stay up to date plus get 5 Free Home Productivity Printable Planners!
Decor & DIY

Early Fall Mantel

One of the ways I like to introduce a new season in our home is by changing up the mantel decor. Because it is usually the focal point of a room, it makes sense that it gets done first. Of course, everyone’s style is different and some may choose to leave things as they are. But I do find the possibilities of decorating a mantel endless and find a bit of joy in changing it up seasonally.

fireplace-mantel-pumpkins-and-candlestands

My kids are always asking “When is Fall” or “Is Fall here yet” because they are too little to understand the times of the seasons. To help them gain some kind of understanding as to when Fall begins I decided to bring Fall to our fireplace mantel. I call it an Early Fall Mantel because I most likely will tweak it as the season continues. 

This post is part of my monthly inspiration collaboration with At Home stores. You can find so many lovely affordable seasonal and anytime decor by checking out their products here. There is also a giveaway at the end of this post so be sure to leave a meaningful comment to be entered. 

fireplace-mantel-mantel-decor

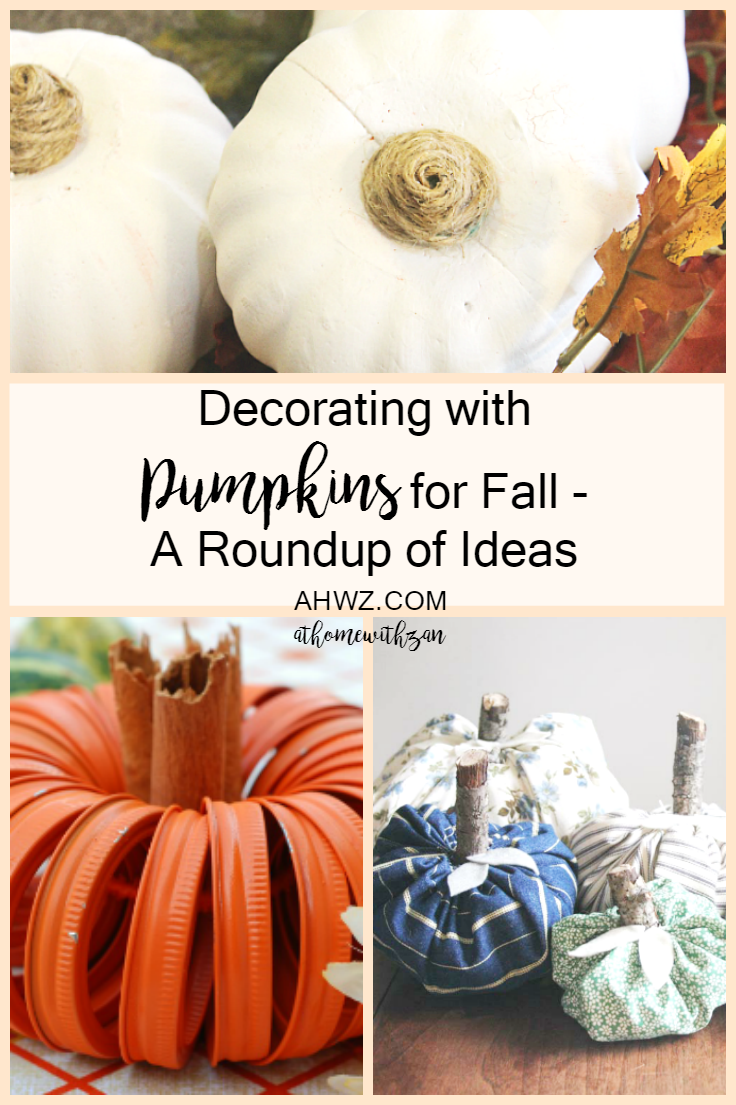
My base decorations for this early Fall fireplace mantel are Fall foliage and pumpkins. After all, these are the staples used for Fall decorating right? I used faux Fall foliage because I have not seen much of the pretty changing real foliage yet. The pumpkins are a mix of real and faux. I was able to find a few real pumpkins to mix in with the faux.

While the colors of the mantel is already painted in typical Fall colors (not by choice), I wanted to still keep the orange color scheme with the decor. Because let’s face it, the kids associate a pumpkin with orange more than any other color. Remember one of the key reasons for the way the mantle is decorated at this point is to help little minds understand when the season begins. But don’t worry, I have a few other uncommon shades of pumpkins that I may use as I eventually switch things up.

fireplace-mantel-real-pumpkins-and-faux-foliage

It took some playing around to get it to look right. Because like I mentioned earlier, the possibilities of mantel decorating are endless. And the paint colors were not helping the situation either. But I am glad it all came together.

fireplace-mantel-full

At the bottom of the fireplace I used a big faux pumpkin and a simple large jar with more Fall foliage. And of course, a big basket of blankets because Fall calls for it. Can’t have too many blankets out during the Fall. 

fireplace-mantel-pumpkin

Can we talk about this beauty of an accent chair for a minute? It looks like the perfect spot to curl up in front of the fireplace with a cozy throw and a good book. My kids love climbing on it and getting cozy.

fireplace-mantel-lovely-chair

Check out some of the deets; I am really in love and want to have a few of them!! fireplace-mantel-accent-chair

A cozy throw blanket and a beautiful throw pillow completes the look. Notice the basket of blankets is strategically placed right next to the chair. Talk about getting cozy you all!!

fireplace-mantel-basket-of-blankets

Unfortunately, the paint colors in the room coupled with some of the lighting do not seem to cooperate well from this angle. But you can see a full shot of what it looks like in this image. So that is how it is decorated for this beginning of Fall – clean and simple with just the right touches to bring early Fall indoors.

fireplace-mantel-in-full

Pin - It New

fall-fireplace-mantel

Want to see how I am decorating some other rooms in our home for Fall and how I may switch things up on the mantel? Join me and some other wonderful ladies as we open our homes to you for the season and talk about our reason for decorating for the holidays.

fall-tour-of-homes-image

How do you introduce early Fall into your homes? What is your reason to decorate for the season? Leave a comment letting me know your reason and you could be one of two winners of $25 to get your own Fall decor from At Home stores. Or pop on over to my Instagram page and follow the instructions there to enter. Note that winners must be able to use the gift cards in an actual brick and mortar At Home store since online purchases are unavailable. Be sure to share your awesome Fall decor with us and use #MyReason to decorate so we could find your photos!!

blog-sign-grey-with-comma

Decor & DIY

Decorating with Pumpkins for Fall -The Great Pumpkin Decor Parade

Do you enjoy decorating pumpkins or decorating with pumpkins for Fall? If you do, then this post is for you. I’ve got a round-up of various ways you could decorate pumpkins for Fall and use them for decorating your home. You are in for a treat!! I call it “The Great Pumpkin Decor Parade” because there are so many lovely and unique ideas all in one place.

fireplace-mantel-real-pumpkins-and-faux-foliage

Recently, I posted a quick tutorial of how I painted pumpkins white and added a bit of jute twine around the stems to complete the look. You can find this post here . They were so easy to make and the look could be customized in any way to suit One’s taste. But as I was considering Fall decor ideas, I thought of pumpkins. As you already know, there are tons and tons of ideas out there. Real or faux the possibilities are endless when it comes to using them in Fall decor. I thought it would be fun to see how others use them for their own decorating and share some of them with you. Check them out – each one is so unique. All photo credits belong to each person linked below. Enjoy!!

Esy DIY Pumpkin – An Alli Event

easydiypumpkin

Fall Burlap Wreath – An Alli Event

fall-burlap-wreath

Farmhouse Style Fabric Pumpkins – Making it in the Mountains

farmhouse-style-fabric-pumpkins

Shabby Chic Pumpkins – Making it in the Mountains

shabby-chic-pumpkins

Kid Made Pumpkin Decor – Me and my Inklings

kid-made-pumpkin-decor

Fall Sugar Mold Pumpkin Decor – The Hamby Home

fall-pumpkin-sugar-mold-decor

Candy Corn Ruffled Felt – Where the Smiles Have Been

candy-corn-felt-pumpkin-square2

Shabby Chic Happy Fall Pumpkin Door Hanger: My Girly Gourd – Where the Smiles Have Been

shabby-chic-pumpkin-door-hanger-final-right1

Hand Painted White & Copper Pumpkin – Phoenix Mom Blog

hand-painted-white-and-copper-pumpkins

Five Minute Monogrammed Pumpkin – Salvaged Sister and Mister

five-minute-monogramed-pumpkin

House Numbers Pumpkin Topiary – At the Picket Fence

house-numbers-pumpkin-topiary

Cookie Jar Pumpkin Vase – Exquisitely Unremarkable

roses-in-pumpkin-vase

Puzzle Piece Pumpkin – Exquisitely Remarkable

puzzle-pumpkin-new

Metal Ribbon Pumpkins – High Style Restyle

metal-roibbon-pumpkins

Faux Mercury Glass Foam Pumpkins – High Style Restyle

faux-mercury-glass-pumpkins

Fence Board Pumpkins – Marty’s Musings

fence-board-pumpkins-fall-10

DIY White Pumpkin Fall Wreath – Paint Yourself a Smile

fall-wreath-on-white

How to Make Easy Sew Fabric Pumpkins – Craftivity Designs

fabric-pumpkins-5

Wooden Pumpkin Fall Sign – The Kolb Corner

fall-pumpkin-683x1024

French Western Pumpkins – At Home with Jemma

french-western-pumpkins

Duct Tape Pumpkin – The Magic Brush Inc

duct-tape-pumpkin-with-burlap-bow

Easy Fabric Pumpkins for Fall – Kreativk

easy-fabric-pumpkins-for-fall-kreativk-net

Easy Fabric Pumpkins – Sweet Things

easy-fabric-pumpkins

Styrofoam Pumpkin Makeover – Intelligent Domestications

fall-centerpiece-using-dollar-store-styrofoam-pumkin-made-over-with-gold-streaks

Farmhouse Style Fall Tablescape – Intelligent Domestications

the-farmhouse-style-stencil-turned-out-really-nice-on-the-wood-crate-and-add-a-nice-look-to-our-farmhouse-style-fall-tablescape

Wow, so much pumpkin inspiration! There are tons more but of course I had to stop somewhere. So thank you to all those lovely pumpkin decorators who allowed me to showcase their pumpkins for Fall. Hope you had fun scrolling through and seeing these different styles of pumpkins all in one place.

Pin - It New

decorating-with-pumpkins-for-fallWhat do you think about all these pumpkin ideas? Do you enjoy using pumpkins in your Fall decor? I would love to know your thoughts in the comments!!

blog-sign-grey-with-comma

Decor & DIY

Painted Pumpkins with Twine Stems

Customizing the color and style of pumpkins to fit any Fall decor is so easy – just use some paint and you’ve got instant color change!

Painted Pumpkins With Twine Stem -Centerpiece- At Home With Zan

Last year, I painted some Styrofoam pumpkins I picked up from the Dollar Tree. They turned out alright but I am not sure what ever happened to them. Recently, I decided to make them again. They are more on the rustic side because of the added twine. I’ve updated this post with new photos ( in place of the old ones) since I was able to do a fuller tutorial with more images. The previous photos did not turn out so well.

You may have heard me mention before that I am very selective of what I buy from the Dollar store. Because while I love decor on a budget, I don’t necessarily want them to fall apart in like a week or two. But these pumpkins originally came from said store. They are nothing special and in fact one of the stems popped right out once I got home, but for quick easy and super frugal seasonal decor they will do!

Painted Pumpkins With Twine Stems -Centerpiece- At Home With Zan

But as you can imagine, these DIY pumpkins are very easy to make. The paint of course, needs drying time but if no paint is involved then these would be super fast. Just hot glue some twine around pumpkin stems.

What you need:

  • Cheap faux pumpkins
  • Jute twine
  • Paint (I used white chalk paint)
  • Hot glue
  • Clear Acrylic sealer (optional)

Directions:

If desired, paint pumpkins in the desired color. Two to three coats is best. Keep in mind that there may be an underlying peek of the original color even after painting. But it is subtle so don’t worry too much about it.

Painting Pumpkins -Gold - White - Customizable - At Home With Zan-

Painting Pumpkins - At Home With Zan

Painting Pumpkins - At Home With Zan -

Start with the body then once it is dried fully, turn it over and paint the bottom section of the pumpkin. Let it dry fully before turning it over.

-Painting Pumpkins - At Home With Zan -

-Painting Pumpkins - At Home With Zan

If desired, spray with acrylic sealer (if desired) and again, allow it to dry fully. This is a different pumpkin as the one shown above but I painted that one too on a different day (I believe this one was spray painted but similar painting tutorial). If spray painting, try spraying the bottom first, let dry, then spray the top down to get a full smooth coverage. I used most of the ones with the shorter stems for a different project shown here.

Painted Pumpkins With Twine Stem - At Home With Zan-

Once everything is dried and ready to go, wrap jute twine around the stems and use a hot glue gun to keep it in place. Start by applying a small amount of hot glue at the bottom of the stem. Attach one end of the twine, then work your way up applying more hot glue as needed to hold the rope in place.

Painted Pumpkins White With Twine Stem - At Home With Zan-

-Painted Pumpkins With Twine Stem - At Home With Zan-

Wrap all the way to the top, making sure that no part of the stem is showing. Cut the twine and hot glue the other end at the top.

Painted Pumpkins -With Twine Stem - At Home With Zan-

Painted Pumpkins -White - With Twine Stem - At Home With Zan-

Painted Pumpkins With Twine Stems - At Home With Zan

This is such a simple idea but it is an easy way to get the color of pumpkins that you wish to decorate with if you cannot find ones in your desired color. Our girls love glittered pumpkins so I am thinking of doing some with them. And you know they are going to be pink because they just love anything pink no matter what season.

Pin - It New


Painted Pumpkins With Twine Wrapped Stems - At Home With Zan

Have you painted pumpkins before? Did you like how they turned out? I would love to know your thoughts in the comments.

Home

Decluttering Your Home for Fall and Why You Should

I love having a clutter free home. But every so often, the clutter creeps up on me and I don’t even realize it. When we moved, I thought I had gotten rid of lots of stuff that I did not use or did not really enjoy. But apparently, I was wrong. As I was (and still is) in the process of figuring where things should go and what I actually want the space to look like, I am realizing that I still have lots of items that make me feel so cluttered. Maybe not too many items compared to hoarders but still a bit too much for my taste. Trying to find a spot for all the things was bringing me more frustration than I knew it. My solution? Go through all the bins and boxes of decor and clothing items and get rid of the ones we don’t use.

One main set of items that added to my frustration were the loads of wall decor (think picture frames, mirrors, wood signs, etc). I cannot tell you how many times I unpacked them all with intention to hang them up but got discouraged and put them right back in their boxes and bins. There were just too many – I finally decided to set aside some time to sort through them again and do away with the ones that no longer were bringing joy. Some were given away and others got thrown out. I also decluttered a bunch of clothing items that were no longer used but were just filling up space.

It is always helpful to do some decluttering before a new season begins. Personally, I am not a fan of adding clutter upon clutter. Keep in mind that what I consider clutter may not be considered as clutter by others. But I am loving the simplicity before bringing in Fall and I plan to keep it simple. Simple elegance is something I am learning to embrace as too many things tend to make me feel so disorganized. My home is not run as smoothly when things feel out of sorts. 

faux-flower-centerpiece

How about you? Does your home feel cluttered to you? If it does, then maybe it is time to dedicate a few minutes a day to make your home feel lighter again. Remember that clutter to you may only mean a few extra items in your home that you don’t need where as to someone else, loads of items. It boils down to what makes your home happy and what is best for your family. If you need a little bit of motivation, here are five ways you can declutter your home for Fall (or anytime): 

  • Give away or sell good items that are not needed
  • Throw away broken, damaged, not salvageable
  • Clean out and get rid of dust and dirt
  • Switch out seasonal decor
  • Embrace simplicity

Download the free printable five-ways-to-declutter-your-home-for-fall and use as a motivator if you need it.

five-ways-to-declutter-your-home-for-fall-season

Your home will look and feel much better. It will create more room and allow the day to day home operations to be a bit smoother. Also, decluttering your home before a new season will help avoid the potential clutter added upon clutter. And as always, if you think that you do not have the time for it, think again. 10 minutes a day goes a long way and you will begin to enjoy your space much better.

Pin - It New

five-ways-to-declutter-your-home-for-the-fall-season

Are you planning on doing some decluttering before ringing in Fall? I would love to hear your thoughts in the comments about what you plan to do. Here is to less clutter and more home.

blog-sign-grey-with-comma

Home

Home is My Happy Place Free Printable

Hi friends, today I have a special little surprise for you. Do you love free printables? I have a beautiful one made just for home.

my happy place free

Every now and then, I get a desire to create something special for the home. This is one of my recent creations. You all may have seen some printables I created in various posts, especially the loads for kids activities. They do take time, so many times I don’t always get to them as fast as I would like. But I have been working on creating more printables to add to my home decor and also to add to Etsy. I have been on Etsy for a few years now and created a shop a while ago. I even made a bunch of printables way back to add to that shop but got so busy that those printables never made it to Etsy yet. If you are into making printbles, you know how time consuming these things could be and you want to make sure you have them done right.

Anyway, if you need something pretty for your home, you can download My Happy Place Floral printable (no strings attached). Not only will it look pretty in your home but it will give you a bit of inspiration to appreciate your home. This will fit in a 11×14 photo frame that is matted to 8×10. My picture exposure is a bit brighter than normal plus I printed it in draft setting to save ink but this is really a lovely print.

My Happy Place

Hope you enjoy the free printable. And if you need more inspiration like these and other budget friendly tips for the home, don’t forget to join us by signing up below.

blog sign - grey

Home

First Day of School Memory Keepsake Printables – for Smaller Children

Who doesn’t like printables? I love them and I have been creating them for quite a while. But maybe not as often as I would like because sometimes, they could be time consuming. But when your first child enters school for the first time, you want to make it special. I have taken photos, thrown a small family party, and made some printables to celebrate. Too much? No – the kid is excited and we want to encourage her on. I am sharing with you all three printables I made as “first time in school” keepsake. If you have smaller children in school, first time or not, I hope you would find them useful for making memories of your little one’s school adventures.

school coloring page

This printable describes a child’s first day of school. Print this out and help your child fill in the answers. If they cannot yet write, then fill in the information as they tell you the answers.

First day of school memory keepsake

This one is for drawing and coloring. Your child may not be able to draw his or her teacher but they can draw a face to represent.

First day of school drawing and coloring printable


This last one is one of my personal favorites. Simply print out this frame, preferably on card stock paper. Have your child glue his or her photo from his first day of school (hopefully you took one) in this frame. If you did not take a photo of the first day, then maybe the first few days or first week. You could also add this to a regular 8 x 10 picture frame to display it at home.

My first day of school


Pin - It New

first day of school memory keepsakes for smaller children

How do you like these? Hopefully, your kids will love them and will enjoy keeping their first day of school memorable.


Home

Free Back to School Cupcake Toppers

Recently, I shared our daughter’s new adventure into school. The post can be found here. To celebrate this new milestone, I threw here a small surprise party with us at home. I made her favorite carrot cupcakes and decorated them with cute cupcake toppers.

cupcake toppers

I included words that described going to school for the first time and others that described school in general. Then I printed, cut, and glued each one to a Popsicle stick. These are geared toward smaller children from K5 to maybe 2nd grade. While we love the the cupcakes the cute cupcake toppers were a hit. The kids loved playing with them when they were done eating their cupcakes.

party for k5

Pin - It New

Free cupcake toppers for beginning school

Do you have smaller children who are about to enter school for the first time or who are going back to school? Why not throw them a surprise by making something special for them? It does not have to be a party but it could be simple as making a few cupcakes or a cake and decorating them with these cute cupcake toppers. Your kids will love them.

Join our mailing list to download your freebie!

* indicates required


Home

A Kindergartener and a New Season

Kind of hard to believe that our first daughter is now a kindergartner. Feels like yesterday I myself was in school. I remember when this little girl was just a baby and people would make comments about how fast they grow. It is so true. At five months old I could not imagine it but now five years later and I am looking back with amazement! Here she is all grown and ready to do this school thing. Let’s do this!!

first day of school

I am excited for our little girl! As I look at her dressed and ready for school each day, I cannot help but think about how fast she has grown before our eyes. I also cannot help but remember my own mom getting me ready and taking me to school back in the day! I am typing this with mixed emotions – of excitement that she has reached another milestone but of worry now that she is no longer under my watch 24/7. I am sure you moms know exactly what I am talking about. Letting go is not as always easy as I may have thought. Now I understand what our moms feel when we go off to school or move away from home.

shenice shool

Initially, the plan was to homeschool. But for various reasons, we decided to try another alternative to see how it would work out. I don’t know what other five year old children are like but this little one is very active. She is ready to get out of the house and try new things. Last year, she watched as her friends entered school and desired to go. She was only four then and there was no real reason to send her to school. Our little pretend homeschooling was enough to help her learn the basics, ABCs and 123s and what nots! Plus she was good at coloring, drawing, cutting, gluing and all the pre-skills that she needed to know.

She is so excited for school and even wants to go to bed early so she could get up in time for school. It is a new experience for her and I get it. She gets to meet other kids her age, interact with them, and develop age appropriate knowledge and skills. Although I think all the excitement waned away once we got to school the first day. I saw her face (she was not crying) but you can tell she had a look of not knowing what to expect and a slight panic about all those new faces. Honestly, I quickly hugged her and looked away once I snapped the picture. I was afraid she would start crying and if she did, I knew I would also be a mess. But she didn’t. She went through the entire day and had so much fun and wanted to go again the next day.

This little girl is so full of energy and maybe was even a bit bored with home. She always wants to go out and just have fun. I think it is great that she has a daily outlet to let all that energy out. (Below is day 2). Her personality is one of “I am a bit shy, but I love to explore and use my skills”  – think gymnastics, ballet, music, art – that girl loves to get moving. She loves kinesthetic learning and I love that about her. Don’t you think she’ll make a great gymnast or a great athlete? She sure has the physical for it.

school day 2


So now that she is in school, what does that mean for the rest of us? Well, it means a change in routines and schedules. Kindergarten is from 8am – 2pm and it has been a bit of adjustment around here. The other two kids have been getting up way earlier than usual, too. I am talking even as early as 5:45 on some days and other days around 6:00. That is not the usual for our kids. In fact, it is not usual for me either. I have been desiring to going back to waking up earlier but I really had no real reason to get up at 6. Well, I take that back. I have tried getting up earlier to get a head start but on the rare occasion, a kid always woke up, too. I used to be an early riser but after 3 kids, late nights and all… you get the idea. In anyway, I am loving getting up early again but the other two have been thrown off their sleep schedule. Sometimes, they are excited to get up early and other times they are cranky because they woke up too early. Our middle child is such a good sleeper but there has been a change. Hoping things will settle down and we could get back into a routine.

As a side note: A few days ago, I got up super early around 4:am to get a head start with blogging. I am so behind and really want to catch up. One kid got up at 5:45 considering he went to bed around 6:30 pm. He never goes to bed at 6:30 but like I mentioned, naps have been earlier so he was tired. Then another kid woke up at 6. Honestly, I was  not happy. Here I am trying to get up early to catch up and here they were right behind me. And boy were they cranky. No one was really happy but we got through it. And no, I still did not get caught up with all I wanted to do. I say this as an example to give you an idea of the changes. But all in all, priority is priority and we do what is best for our family. No matter how sleepy or cranky or joyful we are around here, school is in and that is our priority right now. We’ll get through everything else in due season.

kids school

first day

This is all still very new for us so we are giving ourselves grace. It is a new season of life and going with the flow. Her sister and little baby brother sure miss having her around the home to jump around. And frankly, she kept them occupied most of the times. They have gotten somewhat used to her going daily and is always excited when school is over.

We even threw her a little surprise party last weekend. She couldn’t be more excited. Anything party is this kid’s name!! I wanted to do a separate post on this but my pictures did not turn out well.

cupcakes and table decor

It was only with us (her immediate family) and it was short and sweet. It was really easy to put together since I had everything on hand what I needed. We kept things pretty simple by doing this after lunch on Sunday. I was already making our daily lunch anyway. All I needed was something for dessert. She seems to love carrot cake whenever we go out to eat at one of our favorite buffets. So I made her carrot cupcakes and decorated them with minimum frosting and DIY cupcake toppers.

party for k5

Then she and her sister did a back-to-school drawing and coloring activity and then made lovely bead necklaces from a set I got her as part of her gift. They loved it and our daughter wears the necklace to school all the time.

school coloring page

kid

first day

So that’s our new season story. Hope your back to school planning is coming along nicely and things go well whether your kids are new to school or has been to school before.

Decor & DIY

Organized Kids Playroom and Multi-Functional Room

Organized spaces make me so happy. I tend to function much better when things are organized and I can easily find them. Plus, what is that saying? When mom is happy everyone else is happy right? So let’s make mom happy:)

office area

As part of my monthly inspirational home post with At Home, I am showing you how I organized the kids play room using some of their products. This room also serves as a reading corner, homework station, kids craft area and home office area (So it is sort of a multi-purpose room). One of our kids has started Kindergarten and we needed to get organized for easy access of school necessities and all the papers that have already started to circle in from school. There are yet so many other areas around here that still need organizing because nothing gets all done in one day when you move. At first, I thought I would work on the laundry room/mudroom. In fact, this lovely print was purchased for that reason (laundry room inspo), but then I decided it would be more beneficial to get the this room done first.

Might I be so brave to show you a before? It is actually how it looked when we moved in – we put everything in there until I figured how to organize it. These were all in different kids rooms before so maybe putting them all together like this shows how much junk kids accumulate. And this picture does not even show the boxes of toys still in boxes. Hmmm, I wonder where all these things came from. I thought we got rid off a bunch of stuff before moving. Sigh.

school room before

It took a while to get it done because every time I went in to set something up the kids came right behind me and made another mess. I finally decided that enough was enough, got rid of a bunch of stuff and got this room organized. I still need to get rid of some stuff they no longer enjoy. But for now, I love that it is organized and everyone can find their stuff.

Note: What you will not see is a fancy high class room that limits the kids. But what you will see is various organized little corners to accommodate the needs and wants of the kids and that has been working for us. So welcome to the tour. You can find the links to the various items I used from At Home at the bottom of the post including the link to this gorgeous print.

Hello Gorgeous

This is my printing corner and other organizational pieces I already had. In our home, a printer is so necessary. I feel like I am always printing something. My husband also uses it when he is not at work and needs to print something, too.

printer area

office and homework station

This is the homework and activity corner. Those empty picture frames will be used for displaying kids art or whatever they create on paper. I glued a tiny clothespin unto each one to hold the papers in place.

homework station

playroom office homework station

My kids love the reading corner. That chair is a keeper! Only problem is that it is a struggle to see who gets to sit on the chair. Most times, two will sit on it at a time. That “Dream Big” pillow though. Don’t we all want our kids to have big dreams and to do great things. I thought it was very fitting to include it here. It is not only for bedrooms.

I had another really cute white pillow with pink tassels that I really loved. We had seen it before and my daughter who was with me at the time, loved it, too. But when I went back to purchase it I got side-tracked in the store and forgot to put it in the cart. On that day while I was out shopping, I was also invited to a Back-to-College event with Maria Bailey from Mom Talk Radio and At Home stores. In the process of meeting and chatting with other bloggers in the local area and taking videos and Instagram shots, I forgot all about cute pillow with tassels. “Dream Big” is standing alone and rocking this area, though!!

chair

These large letters make such a statement in this corner. You definitely cannot miss it! They are of two different styles – one plain and the other more rustic. Love them both.

Read

Every kid should have a reading corner, don’t you agree. It is such a great way to encourage reading or watch picture books. Although this little one is in school, we still love to encourage reading at home whether alone or with a parent.

read letters

The cute pink and white chevron fabric basket holds a few favorite books. And that little table has got to be a favorite. I found it on sale at half off. When I was carrying it to the register it dropped from the cart and I was so worried that it had broken. It didn’t but it bruised a bit. An additional 10% of the already marked down price was taken off. I love it right next to the widow and reading area. It will hold various school papers that need to be sorted – one drawer for “to do” and the other one for “done”.

reading corner in room

The other side of the room is really nothing fancy. Everything has its place over here. But it is not always easy to keep it looking this way. When the kids play, things get all over the room. The good news? It is easy to organize again because everything has a place to call its own.

play room organized

Here is a sample of their dress-up clothes. I bet they have one of each of Disney’s 12 Princesses dresses and more. And don’t even ask about the shoes – 8 pairs of princess slippers maybe? 

Princess dress up corner

The girls love playing dress-up. But between birthday gifts from us and from friends and after Halloween clearance, and a few thrifted ones from earlier on, they have accumulated so much of their play dress-up items. During our recent move, I decluttered some dresses that were falling apart; it might be time to go through them again. 

Note: One kid was playing dress-up with a Cinderella gown while I was taking these photos. 

princess corner

Yesterday, I showed you how easy it was to make this P.L.A.Y sign. You can see the post here. This play kitchen did not come cheap, I tell you. It was an investment a few years ago but some of the parts have chipped off a bit during moving and not to mention all the times I moved it around in our previous home to find the correct corner for it. 

Play room area

P L A Y Sign

Play sign

kids play room

Next to the kitchen, I keep another organized area with a few toys, kids craft supplies, and extra school supplies. These other fabric baskets, aren’t they cute? They are really handy for organizing various items and could be used anywhere in the home. Seriously!! 

baskets for organizing

I love how they are hiding the little things. The bigger one is even large enough to fit another organizing container inside. 

basket things

organized school stuff

organized bottles

And finally, organizing with cubicals. I have always had a bunch of them around the home and did away with two when we moved. Now I want them back!! But these are inexpensive and easy to use for organizing.

Organized cubical

play room play area

If you are wondering why I organized everything to the wall and nothing in the middle here is why. I am a big fan of opened spaces for kids to play. Kids love to run around, roll on the floor and just be kids. I like to keep their play areas opened so they can feel free to play without bumping into things. So that’s why there is nothing in the middle. And no curtains? Nope for now. The room is a bit dark with this paint color. Opening the blinds and letting all the natural light in is one of my favorite things to do.

playroom and office

And because I want a fur chair like this in every corner in our home, I’ll share it again. It is such a fun cozy and comfi chair to have around. Don’t you just love how comfi it looks?

So that is our organized multi-functional room. I may need to go through and declutter some toys. 

reading

Here is a link to all the organizational items or similar that I found from At Home stores:

Faux Fur Folding Butterfly Chair

Small Accent Table

“Dream Big” pillow

“Hello Gorgeous” Print

Wooden Letters 

Fabric Baskets 

Have you organized your kids space yet before things get crazy with back to school yet? I would love to know about it in the comments.

This post was written in collaboration with At Home Stores, but all text, images, and opinions of the products are my own. Thank you for supporting the brands that help support At Home with Zan. 

Decor & DIY

DIY Colorful Playroom Sign

I made this colorful playroom sign for our kids play area and I am really loving how it turned out. It was so easy to make, too.

Play room sign

Bright bold letters on white background – I couldn’t be happier. I kind of want to be a kid again just for that sign!

P L A Y Sign

In the past, I have been wanting to get some of the bigger sizes of these wooden letters (following image) to hang somewhere where the kids played. But we did not have the space separated for this. Now that the kids have a separate room to play, I thought it would be perfect to hang the letters. I could not find all the letters to spell P. L. A. Y in the larger size so I opted for the smaller ones (I am doing another post soon with what I used the larger ones for). The one problem though is that the smaller letters only came in red and black.

Large Letters for diy project

Have no fear, paint to the rescue! A couple coats in different colors and my letters were as colorful as I wanted them to be!! I used folk-Art Acrylic paint for the letters – not regular kids acrylic paint. One of the first things I did when we moved was restock my paint stash for when inspiration hits.

DIY play sign with colored letters

Once the letters were dried, I glued them with gorilla glue unto a piece of shiplap wood. Like I mentioned earlier, I would have preferred to hang the letters by themselves if I had found all the letters I needed in the larger size. But when that idea failed, I decided to glue them unto the wood so they would stand out a bit more.

Originally, I purchased the wood as a memo board on clearance for like less than $5. It had no words and I did not really know what I would use it for. At one point, I attached clothes pins and hang the kids photos on it. And then I made a sign out of it for our bedroom. Remember this DIY coastal sign? Since we moved, I have not hang it back up so I thought it would be great to use for another project.

DIY coastal sign

I’m telling you , paint transforms anything! Don’t you love the power of paint?! I sure do!!I used chalk paint (Rust Oleum Linen White) for the wood. Generally, there is no sanding required to use the chalk paint but I had to sand a little to remove the previous painted wording.

Painting Letters for Playroom

P L A Y Sign

Just as a recap and to make the instructions easier here is what to do.

Materials needed:

  • Wooden letters in preferred size (s)
  • A piece of wood (board) large enough to create the sign
  • Wood glue or Gorilla glue
  • Paint if necessary
  • Picture hooks to attach to the back of the sign if you are going to hang it (or if the wood does not already have hanging hooks).

What to do:

  • Paint letters and wood and let them dry if they are not in the color you want (be sure to use a contrasting background color on the wood).
  • Glue the letters unto the wood – line them up nicely.
  • Attach hanging picture hooks at the back, if needed
  • Display sign where-ever you wish.

P L A Y Sign

Play sign

I have an upcoming post about how I organized the entire room and this sign is definitely one of my favorite pieces in the room. Stay tuned!!

Play room sign

Pin - It New

DIY Colorful Playroom Sign

So what do you think? Do you have kids area that could use a little sprucing up with something like this sign? I would love to know your thoughts in the comments.

Breakfast

Nesquik Chocolate Smoothie

This shop has been compensated by Collective Bias, Inc. and its advertiser. All opinions are mine alone. #StirImagination #CollectiveBias

If you follow me on Instagram, you may have seen a post about my little one off to Kindergarten this year. As you would imagine, there are lots of adjustments for us as we enter this new season. Apart from getting up earlier than normal, I have been creating easy and healthy meals that make morning routines smoother and help us get out the door on time. One of my newest creations is this chocolate smoothie using NESTLÉ® NESQUIK® Powder. I serve it along with breakfast or as part of an after school snack on scheduled mornings and afternoons. It is such a delicious addition to our menu.

Nesquik Chocolate Smoothie

I shared our love for smoothies before and how I enjoy coming up with new ways to create them. Our 5 year old daughter is always amazed at my smoothie creations! We usually do a lot of fruit related smoothies because we enjoy all the seasonal fruit. But we are loving this new addition to our list. Adding in a banana or two provides our fruit while still allowing us to savor that delicious taste of Nesquik. Not to mention, it provides 7 essential vitamins and minerals – I’d say it is a win.

Nesquik Smoothie with Chocolate Powder

We’ve been working on being more intentional about cutting out foods with all the added un-necessaries. I love when I can find foods with no artificial colors or flavors. Nesquik chocolate powder is such a fun way to provide that chocolate-y taste while still providing the nutrition that our kids need since it has 45% less sugar than the leading chocolate syrup brand.

Nesquik smoothie for breakfast

This smoothie could be served both as a breakfast or after school snack for little ones. The one thing I always do when I serve smoothies for breakfast (depending on the type) is serve it along with toast, a breakfast sandwich, or some other side dish. I want to make sure that we get a complete meal and people are not hungry 10 minutes later.

nesquik smoothie with banana

As a kid, I have always loved the taste of Nesquik and still love it as an adult.  Most of my intake though was mixed with a glass of milk. Did you know that Nesquik provides 8g of protein when combined with 8 fluid ounces of low-fat milk? That is awesome but discovering more great ways to use it other than just for Chocolate milk is always a welcome experience. My girl proved to me that she loves the new taste when I served it to her. She even said “mom, this is really good!”

Nesquik Smoothie for snack time

If you are in need of a quick, delicious, and nutritional breakfast addition to help jump start your kiddos day or for an after school snack, try my easy Nesquik chocolate smoothie recipe. Be sure to serve it along with additional side dishes to ensure your child gets a complete meal.


Nesquik Chocolate Smoothie
Ingredients
  • 1/3 cup NESTLÉ® NESQUIK® Chocolate Powder
  • 1 cup milk
  • 2 small bananas
  • 2 cups crushed ice
Instructions
  1. Add all the ingredients to a blender and blend until smooth.
  2. Pour in two individual tall glasses and serve.
  3. Note: Use half the ingredients to for less and frozen bananas may be used in place of ice.

You can find Nestle Nesquik Powder at Target and use the Cartwheel App between 8/21/2016 – 8/27/2016 to save 15% off 18.7oz Nesquik powder and 10 packs of Ready-to-Drink Bottles.

Nesquik Chocolate Powder at Target

Nesquik smoothie recipe

Have you used Nesquik in your recipes before. I would love to hear about your creative back to school breakfast or snack recipes using Nesquik chocolate powder. How will you use it?

Decor & DIY

Hanging Plate Wall – What I Used to Create It

When I created our dinning room space a few weeks ago, one of the things I wanted to include was a hanging plate wall. I always love seeing plate walls and I am pretty satisfied with how this one turned out.

Dinning room wall with white plates

My overall dinning room decor is simple, with just a few touches of summer. But I love walking into it and savoring the simplicity. My family loves it just as much as I do. Adding the plate wall is definitely one my favorite DIY wall projects of this space (aka the only DIY of the space).

Summer dinning room reveal

I know there are so many fabulous plate walls out there with all kinds of fancy plates and antiques. While I love seeing those, I decided to stick with the simple to see how it would turn out before trying anything else. I think this was the best decision for this project. And did I tell you how easy this was to create? You would not believe it! Seriously, this took me about 20 minutes or less.

Dinning room reveal - white plate wall

How to Create a Simple No Nail Hanging Plate Wall

First, I picked up some simple Porcelain plates of two different shapes and in various sizes. I went with plain white to contrast the colors of the orange wall.

procelain Plates

I did not want to put too many holes in the walls so I searched around on Pinterest to see what others were using to hang their plates. I found some options but then my husband came across these damage-free hanging command strips for hanging pictures. When I saw that these could hold up to 4 lbs (and they come in various sizes depending on the weight of your items), I figured they probably would work well for some light weight plates. And they sure did! It has been almost a month since I made the wall and not one plate has fallen down.     

command damage-free hanging

The command strips are two sided with tape on one side and Velcro on the other. The Velcro is pretty sturdy which really works well to keep the plates. 

Note: According to the package, it says “damage-free hanging” so I am hoping for the best. I did try removing one strip after a few weeks to see if the paint would peel off. A tiny bit did chip off indeed. Could it be that I removed it too fast? Not sure.

velcro for plates

I did not get very clear images, but here is a shot of the back of the strips (if you have  not worked with command before). The backs are sticky once the tapes are removed.

velcro

To use this for hanging pictures (or plates), I placed two strips together on the Velcro side and pressed them until they clicked (per the instructions on the package). The clicking sound means it is now safe for hanging.

Hanging Plates velcro command

Then I removed the tape on the back of one piece of strip to reveal the sticky part. I then pressed the sticky back firmly on the back of a plate. Once it is firm, remove the opposite sticky back that is facing upward (as shown in the picture) and press it firmly on the wall.

Note: Once the strips were attached to the plates, I started to let them wait a while before hanging for fear that they might come off. But there was no need for to wait as these command strips are pretty firm. 

Procelain plates with velcro command

The wall was so easy to create and I actually did not plan out where I would put the plates. If I get motivated, I may rearrange them for an even more un-even look and maybe add in a few fancy plates. We’ll see.

Summer Dinning Room Reveal - White Plate Wall

Overall, I love the addition of the plates to the room and the pop they add to the orange wall. Even more so, I am happy to have something separate for dinning away from the breakfast nook every now and again. 

Dinning room reveal

Pin - It New Hanging Plate Wall

What do you think of this simple plate wall? Do you have one somewhere in your home? How long did it take you to create? I would love to hear about it in the comments!