Subscribe to stay up to date plus get 5 Free Home Productivity Printable Planners!
Decor & DIY

Simple Personalized Chalk Painted Mug

I love receiving handmade gifts. It makes me think that the giver really cared to take the time from their busy schedule to create something special for someone. In the same light, I love making handmade gifts, too. Although, I probably don’t make them often enough. But when I do, I find such a joy in doing it.

chalk paint mug

We recently made this mug for my husband. He received a promotion at his job and we wanted to do something special for him. We celebrated dinner with the board and staff at his work and then a family dinner with just our little family. Around that same time, we had invited some friends (who had a baby) over for dinner. That is when we did a toast and presented the mug to him. He can take it to work and use it for coffee or for holding stationary on his desk (his choice). It is something so simple, yet so meaningful!

Chalk-Painted Coffee Mug with Glasses

This could be personalized for so many occasions – Father’s Day, birthday, a simple daily inspiration mug, etc. It could also be a nice addition to a graduation gift-set since we are in graduation season (which I know is probably almost over). How about, painting the entire mug in chalk paint and using it as a place to write “well wishes” to a graduate? You know those graduation keepsake books where all your friends write something in for you to remember? It’s been a while since I graduated high-school. I even had to look up the name of such a book (auto-graph) ha ha… But anyway, guessing it will be nice to have something like this set on a desk holding small items or even for drinking coffee with all the notes from friends and family written all over it. How special would that be?!

Chalk Painted Mug - Decorated with logo

It is so easy to make. Here is what I used:

  • a plain white mug
  • painter’s tape
  • chalk paint
  • permanent chalk marker or chalk

mug

The kids helped me pick out a mug from the store. It is only white but there were so many variations and sizes of white mugs to choose from. I do have a million white mugs at home already but we wanted to make his special. Plus it was fun to have the little girls choose a mug for daddy’s special promotion. 

How I went about making it (so easy): 

  • Tape off the section of the mug where the paint would be applied. See how I made it into a square. You may find it helpful to tape the rest of the mug to prevent paint from getting all over it. That is something I did not do but probably should have done.

taped off mug

  • Spray the mug with spray paint (only the part where you want the wording).

Chalk Painted Mug - Sprayed

I used chalkboard spray paint but regular chalkboard paint could be used instead.Chalk Pinted Mug with Spray PaintLet it dry. I used about two coats of paint with drying time in between.

Painted mug

  • Once it is dried, remove the tape (after about an hour or so).

Chalk Pinted Mug with Tape Removed

  • You may see a few places where the paint smeared a little like around the edges. But that could be easily scraped off with a sharp tool. I used a bread knife and it left no scratches. 

mug painted

  • Place it in a safe place and let it fully dry out for a period of 24 hours.

Chalk Painted Mug Almost Complete

Once is fully dried out, bake it in the oven for 30 minutes. 

  • To do this I set the oven on 300 degrees, placed the mug on a baking sheet, then baked it for 30 minutes.
  • Let it cool before touching it.
  • Once the mug is cooled, you can now write on it using chalk. 
  • I chose to use a permanent marker so the words won’t wash off. I found this at Target in the dollar isle.

Chalk Pinted Mug Marker

I wrote the word Congrats’ but did not center it enough. So I added a few dots to fill up some space. I am thinking of spraying it over and re-writing the words. Maybe add something a little bit more specific as to what the ‘congrats’ is for and adding the date at the bottom of the mug.

Chalk Painted Mug decorated with logo

All in all, I love that it is such a simple yet meaningful gift to give to someone. My husband already loves it “as is”.

Beautiful Chalk Painted Coffee Mug

What do you think? Was this easy enough? Why not make one for your graduate or Father’s day or for yourself and write some encouraging words on there? I would love to know what you think about this simple DIY in the comments.

Home

Refocusing on Priorities

Do you ever find yourself straying after from your core goals and priorities and what really matters? Recently, I had been so caught up in the next decor, DIY, picture taking, social media mode that I found myself straying away from prioritizing my home values. Also, I found myself spinning around in circles day in and day out just trying to keep up with it all. As a blogger, I tend to have this mindset that I need to always have something ready for my readers. Maybe so. But when it comes to the point where blogging is almost taking priority, then something’s got to give.

Living Room

A few days ago, a glitch in my hosting system completely vanished my blog for two full days. At first, I was calm not knowing what to think. Then I became very frustrated and called in multiple times venting my frustration. I kept getting answers like my files are taking time to load so I’ll have to wait 24-48 hours for it to come back up. Every time I called in another “wait” ticket was submitted which extended the time even longer. Not that they were not mean – they were very friendly. But I was beginning to think that they did not know how to fix my site. The one good thing they told me is that all my files were still in the system. I have never had such a problem with them before and I think it was an honest glitch but that was no fun at all.

Anyway, finally after two days to no avail with my site, my husband came home and asked if I had called the hosting back. Apparently, he had been trying to pull up my site while he was at work to see if it was working. He wanted my permission to get on them if they would talk to him. I guess they must have secretly known because when I called again, someone finally decided “enough was enough” and they could not keep adding “wait time” to fix my issue. I explained to the rep how I have been getting the run-around and he said that this should not have taken this long to fix. Can I just add that it took him about 5 minutes or less and my site was back up as if nothing happened? What was all that “wait” time about previously? Sigh.

But you know, in the midst of it all, I was forced to slow down from the crazy and just enjoy the down-time for a minute. I even decided to refrain from a couple social media sites for a day (I know, such a long time right) just to breathe in some fresh air. I was forced to stop and consider what is it I am really after. Who am I trying to reach? What is my purpose behind this blog? Don’t get me wrong. I love my little site and all but I am just saying that sometimes I need to just step back and prioritize. Consider what is it I really want for our home and for this blog. As a stay-at-home mom to littles, it is not easy to keep up. But for me, blogging is kind of my little “self” hobby – more like an outlet for this introvert.

Blueberry Bread

And while I love blogging and connecting with others on social media, it can become very overwhelming without the proper balance. In efforts to cut back, refocus, and prioritize I have been making a few changes. One of them which I started a few weeks ago is cutting back on how many posts I do weekly. I used to stress over not having three or four posts weekly. But now, I aim to get at least one good post out (working on this) and if I do two, all the better. I don’t know how other moms with littles and home, and all that come with it run a full-time blog and keep up with everything else. But I sure cannot keep up with the Joneses.

Another way I am cutting back is by narrowing down a bit. What to narrow down to is a challenge in itself because I love all things about home. But I have lessened down on posting about kids crafts activities. The printables, in particular, take weeks to create. I have plenty activities on the blog that we’ve done for quite a while and I am not deleting them. Many of them have received a ton of pins. I may throw in a post or two if I find something new and relevant. In addition, I am not posting as much recipes as I used to. I am not getting rid of them, just not doing as many. And I am working on doing less on many other areas of the blog. Because I am finding that doing less is actually more for me. Other than having more time to concentrate on home (which is priority), I am also finding that I have room to do other blog related work that I have neglected in the past (such as site design, email subscriber related items, Media Kit, etc). I even take the time to promote my posts and your posts more than I have been doing and check and reply to blog related emails. Ha!

Truthfully, I am really enjoying the less stress posting. I was recently thinking about how I kind of miss writing simple posts like these that do not take days upon days to come together. No amount of special photos and polishing up things to make it all look nice and fancy. Just a plain old little post from the heart with photos I snap when my home is clean – not really meant for the blog:) Unfortunately, these areas of our home do not have good lighting either.

Ps. If you are wondering when I have a moment to type, it is usually at night when all are asleep or during naps. Other than that, I don’t even open my computer during the day when the kids are awake. I may respond to a question via my phone but I am never letting them play while I type. I used to think I could do it but quickly realized that it not the best way for us. I let them have priority.

Before I wrote this post tonight, I was really in a slump and was not sure if I wanted to post anything. I was about to edit photos for a DIY home post but realized I had not downloaded them and really did not feel like going through the process. I figured I would browse around others sites and while reading this post about simple joys, I decided I would write something encouraging like old time. It was really helpful to not stress over it and having less to do.

One of the encouraging verses I have been learning to practice for a while now is Proverbs 16:3.

“Commit thy works unto the Lord, and thy thoughts shall be established”.

When I find myself having too much on my plate or not knowing how I’d get through the tasks, I always stop to read it. In fact, I have it written in our little eating area in the kitchen. It is such a good reminder when I sit down with a to-do list or when I am looking at a chaotic mess around me to just give everything to God. Every time I do this, it is like instant clarification. Because when we give our works to God, He takes delight in directing us (Proverbs 3:5-6). Everything will fall into place and our to-do lists will be prioritized, too.

verse

If you are a blogger, do you find yourself having to refocus every now and again on what really matters? Do you find that blogging and all that come with it can tend to take over if you don’t prioritize? I would love to know your thoughts in the comments.

Home

Small Bathroom Organization and Storage

Organized spaces truly make me happy. I tend to function much better when my home is uncluttered and somewhat organized. Lately, I have been focusing on organizing a few areas in our home, particularly closets, cabinets, and under sinks. We don’t have any kind of huge fancy closets, only tiny ones. But having them organized in a way that makes things easier to find helps much. I have organized our bathroom but still need to find a good system for our bedroom closets. 

bathroom closet organizing

A few weeks ago, I shared one of our bathroom makeovers and how much lighter and brighter it is since we decided to do something about the previous condition. Today I am going to show you the simple system that I use to keep it organized. So far it has been working well. It seems as though the cosmetics I tend to get rid off the more we end up having. Organization is definitely a must in a bathroom as far as I am concerned.

vanity 2

Closets and drawers are great ways to store necessities in a bathroom. But since we don’t have drawers in our bathroom, I have come up with a few other ways to help with organizing.

  • Medicine Cabinets: We have recently installed these medicine cabinets for the sole purpose of organization.

cabinets

Personally, I prefer having a sink top that is not cluttered with all kinds of random items. These cabinets are coming in handy for keeping everyday items in reach and off the vanity top. (This is a previous image when I was playing around to see how I would organize it).

bathroom medicine cabinet 2

  • Baskets (big and small): I have a ton of baskets around the home because I love how useful they are for better organization. I love using them as decor and also to coral items.

vanity below

All those body cosmetic stuff that are used occasionally or not currently in use are organized in baskets under the sink. 

bathroom baskets

Another way I organize with baskets is by putting smaller baskets inside larger ones with like items in them. Things like dental care are all in one spot. Items like medical care are all in another spot and so on. They are easier to find than having to dig through a basket filled with all kinds of stuff to find what we need.  

bathroom under sink

Let’s head on over to the closet. Again, more baskets are used to keep things in here in tact. 

bathroom closet towels and baskets

I picked up these cheap $5 baskets from Walmart a few years ago, and have used them to coral mail, magazines, books, etc. and now I am using them here in the closet. Because I have so many baskets, some of these were just empty and used for decor styling. I figured I’d put them to use in the closet to coral some of the larger bathroom items.

bathroom closet basket 2


I am also using some smaller wire baskets that I picked up in the Target Dollar spot, last year, for some of our smaller stuff such as skin care, nail polish, make-up, etc. I used to keep my make-up and nail polish on the dresser in our bedroom because I thought we did not have enough room in the bathroom to keep them. But with a little organization and creativity, I am finding that we have much more space than we actually need in the bathroom.

bathroom closet org

I have seen some prettier smaller organizers. But for now, having things like nail polish in one basket is working for me. That has been my system for the longest while. 

bathroom closet nail polish in basket

It is always good to store a few extra rolls of toilet tissue in the bathroom rather than having to walk back and forth in a separate storage to retrieve them. Nothing worse than getting to the restroom and realizing that you are out of paper. 

And because I am such a lover of “all things home magazines”, I like to keep a separate stack of them in here. I tend to catch up with them while my kiddos are having a bath near me.

bathroom closet bins

Storage Jars: A few cute storage jars are always good to have around for storing things like cotton swabs, cotton balls, bath salts, etc.

bathroom closet organized

I keep a few of these larger kinds of jars around because I think they are cute and are great organizers. 

bathroom closet jar with cotton balls

And I am also using Mason jars to organize some of the smaller items.

bathroom closet small basket

Apart from having our bathroom organized, I also love to have it coordinated. Because our bathrooms are small, I think it looks much better with some kind of coordination. I find it beneficial not only to have the overall color scheme of the bathroom coordinated but to also have the towels coordinating with the color scheme. 

bathroom towels

A few months ago, I switched out most of our array of miss-matched towels for simply white. Personally, I find that having a closet full of one color towels makes it feel more organized. Here is what I find beneficial about this:

  • the closet does not look so miss-matched and busy anymore
  • less time is spent choosing which color towels to set out when it’s time to use them
  • it’s easier on the washing 

There is no rule in a book that says all your towels have to be one color. In fact, not all ours are the same color. We still have colored for the kids and a few others that we invested a few years ago that we love because they are super comfi and hold their shape well. Most of them are currently in use but you can get a peek of a few brown ones in this next image. 

Making over the bathroom has really made a difference. But having it organized is making an even bigger difference. Stuff is not all over the place anymore. It does not look chaotic. And less time is spent trying to find what we need.

bathroom org

Do you have a small bathroom that could use some organizing? What kind of system would you use? I’d love to hear more about it!

Decor & DIY

Main Bathroom Makeover – The Reveal

Whooo! During this bathroom makeover, there were so many other little home projects going on around here that I could not even keep up! But I am relieved that this bathroom is done (or almost done). The floors and doors still need some kind of fixing but for now, the main outlook of the bathroom is much more pleasing than before. Keep in mind that this project was not a full bathroom revamp but more of a get rid of ugly wallpaper, install new lights, new medicine cabinets, and new paint.

Like I mentioned before, since we were already doing the makeover, I decided to join in on the Spring 6-week One Room Challenge (ORC) hosted by Linda from Calling it Home. You can get an idea of the where I started and the progressing weeks by clicking on these links: week 1/week2/week3/week4/and week5. I am so happy to share what it looks like now but it seems like I could never get this post ready on time. And last night I came down with a headache and some kind of virus and just did not have the energy to type. Thankfully, I feel better and the kids slept in some.

plant on sink

Here is where we started…..Yikes!!

ORC wk1 Bathroom 4

And now. . . So much better right?

vanity 2

As previously mentioned, choosing white paint and installing these new lights have really brightened up the space.

vanity lights

The medicine cabinets have really helped to clear the sink clutter.

towel rack

rag

We are only keeping a few prettier items by the sink area and it is really making a huge difference already. I have gotten rid of the un-necessaries and organized the rest of the stuff at the bottom of the vanity (image further down).

soap dispenser

plant on sink

I quickly typed a gratitude sign to keep on one end of the sink because let’s face it, we all could use a little encouragement sometimes. I know my husband could use some when he wakes up in the wee hours of the morning to get ready for work. And I definitely need a reminder when I am grumpy over late nights and I need to have the right attitude with the kiddos.

soap

gratitude sign

We have not changed out the faucets yet. We have them but I waited on the last minute and my poor husband was too tired to change anything. So I may do a follow up post if we decide to install them.

sign

I polished them with some stainless steel cleaner I had on hand and called it a day!

faucet

Here is the before of the vanity.

orc paint 5

orc paint 3

It got a little repaint but nothing major. Changing out the vanity fully was not in the plan for this round.

vanity below


vanity 2

The closet got a much needed bit of organizing, too. I am thinking of doing a separate post about it.

ORC wk1 Bathroom 9

After. . .

closet 2

And the other side of the bathroom used to look like this. . .

ORC WK1 Bathroom

And the after. . . Bye bye wallpaper and hello to all white!!

toilet area with plant

I debated whether I should add a large picture over the toilet or add the shelves. Not sure that I needed extra shelving here but I thought it would be cute to add them. A while ago, I bought these floating shelves from At Home stores for our girls room redo. So far, we have not yet done the girls room so I used the shelves here instead. I added a few things around the home that had no place to call their own.

Bathroom shelf and over the toilet

Bathroom shelf

plant and jar

hello sign

Shelf

The toilet area got its own little spicing up, too.

toilet area plant

Baskets keep me organized but I am starting to think that I have too many. Can one have too many baskets?! Another one of my At Home finds.

toilet paper

I filled up the large space next to the toilet paper area with a plant stand and a plant. Maybe poor Ivy does not like been close to the toilet but that is her new home. And she definitely needs some water, too! But at I have had it since February and still have not yet killed it!

plant on stand

A shower curtain from Target and some wall hooks keep this side of the room prettier and more organized. I wanted to use a cute all white curtain and could not decide between all white this or this one. I ran into my friend Tammy from Creative K Kids and asked her advice on this one since I could not decide. We finally decided that a pop of color would be nice. Hence my inspiration for the pops of color you see in the bathroom (Shades of blue, teal, and aqua).

shower curtain

Kids towels are easier to reach now that they are on these hooks rather than being hung from the shower lining. They are really loving getting the towels themselves rather than me having to reach for them all the time.

curtain

white mirror and hooks

white mirror

I wanted to get a shot of the full area but taking photos of bathrooms tend to be so tricky because of the various tiny angles.

full toilet area

Hope you enjoyed our bathroom redo and don’t forget to check out the fabulous makeovers from the talented designers  and guest participants. I have looked at many of the reveal and they are fabulous!

What do you think of this re-do? I would love to know your thoughts in the comments!!

Decor & DIY

Coastal Master Bedroom Source List

A few weeks ago, I shared our Master Bedroom reveal with a coastal inspired makeover. We have been really pleased with the look and feel of the room. It is really a comfi, airy space that everyone seems to be enjoying. Even the kids tend to find it an inviting place to play jumping now more than ever.

bedroom

Although, not every item in the room is new, I still thought it would be fitting to write up a source list of the various items that we used for the makeover.

master bedroom makeover 29

Note: I am not in anyway affiliated with any of these brands. But I did receive products from ATG Stores to complete the makeover. 

master bedroom dresser side

While there are still some other work to be done such as the baseboards, closets, and doors, we are pretty happy with how it turned out. And our lovely nightstands with drawers are still sitting in their boxes un-assembled.

closet

Here is a detailed source list of where everything came from:

  • Paint Color: Igloo Blue by Behr
  • Headboard: ATG Stores
  • Dresser and Mirror combo: ATG Stores
  • Bedding Sheets: Amazon
  • Bedding Quilt: Amazon
  • King and queen size pillows: Walmart
  • Grey accent pillow: Walmart (already owned from another set) 
  • Blue accent pillow: Ross Dress Store (already owned)
  • Blue coastal throw blanket: Ross Dress Store (already owned)
  • Nautical Striped Curtains: Home Goods
  • White end tables: Walmart (already owned for a few years; they were brown but I repainted them white last Christmas)
  • Weathered top flower stands: Ross Dress Store (already owned)
  • Lamps: Walmart (already owned)
  • Encouragement sign by the door: Kohl’s clearance (already owned)
  • Star wall art: At Home Stores
  • Whale: Home Goods Clearance
  • Wicker mirror: Kohl’s (already owned)
  • Sign above headboard: DIY
  • Vintage clock: Kohl’s clearance (already owned but repainted)
  • Plant: Hobby Lobby half off (already owned)
  • Large brown basket: Ross Dress Stores (already owned)
  • Fur pillows: K-Mart (already owned)
  • Grey Basket and everything in it: At Home Stores

I think I have covered the basis. If you have a question about any item in this room, feel free to let me know in the comments. And thanks for you lovely comments on the room makeover.

Decor & DIY

Update on the Main Bathroom – Week 5

Our main bathroom has come a long way than what it used to be but it is still not quite what to what I imagined. We are already in week 5 of the ORC Challenge, and while I would like to admit that I got it all together, I don’t. When I decided to do the challenge, I figured that I already had a head start since we were in the process of redoing the bathroom. But I am here to tell you, head start or not, I am still trying to figure out a few smaller things for this bathroom. 

But on a good note, most of the bigger problems we intended to fix is already completed. The lighting is already making all the difference and we have installed these medicine cabinets. 

orc wk 52

We bought these for a very reasonable price at Home Depot and again chose white to brighten up the space. Too much white? Nope! We like it!! And we decided to place one cabinet over each sink rather than one large one like we had previously.

orc wk5

Medicine cabinets are out of style you may say. Maybe so. Or maybe not. But we have a good reason for choosing cabinets over just mirrors.

orc wk 5

One of our reasons being that we wanted a place to store daily cosmetics and so forth. Our vanity has no drawers as you may have noticed in the first photo above. And I prefer not to have a cluttered sink with all kinds of skin, hair, and body care gracing us when we enter the bathroom. Having the medicine cabinets gives us some place to organize our daily stuff without the clutter.orc wk5 cabinet

I have been busy trying to figure out the placement of the items in there since the spacing within the shelves are not very tall. But hey, now we have more sink and bathroom closet space. We can hide some of the items that occupied said spaces in the cabinets. Pretty organization, easy access.orc week 5

I have also being busy organizing the cabinet under the vanity. About the vanity, our original intent was to leave it “as is”. But there is some talk about painting the exterior. We’ll see. It is not a huge complicated vanity (image above) so painting should be easy.

orc under sink

And as far as decorating the bathroom goes, I am currently experience a dilemma. I picked up these few pieces at Walmart (hey, no point in pretending)! But I am wondering if a different color would be best. I did a Mood Board as to what I wanted it to look like here. But now I am reconsidering colors.

orc shower curtain

My next dilemma is the wall above the toilet seat. I am debating whether I want to add a floating shelf, a large photo, two smaller photos, or a sign. I have to admit that my bathroom decorating struggle is real:)

orc paint 2

So there you have it for week 5 of the ORC. We have come a long way, though. And those weeks surely flew by quickly. Week 6 is the big reveal and I have begun to tell myself that there is no point in choosing pieces that we do not love for the bathroom. We will show what we have even if it means we have to finish some things afterwards.

You can always see the plans and progress of the bathroom by clicking the following links:

  •  Week 1 – Plans 
  • Week 2 – Progress with Lights and Mood Board
  •  Week 3 – Removing the Wallpaper
  • Week 4 – Painting.

And if you need more ORC challenge room inspiration, go check out those participating by clicking here for designer rooms and here for other guest participants rooms. 

What do you think so far? If you are participating in the ORC, how is your room coming? I would love to know your thoughts in the comments!

Decor & DIY

Coastal Master Bedroom Reveal

It is amazing how the look and feel of  a bedroom could change a person’s mood. Hence the case of our newly made-over bedroom! Rather than being a place of chaos it now a place that reflects calm.

master bedroom end table

I am so excited to finally have this room made over! Ever since we moved into this home, I have been struggling to figure out what to make of it. Like I had written before, our room in our previous home was very nice. It was the first home we owned and that we completely renovated before we moved in so of course, everything was in tact. Even our rooms in apartments and homes we rented before looked like I spent a minute or two creating them. But not so with this one. We moved into this home the same day of closing and honestly, between pregnancies, kids, and what-nots, I have not been able to find my swag. I kept telling myself that I needed to do something to make the space more welcoming instead of what we had going on. I always think a bedroom should be inviting – a place to retreat after a tiring day. While ours was not totally that much of a chaos, it definitely needed some attention. Let’s get right to it!

bedroom nightstands

I mentioned earlier that I was going to do the room on a budget but I have to admit that I did receive products from ATG Stores to help complete the room. Their fabulous pieces are outstanding and well-made and are reasonably priced. We could not be happier with the products, to say the least. I first chose the headboard and the dresser then built the room around them. And yes, pretty much everything else in the room is either from me shopping the home, re-purposing, using gift cards, or finding an item or two on sale or clearance (with the exception of the new nightstands which have not yet made their appearance in the room). I’ll explain a little bit as I go but hopefully, will try to do a separate post with a full source list. 

master bedroom makeover 29

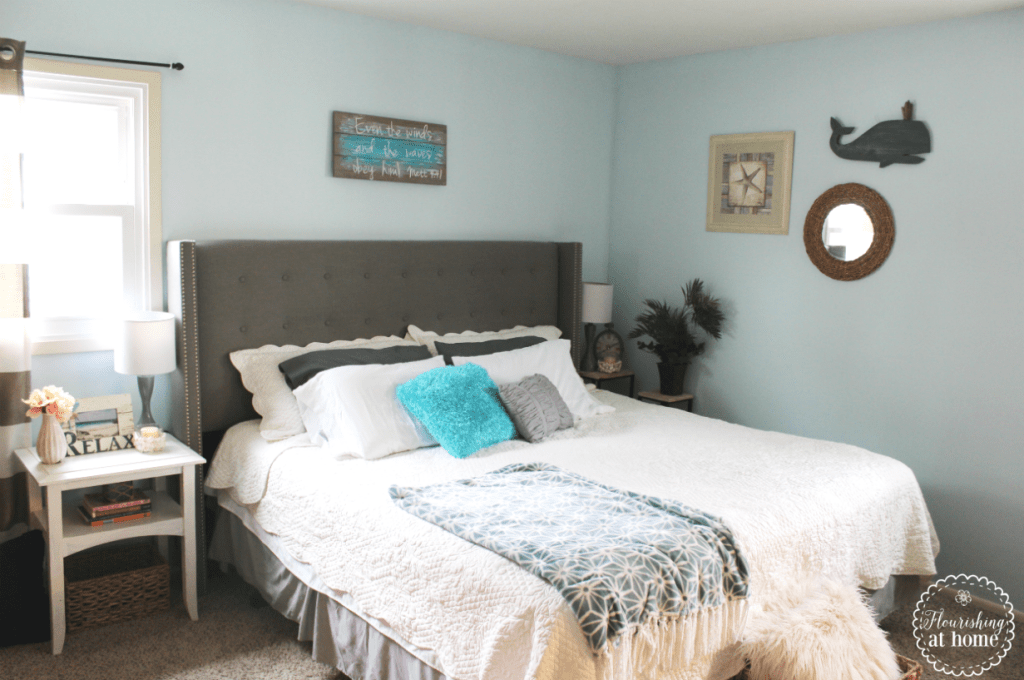
I knew I wanted the room to reflect calm so painting it in Igloo Blue by Behr and choosing grey finish for my larger floor pieces were my main starting point. Nothing says calming than a combination of soft blues and grey and adding a little coastal in the mix. You may have seen my mood board here. Coastal decor is so wide and could pretty much be anything ocean related. Having the main colors and a few related pieces scattered throughout is all a space really needs to bring out that coastal vibe. Cause what does a coastal girl know, right? My hubby says that the blue walls reminds him of the ocean and everything else in the room is sort of in a boat. I did not quite picture it this way but oh, the imagination! 

Anyways, he could not be more happy about this Button Tufted Wingback Upholstered Headboard. As soon as he set it up, he and all the kids got on the bed and snuggled right up. And of course, he proclaimed how good it was for his back since he sometimes uses his work laptop to finish up a project or two for work or school, while sleeping sitting on the bed at nights. I have to agree since my bedroom has become my main blogging spot at nights or during naps (I am just too busy taking care of home and kids during the day). But our lovely king-sized mattress needed a little spruce and this headboard is making all the difference.

master bedroom headboard 1

When my hubby blew my plans for placing a wicker mirror (image further down) over the headboard, I began searching everywhere for something that would work nicely. I must have checked every decor store in Chicago and could not find that perfect piece. I saw some canvas prints that might have worked but honestly, I was not feeling canvas. So I created a DIY sign from a memo board I picked up at Kohl’s on sale for less than $5, a few months ago.

master bedroom headboard 2

The wood was already a shade of grey so I simply added a few contrasting blues and white to go with the color scheme of the room. It may not be the perfect piece of art “you ever did see” but it definitely is perfect for my taste. 

master bedroom diy sign

I decided to keep my lamps I purchased last year and do absolutely nothing with them. They are on the lighter side but the colors blend in well.

master bedroom makeover 30

The case of the nightstands is another story. I have a miss-matched nightstand situation going on here because I still have my un-assembled ones I ordered sitting in their original packaging. Meanwhile, I am using these ones I repainted last Christmas. One is actually used as a nightstand and the other as a TV stand.

night stand

A vase of pink roses, a “relax” sign I had in storage, and a DIY candle holder (soon to be remote, cellphone, pens, etc. holder) complete the look on the top of the nightstand.  

top of the nightstand

These lovely nautical curtains from Home Goods are making a statement and we are loving the contrast with the blue paint on the wall. At first, I could not decide whether I wanted this color or plain white so I brought both colors home and tried them. Light grey and white it is!!

curtain

master bedroom makeover 33

That large wall on hubby’s side of the bed got a small coastal gallery with the wicker mirror I mentioned earlier, and two other pieces I snagged under $20 total.  

master bedroom bed

master bedroom makeover 7

master bedroom makeover 6

These plant stands turned nightstands were last year finds at Ross Stores and they fit the space just right. 

master bedroom makeover 3

Master bedroom - DIY candle

White bedding is becoming a favorite of ours around here. Our little girls share a bedroom and with two different personalities, likes and dislikes, the varying colors began to make the room look heavy and a bit confusing (think character bedding, toys, stuffed animals, etc). I decided to get them white sheets and quilts with just a simple throw in each of their favorite colors. It really made their room look and feel lighter and the space much more calming. They are happy with it and so am I. Hence my inspiration to use white bedding in our room, too. My Amazon gift cards were the exact amount I need to purchase the sheets and the quilts set.

bedroom nightstands

Our bed skirt from our old bedding remained since it goes well with the color scheme. No need to buy a new one. I was also able to throw in a two grey pillow cases from our old bedding, too. 

master bedroom makeover 27

master bedroom makeover 18

Here is a shot from the other side of the room. It’s off centered with the bed because of the bathroom, doors and closets on the other side. Keeping things minimal on that side makes the space roomy.

master bedroom dresser side

The TV now has it’s own little spot rather than on the dresser where we kept it formerly. Not that we need a TV in the room but it does help, especially when my husband travels for business. My kids and I like to cuddle up and watch a few nightly shows. 

tv

A crate storage box is hiding the bundle of chords until we figure out another smart way to place the TV. 

tv stand

This new dresser is another of one our favorite pieces in the room. It is made of solid wood and is just the perfect size. It’s not heavy and bulky and that is a plus! I’d like to add that the dresser was delivered fully assembled. When the Fedex guy delivered it on a huge crate, it did not occur to me that it was assembled. Until a couple days later while hubby and I chatted about it and the light bulb went on! That was truly a huge blessing! I think it gave my husband motivation to set it up as soon as possible. It was a breeze to add the mirror and get it set up in only a few minutes. I also would like to add that both the dresser and headboard were well packaged and did not have a scratch or a screw missing upon delivery!

master bedroom dresser

I love the grey finish with specks of natural wood showing through. Looks so much better than the big bulky black one we used to have. 

bedroom makeover mirror

master bedroom makeover grey dresser

master bedroom makeover 13

master bedroom makeover 16

master bedroom makeover 17

I think I will need to add a catch-all basket for my husband to unload his pockets when he comes home from work:)

master bedroom makeover 11

This clock though was a Kohl’s clearance find a few months ago for around $7. It was a rustic green but I refinished it in rustic white. I don’t really use much green when decorating except for plants. 

master bedroom makeover 8

master bedroom makeover 9

Bedroom Makeover

closet

The room really is much more calming and inviting now than what it used to be. Every time I walk in I want to lay down and take a nap! The kids love jumping on the bed now more than ever. 

master bedroom in full 3

And now let’s talk about a few things. . . .

. Nightstands: In our history of nightstands, we tend to use ones with three drawers for storing our smaller pieces of clothing. We also tend to use symmetrical ones. Because I love ATG products, my original intent was go ahead and purchase some from them. I ended up ordering a set from Amazon with two drawers each plus an open top shelf but guess what. . . they are still sitting in the boxes in our living room. You may find them here in an updated post. But for now, the mix-matched set is working out just fine. You can see here how I arranged all the stands here.

bedroom

  • How the room came together: In my experience, making over a room does not happen in one day. It takes time to figure out what you want the space to reflect. Collecting the pieces for the room is another story. Whether you buy them, make them, or re-purpose them, it could sometimes feel like a never ending process. Life happens and things get put on hold and that is totally OK. But everyone will be happy once it is done, even the ones who the room does not belong to:) As I was about to take some photos of the space, these two kids decided it was a great time to start jumping on the bed. Maybe I should have been singing that “no more monkeys jumping on the bed” song. But they were just as excited as I was to have the room updated.

master bedroom makeover 31

It took me a little while but we are more than happy with how it turned out. Let’s look at a before and after for comparison because before and after shots make it more real.

master bedroom before and after

You may have noticed that there are still some flaws that could be fixed such as the baseboards, doors, closet, etc., but aside from that it really is light, airy and feels so breezy. We choose to be content because it is much better than the previous version. Just imagine taking a little nap in this breezy space in the middle of the day with the sun shinning through the curtains:)

master bedroom bed with logo

A huge thanks to ATG stores for generously supplying products to help transform this room. 

How do you like the new look of our master bedroom? I would love to hear your thoughts in the comments!

Update: I have created a detailed source list for the items in this room. Go here to check it out if you are interested.

Home

Painting the Main Bathroom – Week 4 Updates

I am so happy that the bathroom paint job is completed. Removing that wall paper and simply painting the space was such a relief for us. I mentioned last week how I would reveal what color we chose for the space. Well here it is! 

orc paint

Big surprise! I know you must be shocked that we chose such a boring color. But here is the thing. We have really been digging white paint in our home lately with the brightness it adds to our poorly lighted home. While we know bathrooms are generally in closed spaces and may not necessarily be affected by other lighting (per say) we decided to go with white anyway. And can I tell you, we could not be happier with the simple choice. 

And by now you may know that we went with Behr. It’s about the only brand of paint my husband will buy because of the quality. 

paint Behr

The bathroom is already looking like a totally new room and I am not ashamed of it anymore. Such a huge difference!

orc paint 2

As far as the vanity goes, we decided to keep it rather than getting a whole new one. I am hoping that a little polishing with brighten it up a bit. 

orc paint 5

Remember the bottom of the sink that was stained from all that watermarks?

orc paint 3

It, too, got a little paint makeover and is already looking so much better.

orc paint 4

We have also added some new mirrors/cabinets but that is for another post. And at this point, we still have not yet chosen the new faucets. I think we are at a stand still and have become content. Sometimes projects can become overwhelming whether they are large or small. A little break is always a good refresher. Well, we shall see what we make of it:) You can catch up on week 1/week2/and week 3 if you want to see the progress throughout the weeks. 

What do you think of our choice of color? Would you have gone with a simple white or would you chose another color? Linking up with the One Room Challenge from Calling It Home. You can check out more room progress from many others here and here

Home

Bathroom Makeover Week 3 – Removing the WallPaper

We are already in week 3 of the One Room Challenge (ORC) and our bathroom is coming along nicely. Not familiar with the One Room Challenge? It is hosted twice yearly (Spring & Fall) by Calling It Home where twenty designers take up the challenge to makeover a space during a period of six weeks. Every Wednesday, for the first five weeks, they will share their space and the progress they have made. The last week of the challenge is all about the big reveal with the project all completed, hopefully. Guest participants can also join in and share a space that they have been working on via a link up that is provided each Thursday. Check out more of the the details here. But since we were in the process of making over some spaces, I thought it would be fun to join in and share the progress of one of them, our larger bathroom. You can catch up on my previous posts about the makeover here in week 1 and week 2

Last week, I discussed a hidden surprise and the new lighting we installed. Many of you expressed that you liked the lighting we chose. It has has already made such a difference in the space. Here is a little recap.

orc wk2 1

orc wk2 3

Once we had lights, we intended to tackle our biggest issue which was this horrible looking wallpaper. I am sure it was a great idea when it was first installed. But overtime, it began to peel off and did not look attractive (at least by the time we bought the home). I said I would discuss our choice of vanity this week but I decide to switch things up and discuss the wallpaper and a major setback we encountered.

ORC wk1 Bathroom 2

Unfortunately, our bathroom remained looking like this (next image) for over a week. My husband’s grandma went to be with the Lord and so we had to put things on hold. At this point, the bathroom was no longer our priority but it sure was not a pretty sight. Remember this is the main bath because the one in our master bedroom is only a half bath. Not to mention, we had other extended family come over for a few days during this time, too. But we were able to make more progress once things were settled.

orc wk2 2But I am happy to announce that the wallpaper has been removed – ALL of it!

Removing wall paper 3

But wait, it was not just one layer of wallpaper, it was two! There was some kind of undercoating at the bottom. The brown area in the following image shows the second layer under the flower one at the top.

Removing wall paper

That’s no fun! Originally, I intended to remove the paper myself but did not get far (see next image). My intent was to remove little by little until everything was removed, over a period of time. Once I saw the underlining layer, I gave up. My husband was not in any mood to remove it either so he recruited help from a handyman. I was so glad he did. We had removed the wallpaper in our kids’ bedroom before and while they were on a smaller scale and only one layer, it was still not the easiest job. But we were able to handle it. Not so with the bathroom. None of us had the desire to remove it. 

ORC wk1 Bathroom 3

ORC wk1 Bathroom 6

Removing wall paper 1

In this next image, all the paper is gone, both top and bottom and in less than a day’s work! It took the handyman way less time than we would have taken with the kids around plus with my husband’s job. But once it was all gone, it was like removing a heavy burden. Really, that wallpaper was seriously embarrassing! 

Now to patch up all the holes and get this thing painted. Are you wondering what color paint we chose for the bathroom? Well, I guess you’ll just have to wait to see:)

Removing wall paper 3

Have you dealt with removing wallpaper before? Did you do it yourself or did you recruit help? I would love to know your thoughts. If you wish to see more room progress from other participants in the ORC, click here.  

Decor & DIY

Master Bedroom Makeover Progress

Wow, we have so many little makeovers going on around here that I can’t even keep up. One of them includes a room makeover with paint, furniture, and decor updates. Last time, I openly shared with you what our master bedroom looked like with a plan to make over the space with some simple paint and decor updates.

Master bedroom makeover plans 5

If you’ve been reading here for a while, you pretty much know that we try to find inexpensive ways to make our spaces work. Although, I have only shared smaller scale projects with you. This is because we really have not done anything major, except carpeting. At least in this house. At our previous home, we did a complete renovation before moving. I did not blog about it because I think my blog was just beginning to come into play. Plus, I was not on the scene of the home while my husband and good friend did all the renovations. So this room makeover is not necessarily a revamp and tearing down of walls. Its only a makeover using paint, furniture, and accessories. I am happy to say that the room has been painted as of a few weeks ago. Paint makes all the difference. It is already beginning to look like a new room. Here is a little sneak peak.

Painted room

We chose Igloo Blue by Behr. Owl grey seems to be a popular color for bedrooms now but we were not feeling “grey” on the walls since some of our main floor pieces are grey. The room was already a shade of blue and we decided to just do blue but somewhat lighter. I have to admit that it turned out a bit more blue than I had hoped.

Room painted

When they mixed the color at the store (see following image), it looked like the perfect shade. But on the walls, a bit bluer. No bigge. All in all, it is still looks great!

Paint Igloo Blue Color

Now to accessorize the space. I have done some shopping and have most of the items ready. This is a general feel of what I want the space to look like. These are not the exact pieces but the color scheme and designs are basically what I am going for. For the decor, you should have known that a coastal gal would add a little nautical decor, right? Oh yea – we shall see what we make of it!

Master Bedroom Makeover

For the lamps, we currently have similar shaped ones as pictured in the board above. My husband made a comment last time wondering if we were keeping them. Since this makeover is on a budget, high priced lamps are not going to make their way to the room. Depending on cost, like under $20 and under for both, I may opt for some trendier lights like these. I saw some at Target on clearance for as low as $7. But that was last summer.


Table lamps
The only items that’s really holding me back from completing the room are the nightstands. It has taken me quite a while to figure out which ones to use. In part because I cannot bring myself to spend a ton on a night stand. Seriously, those that I see that could work for us are either high-priced or have low reviews as far as quality. While I would love having fancy ones that look like end tables, the ones with more than one drawer work better for us. We love using them to keep our smaller pieces of clothing. Anyways, I have ordered two but I am still not happy with the price! So that is about where we are with the progress on the master bedroom.

Update for April 20: My nightstands have arrived but they have not been set up yet. It is a matching set with 2 drawers each and an open top shelf. But they are still sitting in their original packaging in the living room un-assembled. You can see them here (not an affiliate link). Now to get them all set up!

Night stands

What do you think so far? I’d love to hear about it in the comments!! 

Decor & DIY

Bathroom Makeover Progress Week 2 – With Mood Board and New Lights

Hello again! Last week, I posted about our bathroom makeover and a few things we hope to do to transform the space and make it more welcoming. I also mentioned that I was linking up as a guest participant in the One Room Challenge (ORC) hosted by Linda from Calling It Home. Since we were already in the process of making over the bathroom, I thought it would be fitting to join in with the ORC. Learn more about the challenge here.

Last week, so many of you from the challenge stopped by to say hello and to see state of the bathroom and left encouraging comments. Thank you! We are in week 2 of the challenge and I want to show you what progress we made from when you last saw the before photos. But before I share the progress, I also want to give you an idea of the general feel we are hoping to achieve. So I created a small design board with a couple items that I want to add to the bathroom. Some of these will not be the exact pieces but I am aiming for similar colors and styles.

Bathroom mood board
 Remember one of the angles from the room? The next image shows what it looks like when we removed the vanity and mirror. Here goes!

ORC wk1 Bathroom 4

Eeeek…… What is this supposed to be? My husband and the person who was helping us discovered this hidden image and immediately called me in to have a look. Oh, the hidden things you discover when you decide to renovate a home you’ve bought. Looks like very unprofessional work to me. I guess I could see how the wood and pipes are connected making this shape but at least they could have done something to make it look more complete. Maybe they figured it was behind the mirror anyway.

orc wk2 1

Once we got passed the surprise, we moved on to installing the lights. This is not by any means an expensive set of lights. But it is definitely an upgrade from whatever the previous owners had going on! We purchased it from Home Depot

BTW: This one is actually for our smaller bathroom (half-bath) with three bulbs. We used the same model for this larger bathroom with four bulbs. I forgot to take a photo before it was installed.

orc wk2 5

My camera does not give me the best lighting but as you can see, the lights were installed before anything else. Because of course, we needed light in the bathroom plus, the person who was helping us needed lights to finish the job. So at this point, we had pretty lights but interesting looking walls…LOL! Really?!

orc wk2 2What a difference already!! These lights really made the bathroom shine brightly. It was like a whole new bathroom. Even the little kids realized the huge difference. These cone shaped lights could either be turned facing upward or downward. We chose to leave it downward for now.

orc wk2 3

Well that is it for week two. We are talking next about our choice of vanity. Stay tuned!!

What do you think about the “mystery” of the wall and the new lights? Have you encountered any kind of hidden surprises while you renovated a space? If you are coming over from the challenge, how is it going with your project? I would love to hear about it in the comments!

Decor & DIY

One Room Spring Home Tour – Our Frugally Decorated Spring Mantel

Welcome to our One Room Spring Home Tour! I am excited to be joining together with four other awesome bloggers to show you how we have decorated one room in our homes for Spring. My original intent was to share our multi-purpose family room. But after a camera fail which resulted in some very dark photos, I decided to only share our mantel. 

Spring Mantel Reveal 2015

The one fun thing about having a large fireplace mantel is the ability to change out the decorations seasonally or just whenever inspiration hits. Here are some things I do when I am decorating the fireplace mantel:

  • I like to find fun and frugal ways to decorate the space without spending much or spending none, at all. Most times, you can find me rounding up a bunch of items around the home to create the look. It’s kind of like anything goes. But I have found though, that while you could pretty much decorate a mantel with any kind of favorite things, it does take some thought of where the items should be placed.

spring mantel reveal

  • White, bright, and lighter colors are my favorites to contrast the darker tones of the fireplace.
  • I start with a large statement piece to place in the middle. This time, I decided to start with a large DIY vintage decorative clock as my focal item (tutorial to come soon). Let’s just hope the numbers were placed in the correct order. Ah, those Roman numerals that we learned way back in high-school!! So glad the internet comes in handy:)

Spring mantel clock DIY

It has taken me a little while to figure out what I wanted to use as a main focal object. In the past, I rotated with mirrors, wreaths, chalkboards, large pieces of wall art or large family photos. While I would love to have a cool looking mirror sort of as a permanent piece that could stay for a while, I decided to skip that option for now. One reason being that I still have not found the perfect piece to my liking. Another reason is that I have two mirrors on the walls adjacent to the mantle already.  You can get a glimpse of one of the mirrors on the wall to the right.

spring mantel reveal new

And a third reason for me not yet settling on a cool mirror for the mantel is that hubby thinks a large old fashion mantle clock like this would look lovely. But those things cost an arm and a leg. One time we were out shopping and could not believe the price of a little clock that sits on the mantel. We figured that if a small one cost so much then a large one would be twice as much. Like they say, “ain’t nobody got money for that!”

So this DIY clock will suffice for now. After all, I already had the base for it and could not figure what to do with it. Then one day, it occurred that I should try my hand at making a big ‘ole’ clock. We truly love how it turned out! It was very easy to make and it adds a bit of a character and personality to the mantel.

  • Once I find my focal item, I then add a bunch off items I have on hand to fill the space. Notice that I used items with varying heights and shapes. And that they all have a sort of rustic look to them (truly not intended). 

spring mantel items

I used two re-purposed spray painted mason jars with with cheap flowers from the Dollar tree that I had already. We are still getting snow and hail here so no spring blooms yet. For now, fake is it!!

spring mantel with DIY clock

On the far ends of the mantel, I added pedestal candle stands in two different heights. I have had those candle stands from Big Lots for a while now. They used to be black but I redid them in chippy white sometime last year.

Spring mantel candles

I also used a metal watering can I bought at Target dollar spot earlier last year, I believe. And added some IKEA faux flowers in it. Spray paint and just a tad bit of antiquing wax gave it its look.

Spring mantel (2)

Another re-purposed item on the mantel is this bunch of flowers here on the left. I purchased it from Hobby Lobby, earlier last year, for our baby’s nursery. I decided to bring it out since he is growing so big and may need a room redo. The white vase is from At Home stores – I purchased it a while ago, too. This time around, I did not do layering but that is always such an elegant option. Frames of different sizes are great for layering. 

spring mantel reveal

Now that you’ve seen the top of the fireplace mantel and how it’s frugally decorated for Spring, I also wanted to show you my simple decor at the bottom of the fireplace.

  • When choosing items for the bottom of the fireplace, bigger items tend to be my friend. Depending on the season of the year, I will use items such as a good-sized plant (real or fake), large jars, a large piece of art, an old stack of books or magazines, a basket of fireplace wood, a basket with blankets, or just any kind of large enough item(s) to fill the spaces.

spring mantel with flowers

So on the left, sits a simple basket with magazines. I have about 2 to 3 more baskets with magazines. Confession – I am a magazine hoarder! I tend to keep the old ones around for inspiration. But it looks like the ones pictured here are some of my most recent ones. Oh, and I never really pay full price for subscription either. I usually find some free sign-up on line or free subscription with a store purchase of grocery or other items.

Spring tour basket

To the right bottom of the fireplace, I added a real plant that was recently gifted to us. Did you notice it is sitting on a stack of magazines? I told you I loved old magazines!! The plant was in the basket to the left along with some flowers and other stuff. The rustic can it is in now was a purchase I made earlier this year for a little under $5. I found it at Ross Stores. If you are interested, you can read about our Spring and Easter shelf display with this rustic can here.

spring mantel plant

And of course, I always love to show the mantel in full before closing off. The shot may not be the best because of the lighting but you can see how gigantic it looks!! Our one year old decided to use the gate as a tool to add some crayon marks. I started to scrub it off for the photo but then I thought, “kids live here”. Just saying!

spring mantel in full

I love decorating our fireplace mantel and I hope you enjoyed seeing how I decorate it frugally. When all else fail, family photos are always a great option to display on a mantel. You can find another of my Spring mantel here.

Don’t forget to stop by and check out the beautiful rooms in the tour today to see how these other ladies decorate their spaces. They would love to have you for a visit!

One Room Spring Home Tour

Madison – Corner52

Lora – Craftivity Designs

Shaina – Married to Restoration

Lauren – Lovely Decor

Do you do have a mantel that you love to decorate? Do you tend to go frugal? I would love to know of your ideas in the comments!