There are so many great craft ideas one can use to teach children the Story of Noah. I so love that story! I especially love that Noah found grace in God’s eyesdespite all the wickedness that was happening during his day (Genesis 6:8). Below are the crafts we made to help teach the story concepts and the snacks to go along with them. You can find my beliefs about teaching bible stories to children on “The Bible & Kids” page here.
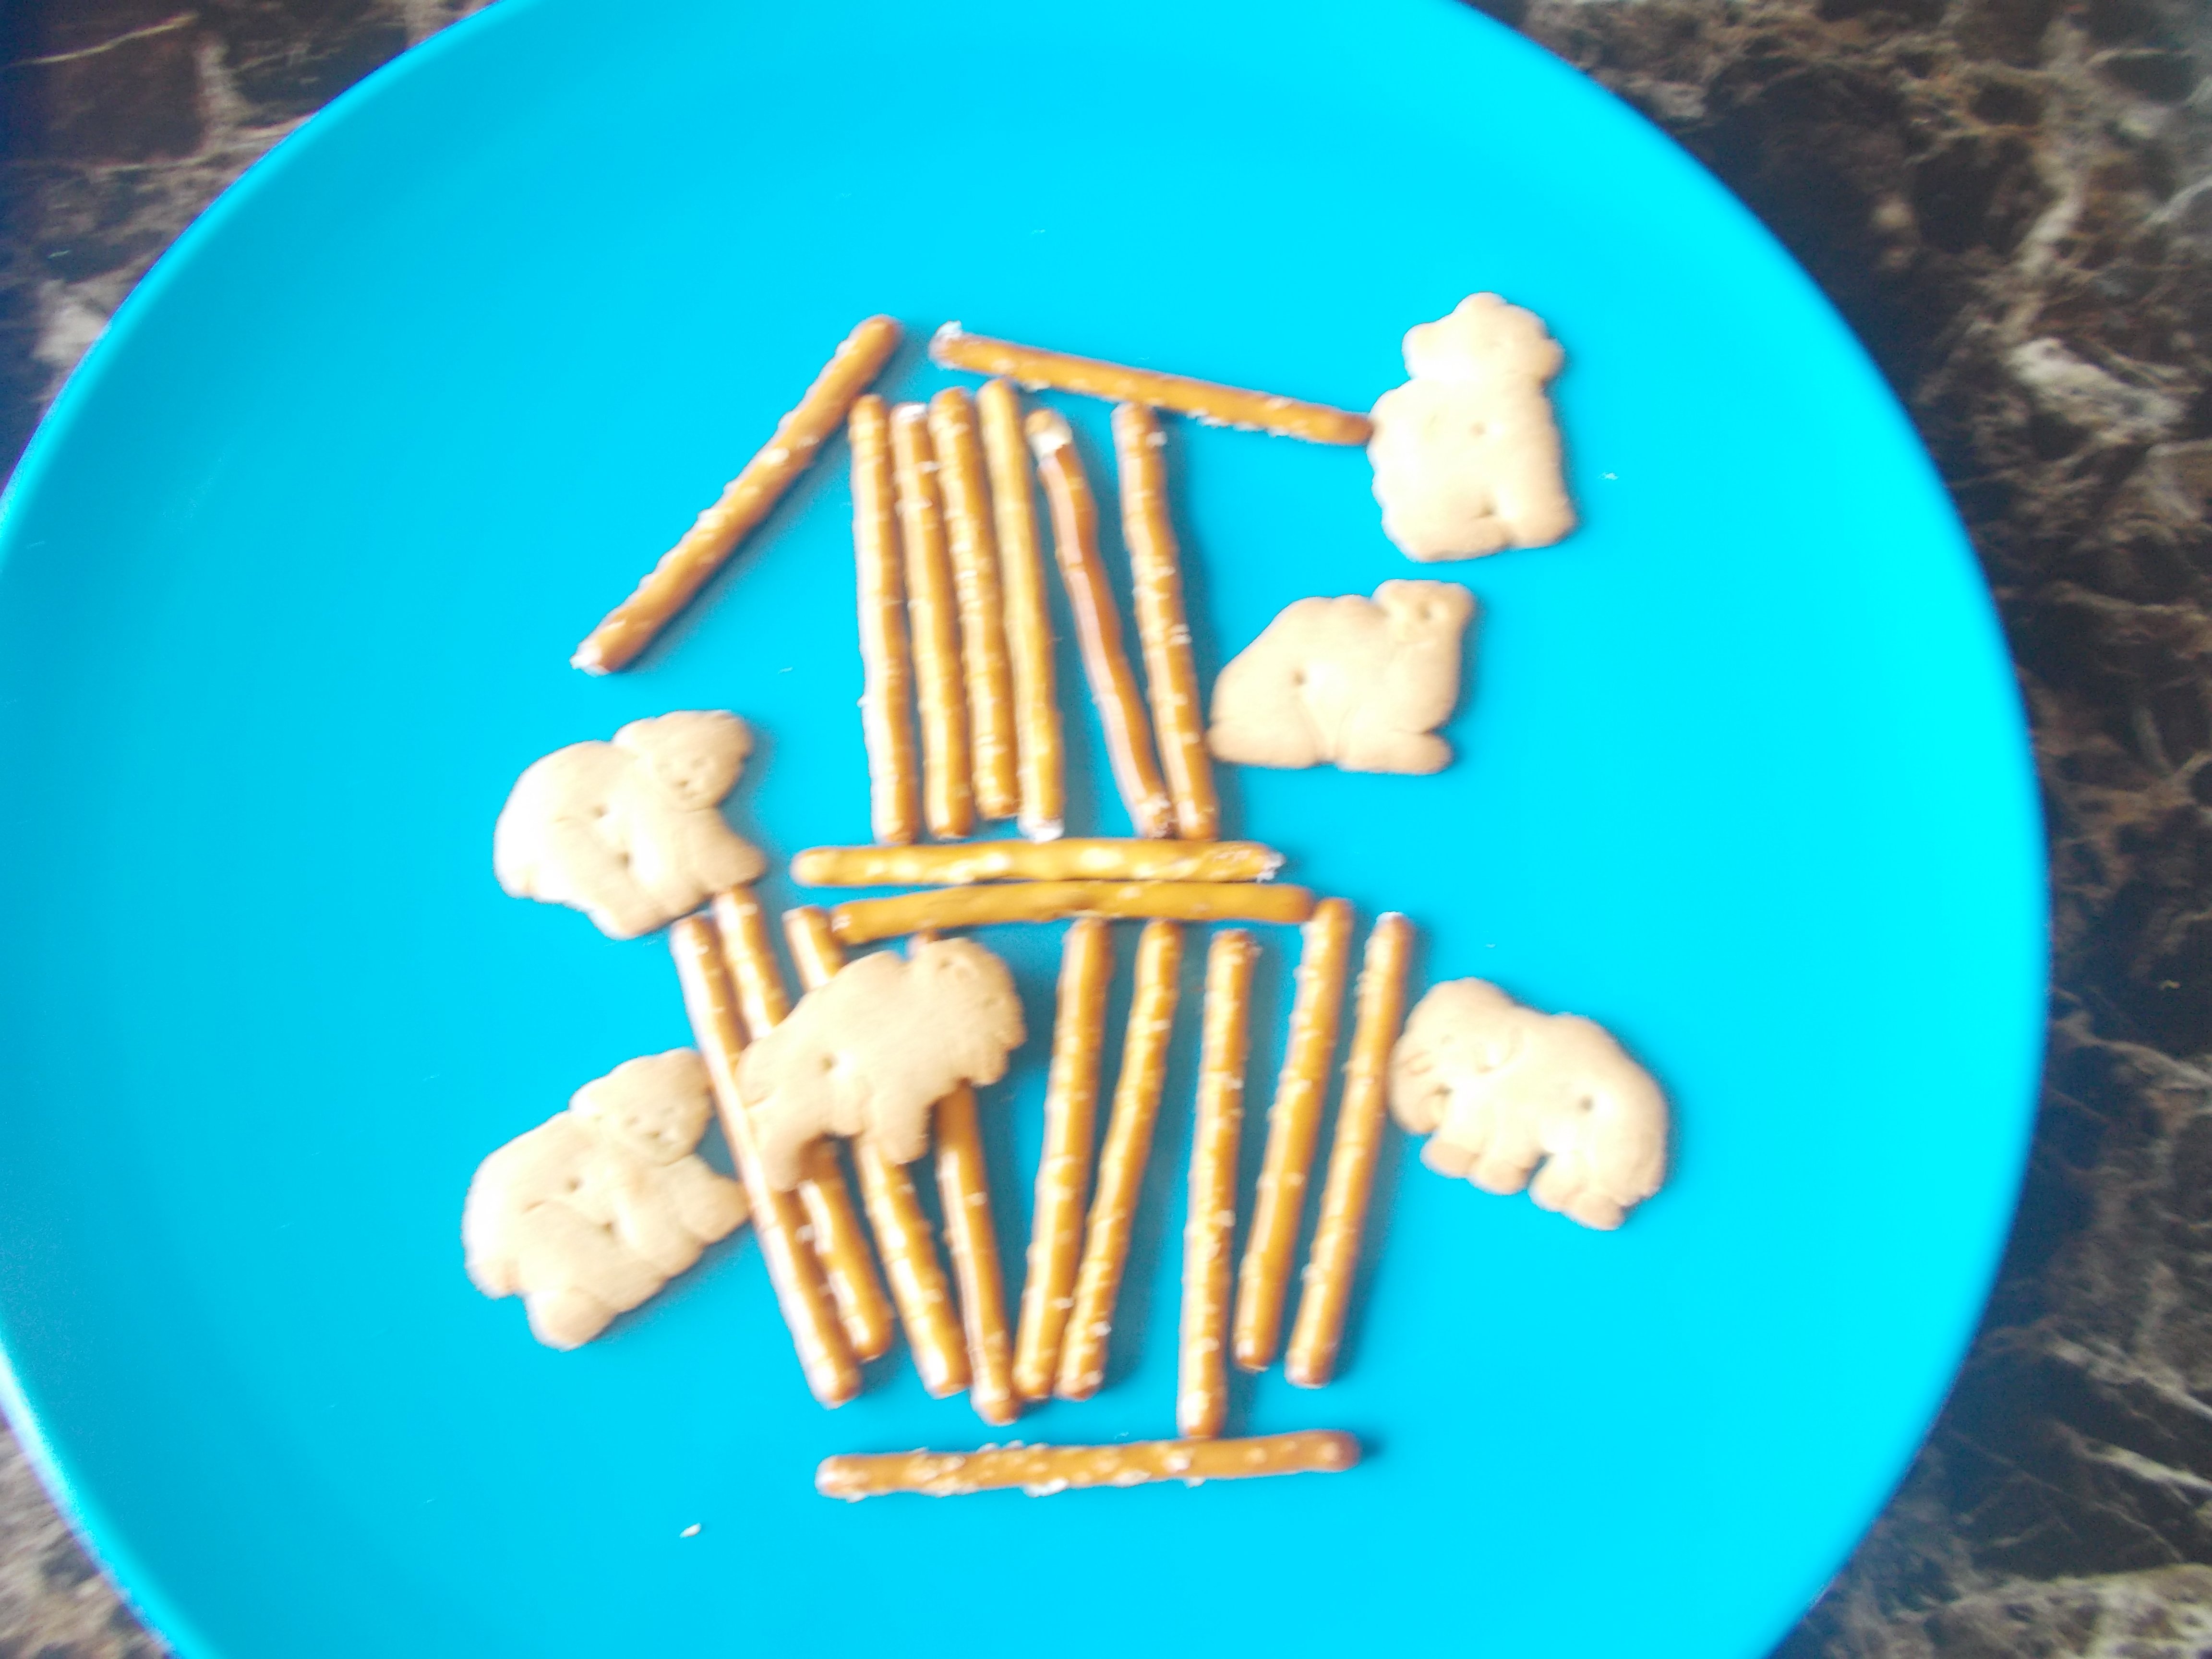
The Ark – Made from construction paper, popsicle stick, glue, and foam animals stickers. I saw this very simple pattern for the Ark at Daniel’s place and decided to use it instead of a more complicated idea.
Snacks: Pretzel sticks and animal crackers.
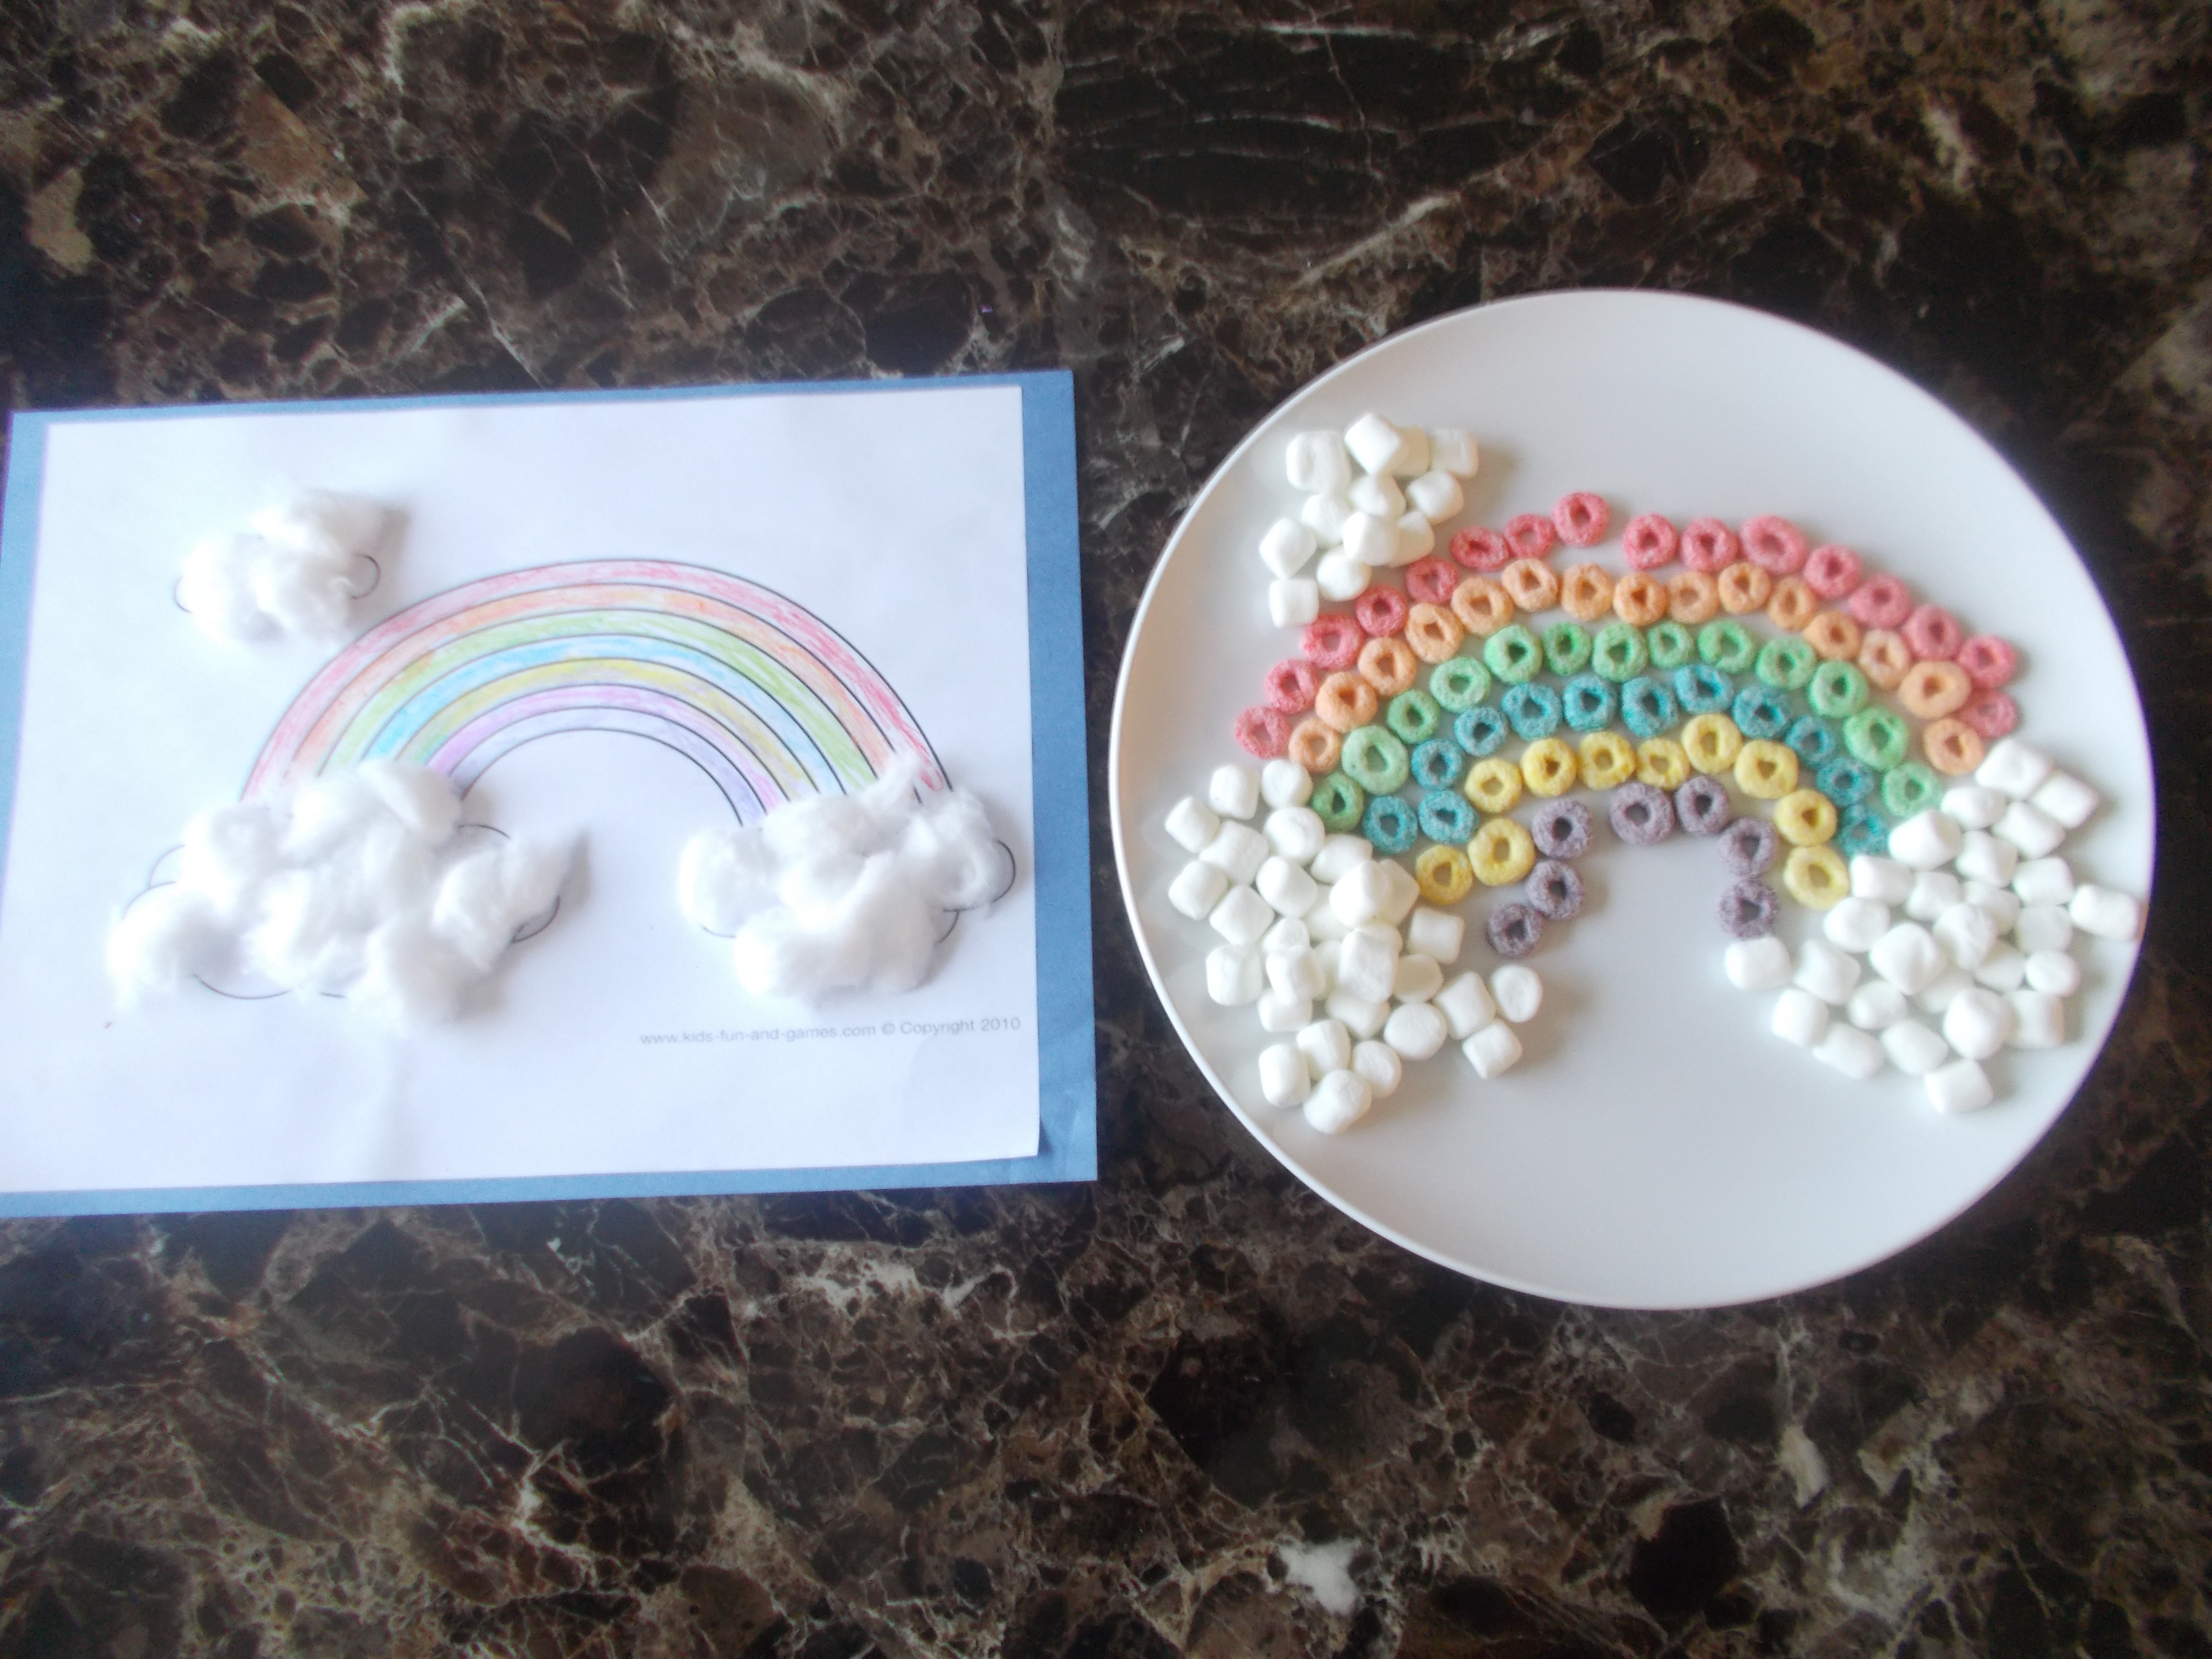
The Rainbow: Made from printed out rainbow coloring page, cotton balls, and glue.
Snacks: Froot Loops and marshmallows.
This is an extra little book that could be used to reinforce the story. It shows different animals that went into the Ark, two by two.
Teaching Bible Stories to Children – Creation Crafts with Snack Ideas
We began incorporating bible stores in our everyday learning. Whatever story or concept we are learning, we will try to do crafts/hands-on stuff with them. You can read more on my beliefs in teaching the bible to children on my The Bible & Kids page.
These are the activities we did from the creation story. I read and explained the story to the children in simple form over a period of a few days. This was done during morning and evening devotions. Then we would do a craft each day depending on what day of creation we were on. Before we did a new “Day”, we reviewed the “Days” we had already completed.
I would like to say that the crafts are pretty self-explanatory. But if you have a question, I am more than willing to explain in the comments. We used whatever materials we had lying around the home so we did not have to go out and by more stuff.
Also, we ate corresponding snacks with each craft/activity (whatever food we could make out of what we had at home).
Day 1: Light out of Darkness
Snacks: Bananas/Raisins
Day 2: Skies (separated from the waters below)
Snacks: Marshmallow on a blue plate
Day 3: Dry Land (separated from the water)
Snacks: Fruit and Vege nibble tray (Peanut Butter for soil color)
Day 4: Sun, Moon, Stars
Snacks: Whole Wheat Ritz crackers and cheese cut into shapes
Here is our toddler doing the activity.
Below is a extra craft we did to represent the moon and stars. I found the pattern in $$$Tree.
Day 5: Fish in the sea/Birds in the air
Snacks: Goldfish
Day 6: Land animals/Man
Snacks: Animal crackers
Day 7
Nothing – God Rested!
We wrote the days and names of each creation on the paper plates.
Then glued all the projects on a sheet of poster board for display. The paper plate at the top (not glued unto the the poster board) represents how God created everything out of nothing.
Two weeks ago, I discussed my first topic on the “Growing in Grace” series – The Command.
In this second post, I want to briefly discuss The Need to grow in grace.
I like to look at this need from two different angles: Our Recognition of the need and God’s Desire for the need.
However, today I want to focus on Our Recognition of the Need to Grow in Grace.
In order for a person to grow in grace he must come to realize that he is lacking in an area and therefore, needs growth.
One of the areas I struggle with is the area of spiritual perfectionism. Feelings of inadequacy in comparison to God’s demands would often cloud my mind. In fact, sometimes I wonder if I am “measuring up”. I want everything to be done right before His sight. Am I doing what he wants me to do? Am I being a good spouse to my husband? Am I being a good mommy to my children? Am I pleasing him by watching a TV show and not reading my bible in that slot of time? Am I spending too much time blogging when I should be doing laundry or looking after my kids? Am I, Am I, Am I……? On and on the list could go.
Do you ever struggle with thoughts like those mentioned above? Rather than convincing ourselves that everything has to be done right for God to approve of us, we need to remember that God knows we are human. Yes, He has sent His Son, Jesus, to wash away our sins. Yes, He forgives those who ask for His forgiveness. Yes, He desires for us to be “perfect”. But he also knows that we have a limit. In reality, we cannot “be” like God – He alone is Omniscient (all powerful); He alone is Omnipresent (always present); He alone is Omnipotent (all knowing); He alone is Immutable (never changing); He alone is always Faithful, Merciful, Good, etc).
So what does that “perfection” looks like for us? It is a matter of growing and becoming more and more like Christ daily. There are a bunch of verses that express God’s desire for us to be “perfect” (more like Him). Here are a few verses that expresses that principle:
King James Version (KJV)
1 Peter 1:16 – “Because it is written, Be ye holy; for I am holy”.
Colossians 1:28 – “Whom we preach, warning every man, and teaching every man in all wisdom; that we may present every man perfect in Christ Jesus”.
Philippians 3:12 – “Not as though I had already attained, either were already perfect: but I follow after, if that I may apprehend that for which also I am apprehended of Christ Jesus”.
We are already made “perfect” by what Christ did for us on the cross. But we are to strive to please Him in our ways. There is a verse that says, “Whether therefore ye eat, or drink, or whatsoever ye do, do all to the glory of God” (1 Corinthians 10:31). When we fail, God awaits with loving, opened arms to forgive us. This does not mean that we are to fail willfully, but when we do, we are guaranteed His forgiveness if we ask Him. 1 John 1:9 says, “If we confess our sins, he is faithful and just to forgive us our sins, and to cleanse us from all unrighteousness”.
So if you struggle with perfectionism whether it is spiritual or some other outward type of perfectionism, remember that we are already “perfect” through what Christ did on the cross. Remember the Pharisees? (Their stories are found in the Gospels). The gospel of Matthew is a great book to learn about them. It seems like no other group of people could not have been more “perfect” in there own ways. They held unto tradition, and self-righteousness was their names! But God condemned them because He is not concerned with outward righteousness. God looks on the heart. Let’s trust Him to help us grow and understand what His perfection means for us.
In what areas do you need to grow? I would love to hear of them. Let’s help each other[icon icon=icon-smile size=14px color=#000 ]
Growing in Grace Series – The command in 1 Peter 2:2
When I started this blog 2 years ago, my intent was to base it of the Proverbs 31 woman. However, I had no direction as to what I would post constantly based upon that topic. So I created a static page by the title of Encouragement and added a post with the qualities of the Proverbs 31 womanunder that post. And then for a while, I posted other “spiritual” type posts under the same page.
Albeit, I have long strayed away from posting anything “bible” related. Not that all my other posts (recipes, organizing, family activities, etc) are non-biblical but you get the picture. I have been wanting to get back into a once-a-week routine of posting some kind of biblical principle. So here we go…… My first post in this Growing in Grace series is on the command itself in 1 Peter 2:2. The scriptures talk about growing in God’s word in 1 Peter 2:2, “As newborn babes, desire the sincere milk of the word, that ye may grow thereby”. What does that look like for us? When a baby is born, he/she needs appropriate milk to help him/her grow and develop in that first year. But wait, babies do not stop drinking milk after 1 year. They may move on to a different kind of milk but they still need some kind of milk to give them that calcium and whatever else milk does for children. We often tell kids that they need to drink their milk to help them “grow and get big just like mommy and daddy”!
As believers, God’s word is our “milk”. Whether we are new or seasoned Christians there is always something to learn from God’s word. For a while, it seems like I was not growing at all. I felt backslidden in heart. I felt like I was missing out on God’s principles because I was not applying myself as much as I could. I was reading the same passages of scriptures over and over again – just because they were short and easy to find and my bookmark was there. Or even more so, they were the first ones that showed up when I opened my bible. I have read; I have done my devotions. Check mark. Anyone with me on this?
If that what it is all about, then I guess the point is missed here. It is not about reading quickly to add check marks to remove the guilt of not reading. It is a matter of searching scriptures to understand who God is and to live by the principles He has laid out for us.
I have been learning quite a bit from reading God’s word and from messages in our Church. God has given our church an amazing pastor. His challenges are so deep and mind blowing. I can tell he speaks from his heart, with great conviction from what he has learned from God’s word. I want to dig deeper into God’s word and do more in-dept study. I want to learn. I want to apply God’s word. I want to grow. How about you? Have you been trying (with God’s help) to grow in His word?
Christmas Home Decor with DIYs – Merry Christmas!!!!!
Lovely view from our front door!
Front door wreath
The many Christmas trees in our home:)
Tree #1: Large pre-lit tree. I have not yet tried a real tree – although they look so beautiful and smell great!
The Popsicle stick frames on the first photo of the tree were made by us. No photos included, yet. See my post here about kids activities to make the frames. The small tree in the second photo is a craft done by our toddler. The JOY in the third photo was an ornament given to us last year from someone in church.
Not too many gifts under our tree, yet.
Tree #2: Small pre-lit tree bought at Walmart.
Tree #3: Little Pink tree for the girls room – Walmart.
I used a Receiving Blanket for the skirt.
Tree #4: Tiny DIY from a student (placed over the cable box in my room).
Tree #5: Minni decorative tree found at Jewel – It’s over the bookshelf. So as you can see, we love Christmas trees!
Table Center Pieces and DIY candle holders. Glued ribbons around the jars and added rocks and candles. Notice that the center piece is a matching set with the main, large, Christmas tree skirt. Decided to upscale from those cheap looking $$$Tree ones we always use. This one is a very nice quality.
Another DIY decor – Tied a ribbon the jar and added Christmas ornaments in it
How about the DIY snow globes I made earlier? See post here.
DIY names on stockings, easy. Use clear tacky glue to write names on the stockings. Sprinkle with lots of glitter all over the and in between the names. Let dry, then shake off. The names magically show up clearly. (I thought I had photos of adding the glue and glitter but I cannot find them).
We have no fireplace, mantle type thing, so the top of my bookshelves is where I added some Christmas decor!
Small manger scene: Our toddler wanted a manger so I bought her a small one. I had a medium sized one for many years, but it has fallen apart.
Window view: Needs to be fixed a little better:)
Not so DIY gift: Bought the jar with ribbon and tag at Walgreens. Bought some good chocolate (Lindor and Rochelle) and added to the jar.
Kitchen.
Then my DIY cookies and hot cocoa mixes in jars. I still have not added the labels on them, yet. They are for us, though – make ahead preparations for the holidays.
Now for the Giving Basket: “And the gift goes on. . . .” Christ gave us All! What do you give at Christmas to demonstrate Christ’s love through you?
This is our recent tradition that we started last year – giving a basket of food at Christmas time to someone in need. The basket is not filled yet, by the way. And the items in the basket are just staged for this post. I still have to gather them together.
What’s in the basket: food that could put a Christmas meal together and maybe a little extra for a couple days – not just random stuff. We usually include tin stuff or dry staples and then a ham.
The food can be collected throughout the month of December as we shop or buy them all at one time.
We get a family in need name from the pastors at church or if we know someone else out there in need and then deliver it to them on Christmas Eve. We want to make sure we do not forget the needs of those close to us, too. Sometimes we tend to bypass the ones close to us who have needs and try to meet the needs of those we do not know.
And the beautiful snowfall views around our home:)
Our two little kiddoss had a small party on Saturday. I think I learned a lesson about over planning for birthdays: keep it simple!
As parents, we think we are going to make the best parties ever for our little ones. But it really is to satisfy us and not the kids. Especially when we look online (Pinterest and other blogs) and see all the fancy looking parties. Well, that could be a trap for some of us.
The thing is, most of the people we invited could not come. Even up to Friday and Saturday morning of the party, I had 3 cancels. We had invited some from our kids nursery friends and a few other family friends who always come to their parties. Needless to say, we only had 2 families show up for the party.
These were the results:
——Money loss: we had to cancel our rental place the same morning and lost our down payment. We had that place (not too far from our home – a few streets over because our home was a too small to host the families. Most of the families had 2 parents and two little kids coming so we had to count for parents, too.
——-I ended up cleaning my house and running around “like a chicken without head” on the last minute to get stuff done.
——-Food: way too much food remaining
——-Decorations and paper servings: need to return them to the store
We were kind of disappointed but at least we got over it and had fun, after the fact.
All in all, the party ended up costing us about $150 or a little less with invitations, food, cakes, decor, and other miscellaneous stuff included. So I guess not too bad. But we lost the $50 for the down payment at the clubhouse, too:(
The two kiddos playing with their balloons before the guests arrived. The baby fell asleep and missed the first part of her party. And then was a bit fussy when she got up. Oh well – (she is getting her teeth)!
Our toddler turned 3 years on Nov. 29 and the baby will be 1 year Dec. 22. We figured with the holidays and people being super busy, we’ll do both together and have a little cake or something for them at home on their individual birthdays.
For our Disney Princess themed party:
—-the baby was Sofia the First and
—-the toddler – Rapunzel (she really wanted to be Rapunzel). I bought her a Rapunzel dress but it was too big so we went with a purple she already had (here again, over planning) so ridiculous!
Here is our toddler playing with some of her new gifts. Then we bought her a cake and we enjoyed it at home as a family.
The following day, Saturday, we took her to one of her favorite play place at the mall – loads of fun for kids! I have 2 or 3 posts on this else where on the blog. Baskin Robins Ice-Cream afterwards:) Then pick a couple gifts at Toys “R” Us – a simple “You and Me” doll, a stroller, and a bath tub with towels and accessories for dolls.
A week later, combined birthday party photos for both kiddos (Saturday Dec. 7th).
Played Princess Music (ordered from Amazon)
Games: Pin the tiara on Rapunzel
Games: Bowling and standing at a point and trying to place a quarter in each bowls
Other activities included:
I found about princess “themed” story books at the $$$$$tree for the kids to read.
Coloring – found a princess book at the dollar tree (each kid gets a coloring page)
Craft – found these little board crafts at Target. They were 8 in a box for $3. I thought they were butterflies and other insects only but got them anyway. I got home, opened the pack to find out that they were “princessy” stuff, crowns, dresses, castles, and a couple insects like butterflies that can be found around castles were included. This was to be included in their “favor bags”.
I think it is funny that this little boy was way more fascinated and interested in the princess activities than the girls. Maybe because he was able to do them by himself without any help. The others were too young not to have help.
Kids got gold fish snacks packets for participating in games (and some went into their favor bags, too)
Food:
Pizza, Vege tray, Strawberry and Grape Kabobs, Raspberry Punch
Cakes:
Bought cup cakes from the store – and they game me some princess cake ring toppings. Got a couple other neutral toppings for the boys!
I added sprinkles to the cakes because they were colored but had no sprinkles. I also placed the cakes in little princess cupcake liners. (I wanted to make the cupcakes myself but thought, it was going to be too much to handle).
Castle cakes: I found tutorials via Pinterest. Basically, frost waffle cones and let them dry. Frost cakes. Place frosted cones upside down on cakes. Add more frosting to hold in place. Decorate castle cakes with desired colors and style.
Dessert Table and enjoying some cake!
Other dessert on the dessert table:
Cookies: Bought some cheap cookies at Jewel and frosted them. Tasted great with the added frosting. I had made cookie dough but had no time to make them so the dough is in the freezer right now.
Chocolate coated marshmallows: Pinterest idea – Place marshmallows on a stick, freeze about 15 minutes; melt pink candy coating or white chocolate with and add a little pink food coloring. Dip marshmallows in melted chocolate and add sprinkles immediately, if desired. Place on wax paper to harden.
Chocolate coated pretzels: Pinterest inspired – Melt pink candy coating or white almond bark chocolate coating and add a little pink food coloring. Dip pretzels in coating and sprinkle with desired sprinkles (I used) Place on wax paper to dry.
We also did a pinata – yes, I am Spanish! Just kidding, I lived in Puerto Rico seven years, though and had a lot of Hispanic influence:)
Hubby had to hold it up because the kids were to small to pull it down from a ceiling.
What’s in the pinata? Not your regular candy. We put healthier stuff for the little mouths, instead (granola bars, fruit snacks, and of course a few lollipops just because. We got granola without nuts just in case somebody was allergic to something.
Some of the gifts they got from their friends.
DIY birthday banners!
DIY “Thank You” tags made from $$$$ Tree: word strips and added craft ribbon. Well, I had to come up with something “fast” on the last minute! Didn’t get to do the other ones that I wanted to do (over planning again and cannot get everything done)!
Picture time! All in all we had fun but mom still learned her lesson about over planning with all the birthday decorations and too much stuff, that is really not necessary.
So that was the party and a lot of photos and craziness. But it was all worth it for those two little cuties and their friends!!
Printable Christmas Pre-School Worksheets for teaching the “Birth of Jesus”
Our little one (who just turned 3 years old last week) loves doing “school” work. So I created a few Christmas printables to go along with teaching the “Birth of Jesus” story throughout the month of December. They are nothing fancy but she loves circling, coloring, underlining, etc. so I made them for her. (Click here or click on the image to print).
I would probably try to find some visuals/charts to show along with the story. Visuals are great teaching resources for little ones! But if I cannot find visuals, then I would read the story from a toddler Bible or so and try to explain it in simple terms.
Here are all the worksheets to go along with the story. Some of them look like they are not evenly sized with the others – that is because they have white backgrounds instead of coloured. (Click here or click any image to print the set).
For the craft: A Nativity Scene
This one is super easy (the photo is a little blurry).
There are many great tutorials for nativity scenes on the internet. I decided to follow this link and use the simple tutorial and download the free cut-outs.
For the background: We would use brown felt or a sheet of brown poster board paper.
For the barn: We would glue Popsicle sticks on the background to make the shape.
For the characters (people, animals): We would use the cut-outs from the link above if we use poster board background or felt shaped animals if we use the felt background.
This person has no grass: But we would use some brown and green construction paper or felt to make strips of grass then glue around the barn. Will try to post an update once we get it done.
Nothing beats holiday cooking like a good potato side dish! Trust me, you cannot go wrong with this one. It is husband approved. You know you have made something delicious when “every once in while”, your hubby takes one bite of what you made and says “hmmmnnnnnnn”, keeps on eating, and then finally says, “this stuff is really good!”
I stayed home from church with the kids on Sunday because they are both sick with some kind of flu/terrible cough. Hubby went alone:( Our toddler really wanted to go to church but we knew it was best to keep her home with the way she was coughing nonstop. Anyway, I guess I had time to really make a good Sunday lunch. I feel like these past few months, we have been kind of “flying by the seat of our pants” with Sunday lunches. You see, we are always running around doing all kinds of stuff on Saturdays, shopping, family activities, kids fun activities, etc. Usually, by the time we get home in the evening, usually around 8 or 9 or even 10 at times, I am just to tired out and have a million and one thing to get done to even think about what I want to do for Sunday lunch. Not good, I know. But in my defense, Saturday is the one day of the week we can run around as family and do stuff together. So why not?? Then I am frustrated on Sunday night that I still have a million and one tasks to complete before we head out the door to work/student teach/babysitter on Monday morning. In addition, we are usually up 12:00 and 1:00 am trying to do stuff, laundry to fold and iron, kids clothes to get ready, lunches to be prepared ahead of time, etc. By the way, without fail, I never get to finish folding laundry and iron (if it happens) until somewhere around Tuesday evening…ahhhhhhhhhhh
Anyway, this past weekend we stayed home all weekend. A first in many months! Our minds were relaxed and we could actually think straight. It was good for the family and for the kids, though, because they were not and still not feeling too well. Needless to say, I had time to think up a good Sunday lunch:) Oh the benefits of settling down! So I made this potato recipe and served it with baked chicken and steamed mixed veges. It was truly delicious!
Homemaking Wednesdays: Simple Home Decorating On A Budget
We bought our first home last year in September and moved into it at the beginning of October, 2012. However, with a 2 year old daughter, a new baby in December, a mother-in-law who lived with us for a while, and everything going on, home decor had to be set aside. At least we had our home renovated before we moved in so it still looked very nice. In addition, we had our new couches, beds, and every piece of major furniture and necessary kitchen equipments. In the past, we have always rented and used hand-me-down furniture, Craigslist, or Thrift Store furniture:)
But we were able to set aside some money, last year, to make a few new purchases for our new home – yea!
And we were finally able to make a little progress with decorations this summer (about 11 months after we moved in). Somewhere around the month of June, my hubby looked around and exclaimed, “Men, this house is really plain; we need some decorations around here!” That is all I needed – a cue and hubby’s approval – and of course money and time to get to it!
I tried to find decorations that would look nice but cost little and seem durable. I went to Kohls, K-Mart, Wal-Mart, Ross, Big Lots, and a couple other stores that are not too pricey. But the colors just did not seem to compliment. As you may be able to tell from the photos below, our living room, kitchen, and dinning area are painted with different shades of orange (not too bright). I forgot what the names of the paints are called – but the entire compliment is very warm and welcoming, especially with a lit candle!
Finally, one day we were driving around shopping, and my hubby noticed a Family Dollar store not too far from where we live. I know we must have seen the store there before but I guess we never paid much attention until then. I jumped in, and sure enough was able to find some decorative Wall Art stuff (see living room photos below). By the way, it was the only matching pair of that color left. I thought great – the leaves and the colors will blend in really nice! I guess my home has a taste of Fall all year round:)
So here are a few snap-shots of what we have done so far – mainly wall decor with a few other touch-ups! I tried to take photos that does not expose too much of our home. Sorry about the quality of the photos – camera problems:(
Foyer Area – front door/entrance to the Laundry room/Garage, etc.
Living room area – Curtains, lamps, and wall decor……….. The photo with the black frame has the same kind of leaves as the first two photos. They are a matching set (I found those at Family Dollar not Dollar Tree (Dollar Tree Decor do not last).
The curtains (I have a Fall leaves one that I really like for the dinning area, but this same color below in the dinning). See an example of what it looks like when I put it up here in this link or below I copied a photo of it.
Kitchen Walls – with coffee photos (Below)……….. They are not crooked; it is just the angle from where I was standing to take the photos that makes them look crooked!
A Touch of Fall on on the breakfast table (below)…………
Dining room area with bookshelf – Our old book shelf (was passed down to us from a friend). It decided to give-up after many moves throughout the years! We bought a couple other cheap smaller ones in between from Wal-Mart because my hubby seems to be forever collecting tons and tons of books. But from our experience, save the money and buy durable ones. We got our new ones from Ikea.
Our weekend review posts is up again today. I had not have a lot of free time to write them up these past few weeks.
This weekend we took the children to Royal Oak Farm in Harvard, Illinois. I never knew Chicago had country areas and even people that look and act like country.
My hubby gave me a little heads up that Illinois has many country areas and prairie farms and lots of land!
The farm is Christian based and they show that by the many verses and items on the farm. One of the many verse displayed.
On this farm, we picked apples (11 different kinds of apples are grown on this farm)!
Then the children took some photos…..
Feed the hungry goats
Played with the slides and other items for kids
Other Sceneries
A group of people singing country gospel song. Visitors really enjoyed this scene. They stood around just listening and having fun!
I am so happy to have Tammy over at creativekkids share a post with us today. Tammy is a dear friend and one of our Pastor’s wife at our church. Her youngest daughter, Kiley, and my oldest go to the same 2 year old nursery at church. Tammy is such an encouragement to me through this blogging journey and I am just amazed at how fast her own blog is growing. In fact, when I discovered, through facebook, that she had a blog, I was estatic and could not wait to read her content and she what she had to offer. I said to my hubby, So far, I have not been disapointed, yet! So check out her blog at creativekkids where she shares daily activities her creative kids have done, yummy recipes, DIY’s, etc. I am confident that you would not be disappointed!
However, I wanted to write how I save money in the house. One way we save money is by decorating our house ourselves. Now our house is not a Martha Stewart house. It would not be featured in Good Housekeeping. But it is a house that has to be lived in by 7 people: 5 under the age of 10 plus I babysit 3 children as well as host Sunday School parties and other functions. Therefore, I want a house that is kid-friendly, low maintenance, yet still looks nice.
One way I have saved money is by making all the curtains in our house.
I know that not everyone can sew, but if you can, curtains are some of the easiest things to sew! I do have help with my mom as the tutor, but if you just want to do sheers that you can drape, then it would consist of hemming two edges! Another reason I make my own curtains is so that I can also get exactly the colors and design that I want.
The last major room make-over we did was when we switched all the kids’ bedrooms. We put our two oldest girls in a new room, and let them pick the color. I told them that I would make strip quilts for them, so we first went to the fabric store to pick out the material. Of course we went when the material was 40% off and I had an extra 10% off coupon. Woo-hoo! I bought material for both quilts as they will be Christmas present; but if you sew a lot, quilts can be very economical if you use your scraps or find material at garage sales. My mom will use a sheet that she gets on clearance or at a garage sale for the back of the quilt.
We took the material with us when we bought the paint so that we could get the right color. We painted the room ourselves, and the girls were able to help as well which helped them take ownership for the room.
The girls helping to paint their room.
We wanted to give the girls loft beds so that they would have their own personal space under the beds. My oldest needs to get away from the little brother and sisters at times and have some peace and quiet, so we were hoping that this would give her that space. One loft bed had been given to us, but we needed another bed. The only problem was that we needed one that was a shorter length than the normal size so that it could fit in the corner that we wanted it to go in. We were not able to find anything that was the right size, so my husband made one out of 2″ x 4″ pieces of wood (and other sizes as well.) Then he painted it. It is very sturdy, and only cost the price of wood and hardware!
The bed my husband made
We had a little loveseat given to us that folds out into a twin bed for their cousin or friends that will sleep over. It doesn’t really match–but they don’t care! Kaylin will curl up on the loveseat and read a book.
I wanted them to be able to decorate above their bed a little, so I went online and ordered a few sheets of vinyl. I had bought a little cricut at a garage sale for $15 for the crafting that I do, and I had bought two cartridges at a different garage sale for $12.50 each. With that little cricut and those two cartridges, we cut out their names and some flowers and dots. (Their quilts have flowers or dots.) Then we went up on their beds, and they helped decide where they wanted the flowers and dots to go.
Putting the vinyl clings on the wall.
They loved it partly because they were able to help in the work and the decision process!
The curtain that was made out of a sheet.
I just took a full-size sheet that my mom had given me and made a curtain that will hide the bottom part of Kaylin’s bed. The sheet had a rip on one side, but it was great for what I needed it for. My husband cut a piece of rod that he had and somehow made it fit perfectly from one end of Kaylin’s bed to the other. I sew–he saws!
Half of the front of Karis’s quilt.
I am still making the quilts, and then I will make curtains with the left-over material. When those are made, the room will be complete!
I have found that if you expect the best and the niecest, that that is what your kids will want. But if you are happy with the little things and take pleasure in doing it yourself, so will your kids! Of course, there are many ways that you can decorate a room, but it doesn’t have to break the bank.
If you are looking for a new way to decorate or you want to spice up a room, go to thrift stores and garage sales looking for bargains! Go to craft stores at the end of the season when they mark everything down 75%-90%. Look on pinterest for upcycling items. I have started boards on reusing jeans, t-shirts, and towels!
If you don’t think you are good in those areas, bring a friend along who is. I do not think I have a great eye, but my mom and her friends do. They go garage saling with me, and they will see a wreath and say, “Oh, yeah, we can totally remake that!” Then we do a craft day, and they all will come over and bring down our bins of flowers, foilage, and wire, and get to work! By the time they are done a couple of hours later, we have beautiful new creations. As we are creating, we’ll hold them up, and say, “What do you think?” We’re all comfortable enough to give feedback. Sometimes it is taken, sometimes it is not–but we all had a good time. However, with their feedback, I get new ideas I would have never thought of.
So that is just a simple way that we decorated our older girls’ room. What are some of the ways you have decorated a room and not spent a lot of money?
Mix Baking Soda with Vinegar and watch your little one’s expression as they experience the magic of the foaming and fizzing action.
I first saw the idea of doing this with kids somewhere on Pinterest. I thought “why not just try it with our little one?” This activity is not new to me but it is to our toddler and it fascinates her. It sure did. This is our second time doing this activity. Her expression the first time we made it was priceless. However, I think I may have deleted that photo.
How to Make Baking Soda and Vinegar Experiment
You need:
Baking Soda
White Vinegar
Food Coloring (if desired, but adding it makes it more interesting for little eyes)
Get a bowl and some form of wide mouth jar or container. I used a Ball canning jar.
Place it in another wider and bigger bowl to contain the solution.
Measure about a 1/3 cup or a little more vinegar in a separate cup. Add food coloring of choice.
Add about a tablespoon of baking soda to the jar.
Pour the vinegar over the baking soda and and let the kids what what happens.
Colorful Baking Soda and Vinegar Experiment
Add to food coloring to the baking sod and vinegar experiment for a really cool experience. We decided to get creative and do a few different colors all at once. My daughter and I poured into a different jar at the same time. The second photo below shows when the fizzing stops and all the bubbles just seem to melt away:(
Be sure and add enough baking soda and vinegar so it can rise all the way to the top. When the foaming action stops you can add a more vinegar to the solution. It may foam up again. You can also add more baking soda and keep experimenting.
Baking Soda and Vinegar Experiment is such a fun activity for children. Have your tried it with your little ones before? What was their reaction?
Visit My Etsy Shop
Come check out my planners and printables to help you become more productive at home.


 We had a little loveseat given to us that folds out into a twin bed for their cousin or friends that will sleep over. It doesn’t really match–but they don’t care! Kaylin will curl up on the loveseat and read a book.


