Subscribe to stay up to date plus get 5 Free Home Productivity Printable Planners!
Home

Why I’ve Decided to Blog Less

Do you ever find yourself knowing you need to change an area in your life because you “no longer can” but you just keep putting it off? You keep pushing and pressing hoping that something will work out so you would not have to change it? Such is my situation. For too long I have let blogging be the center stage of how I do things. I know I needed a change but I just kept pressing on and pressing on. If you are a blogger, you know how great it feels to share your ideas with others but you also know that it is a LOT of work! I’m sharing some behind the scenes with you today about where I’m at with blogging and a change I’m making.

If you’ve been following along here for sometime, you may have seen how drastically my posts have gone down over the past few months, some intentionally and others unintentionally. A while ago, I evaluated myself and realized that every spare second I had free was been used to blog (either creating something for a post, taking photos for a post, editing photos for a post, typing a post, editing a post, or posting a post). If  I was not doing that then I was promoting a post on social media or browsing and reading others posts.

Blogging Less -

I’m often asked, “how do I blog with small children at home”. The truth is, it’s a struggle.

You may have heard the term, “mommy by day and blogger by night”.  While I may have not used this term, in so many ways it describes me. I cannot tell you how many times I’ve stayed up until the wee hours of the morning to work on the blog. I would stay up until anywhere around 2, 3, 4 am. Other times, I’d go to bed at 4 and woke up at 6 if I had a post I was trying to post that day. In fact, there were even some nights where I got no sleep at all. Literally. I’d be up all night, jump into bed at 6:am hoping to catch a few minutes of sleep before the kids woke up. That was not good at all. This was a while though because I’ve decided several months ago that “enough was enough”. I’ve taken back my nights and going to bed earlier. Rarely do I stay up even past 12:00 am. It feels great not to be staying up so late working on the blog. I have more energy and I don’t feel sluggish, depending on coffee to carry me through the day.

Along with blogging late nights, the kids naptime were used to catch up on the blog too. The girls are past the age of consistent daily naptime and our youngest have been giving up his daily naps for several weeks now. The girls used to do “quiet” time or rest time in their rooms but now with our son not napping, it is becoming a challenge. I’ve tried to get him to nap but there is literally no sleep. So he’s been sitting next to me catching a show or something on the ipad/phone but it’s not long before he wants to go see the girls. Two year old kids don’t quite understand the concept of quiet time, yet.

Those two main times were when I did blogging. Trying to blog when the kids are awake and up and about is next to impossible. I’ve tried it a few times when they were playing nicely but really did not get any where far. Five minutes before they’re calling or needing help with something.

As am mom of littles, I just cannot keep blogging two to three times weekly anymore. It was easier to blog when we only had one kid. She was the making of so many of my kids activities and family posts. But with two more littles added, it’s not easy to be consistent with blogging. I used to wonder how so many moms with small children were able to find balance, run successful blogs and even write books and all kinds of stuff. And why it is that I myself could not have a great balance that so many talk about. Why can’t my content be better? Why couldn’t I just get it together? Then I realized they had something (behind the scenes) that I did not have. It’s called HELP. More and more, I’m realizing that a lot of mom or successful bloggers have a ton of help behind the scenes: babysitters, blog helpers, parent helpers, etc. I’m totally not bringing down anyone, though.. I’m only saying that comparing our lives to theirs probably is not the best thing to do. I’ve tried to find that balance but things just keeps getting a bit more un-manageable with the changing needs of our little ones.

I’ve been wanting to make a change but did not know where to start so I kept pushing myself beyond unreasonable limits. Blogging gets addicting but it’s not a priority although I’ve made it so. My blog is not our main income neither is it generating any kind of passive income. I do it because it’s something I enjoy and I love sharing my little ideas with others. In fact, since I re-branded, things have not really gotten far along and I choose priority over blogging. In Evaluating myself and taking a break this summer has really been a turning point for me. It got me away from the blog some. It felt really great not to be “stressing” over it. And it was free-ing. But most importantly, it made me see so many areas I was neglecting and other areas where I was not learning and growing and this gave me the urge to make a change. As an example, sometimes I just want to read a book with a few minutes of quiet rather than having to always think blogging. There are other areas I’ve been working on but really getting no where because all the time goes to blogging. I get that it’s all about balance which apparently, I don’t have right now. Ps. It’s taken me about 5 days to finish this post and that’s with no taking and and editing photos.

News Flash: We’ve added homeschool to our plate for our little ones. We’ve actually recently started. Now that we’ve added this phase, I definitely don’t see any way I could try to manage it all. I have to send in progress reports for our first grader to the school program we chose and therefore, need to make sure the work is done in the correct way. It’s not hard work (video/books) but we do need to stay on top of things since we’re home. We’re so used to not having anything to adhere to on on the agenda.

So with that being said, where does that place the blog? I plan to blog less for now. I do have a bunch of posts in the making that maybe that I’ve already worked on and others I’m working on that I’ll post one a week or two weeks or … I really don’t have a schedule right now. But I do I know, I desire to work on content rather than just constantly posting for the sake of it. I still love you blog but I need to figure you out and find that balance.

I do appreciate your support in this decision and what you’ve always given. After all, readers help build your blog. If you are a blogger, how do you manage it all? Do you stay up late or do you have some additional help? What is your average amount of time for writing a post?

Decor & DIY

How to Create a Small Coffee Station at Home

Create a simple coffee station in your kitchen for easy, hassle-free coffee brewing and serving. Coffee drinking family fans will enjoy it.

How to Create a Small Coffee Station - at Home - Kitchen - At Home With Zan-

Do you enjoy drinking coffee? I’m not a heavy coffee drinker like 4 and 5 cups a day but I do enjoy a cup or two and I just love the smell of it so much. There’s nothing like the aroma of coffee coming through the house on quiet mornings, birds chirping, kids sleeping, etc. That’s not my reality though, haha! I usually enjoy a cup of coffee after breakfast, when the kids are playing ‘nicely’, and I take a moment to savor the taste and smell, sometimes with a to do list making in hand. Funny, I know. Remember our kitchen tour during this summer? You may have seen a little corner with our coffee station. While I was getting photos ready for this post, I read another post that it was National Coffee month and thought, “who knew”? How convenient.

It’s actually a coffee station along with tea and hot cocoa or just a hot drink station all together. And I have to tell you, this little corner makes coffee brewing so easy and hassle free. Everything is in one spot, in easy reach, and there is no running around in the kitchen trying to find a mug or a spoon or something other items for brewing coffee. We’ve had it for quite some time now and it brigs a smile when I see hubby enjoying it just as much as I do.

How to Create a Small Coffee Station - at Home - At Home With Zan - Feature

Creating a small coffee station is very easy. It does not have to be complicated to be pretty and functional. Here is what you’ll need:

  • A coffee maker (single brew or )
  • Grounded Coffee or K-Cups
  • Mugs
  • Cream & Sugar
  • Stirrers or spoons
  • Jars (for grounded coffee, cream, sugar, stirrers)
  • Tray or something to corral items
  • Coffee art or print (optional)
  • Flowers real or faux (optional)

Smaller Corner: Find a small corner on your kitchen counter that you could use to set up a coffee station. If the counter is already out of space, a small table or cart could be used instead. (We use a Keurig for daily brewing but when we have guests over or when we need larger amounts we simply bring out the bigger coffee maker).  Also, make sure where you choose does not see awkward to you. I first tried out the Keurig in another corner close to the pantry but it seemed awkward, way out of water reach, and was the chord/plug was showing since the circuit was a tad off the corner.  This little corner here seems to work really well.

How to Create a Small Coffee Station at Home - At Home With Zan-

Tray: I found a little try that I have dedicated to corral all things coffee making to organize that corner. I have tried other trays and sometimes no trays because what I had on hand was either too small or too big. I have a coffee mug holder that used to be in this corner too but it made it seemed too crowded. I’m all about un-crowded counter tops so the kitchen would not look so cluttered.

As I was typing this post, I realized that some of the items represent my husband. The Keurig was a birthday gift I gave to him a few years ago (smart wife, huh?). Hey, sometimes you got to give gifts that you both could use. The tray, I’d seen it a couple times in my search for something that was just the correct shape and size but skipped over them because they had handles and monogrammed initials. Not the look I had in mind. Then one day I decided to try it out (hubby’s name begins with A anyway) and I really love it, handles and initials and all. Like it’s the perfect little tray here.

How to Create a Small Coffee Station at Home - Tray - Cute - At Home With Zan

-How to Create a Small Coffee Station at Home - Tray - At Home With Zan-

Once you have a tray and all the coffee making items listed above, then set them up nicely. Start by placing the coffee (I have coffee and tea, cocoa, even cider) in one jar, too. And then add the other items in a way that makes sense to you. All done!!

-How to Create a Small Coffee Station - at Home - At Home With Zan-

How to Create a Small Coffee Station at Home - Cute Tray - Coffee Things - At Home With Zan -

Mugs: I’d like to add that though I set out these small white mugs, we usually drink from our favorite larger ones that are in a cabinet nearby. You’ve got to drink it from your favorite mug, right? The pretty mug you see on the Keurig below is just for the photo. I thought it made a cute display mug.

Creamer/Sugar: Also, I have raw sugar and powdered creamer in these tiny jars but we do use cold liquid creamers too. It has to stay in the fridge, though. And let’s talk about these cute little spoons just for the station. I thought of it all, or so I think.

How to Create a Small Coffee Station at Home - At Home With Zan

Note: As far as the Keurig K-Cups, we have not used them in a while. A friend once gave me the best advice that has been helping us same a few pennies. Instead of the K-Cups, we’ve been using a K-Cup reusable filler. Fill add to Keurig, brew, take out and wash, re-fill again for another brew, repeat. That’s why I have the coffee in a jar for the Keurig maker rather than the K-Cups. The filter is kept in a cabinet drawer right below (you may even catch a tiny shot of the closed drawer in some photos).

How to Create a Small Coffee Station at Home - At Home With Zan -

Additional decor could include a coffee sign (art or printable) and even some pretty fresh or fake flowers. I just recently made this cute 5×7 printable to add to the station. I could not decided what I wanted the sign to say so it took me a while to come up with something. I’ve seen lots of coffee signs and prints with funny sayings but I do love how simple and clear the message is on this one. Download it for free, Coffee Time Printable For Home, set your printer on 5 x 7, print and cut to fit the frame. Or use it as is if preferred.

How to Create a Small Coffee Station - At Your Home - At Home With Zan

-How to Create a Small Coffee Station at Home - Coffee Printable - At Home With Zan

And then of course, I added some roses from around our front yard to take some photos. Everything looks and tastes better when there are fresh flowers in view:)

How to Create a Small Coffee Station at Home - From At Home With Zan-

How to Create a Small Coffee Station - at Home - At Home With Zan - Feature

And that’s how simple and uncomplicated our small home coffee station is to us. It’s simple, pretty and functional and we truly love it.

- How to Create a Small Coffee Station at Home - At Home With Zan -

Do you have a coffee station set up at your home and what are your key elements for it? Has it been helpful for making and serving coffee?

Home

Orlando Vacation Part 2 – Visiting Disney World

Did you catch part 1 of the trip? I shared it in this post along with 3 free or low cost things to do in Orlando, FL. Orlando is a hotspot for vacations. But it can cost a ton if you don’t do a bit of research to find the savings. Today’s post is not so much about the savings, but I thought I would link to part 1 just in-case anyone was interested in reading.

Disney World - Dos and Don'ts When Planning a Disney Trip-

Orlando Vacation - Disney World - At Home With Zan

In the beginning of July, just before Independence Day, we took a small family trip to Orlando, FL for a week’s vacation. We’ve gone a few times in the past. Disney World was one of the places my hubby wanted to take the kids on this trip. I got to admit, at first, I was not super thrilled about the idea. Between Disney World Orlando and Disney Land California, we’ve visited around 4 times and all I could think about was the long lines, hot sun, and sleepy kids we had to carry around, every time. Personally, I did not find that much desirable. I know what you are thinking: “Isn’t Disney supposed to be the most magical place ever?” Why yes. But keep in mind the thousands upon thousands of people who visit in one single day. It means lines are long and wait time for activities takes a while. If you have tiny babies or tiny kids when you visit, you’ll have to plan it with the needs of the kids in mind. So while there are lots to enjoy, at first I was not up to it. But then I thought that the kids have gotten a tad older, is able to move around more, and might love it (by older I mean, 6 and 4 and one is still 2). In any event, once we started talking and planning, I welcomed the idea some more.  

Disney has four (4) Themed parks: Magic Kingdom, Epcot, Hollywood Studios, & Animal Kingdom. When ever we’ve visited in the past, we only did one theme park, the Magic Kingdom. This time around, we were able to visit three (3 parks) all in one day. Thanks to Disney World Orlando who provided us with tickets and for making this possible. 

Orlando Vacation - Disney -Tower of Terror - At Home With Zan

We were actually shooting for all four parks, but did not have the time to do so. We were already cutting it close by visiting three parks in one day but not getting there until noon, left no time to visit the fourth. I’ll share more about the ones we visited down below. But first, I’d like to add a few tips about Disney. I’m not a Disney pro by any means but because we’ve gone a few times, I’ve learned a few things I think would be helpful to anyone who’s never been and is planning a trip there.

Things to Do

  • Research About Your Trip and when might be the best time to go –  We’ve gone both during the summer and Fall and I can tell you that we prefer the Fall best. We have not gone during the Winter. But in the Fall, we loved that the sun was not too hot as compared to the summertime; we loved the gorgeous Fall decorations all around Disney; and most of all, we loved that the lines were not long. People crowd Disney on the daily so imagine how long lines could be waiting to go on a ride, to go see a show, or to go visit one of the princesses and other famous characters, etc. It could take all the way up to an hour, yes 1 hour’s wait! During the Fall, we were flying through the lines like nothing (5 to 20 minutes wait max). We loved that because we had small children in tow and they could get very restless standing in long lines.
  • Plan to go earlier rather than later during the day – It’s best if you go earlier in the morning and take your time exploring rather than going in the evening and find yourself rushing through the park and not getting to do all the things you wanted to do. I mean, it’s OK to go in the afternoon (we did this time) but it’s just way too much to take in while in a rush.
  • Wear comfortable clothing and shoes – It gets hot and the walks are long. This is not the time to be all dress-y dress-y. You want to be the most comfortable that you can. You’ll get a hint of how people dress from what we wore and from what others are wearing throughout this post.
  • Use the Fast Past option as much as you can – You’ll avoid standing in long lines. A Fast Pass is connected to your Disney ticket (the ticket is a small card) if you choose to use this option for any Disney event. There are usually two lines, one regular time and the other fast-er. You’ll scan your ticket (card) when you get to the Fast Pass line. The lines may be long either way but your wait time will be shorter than others if you have a Fast Pass. Fast passes will get you in sometimes between 5 to 20 minutes while without them, the wait will be 40 minutes to an hour. There is no additional cost to get it. But they do sometimes run out of it if too many people already have them. Or else what will be the use of it if you still have to wait behind a ton of people who already have them? If you go to Disney, inquire about the Fast Pass option.
  • Bring a stroller(s) if you have young children –  You can rent a stroller from Disney but if you want to save money, just bring your won. You can park the stroller outside of the buildings when you stop to go in for shows, etc.
  • Plan Lunch – It’s OK to bring quick fixes for lunch such as sandwiches, fruit, finger foods, etc. You can buy lunch from the Disney shops if you prefer. We’ve bought lunch in the past but I’m all about saving a penny. Whether you buy lunch or bring your own, be sure to include it in your day. You’ll need the energy to help you get through. Also, if you plan to stay through the evening, be sure to plan dinner sometime. The key is to eat and stay energized. Cranky and tired people don’t need the additional stress by walking around hungry. LOL!
  • Bring lots of additional snacks and plenty of water – Walking around Disney can cause one to be quickly de-hydrated. Fuel up with water and take a break to enjoy a snack here and there.
  • Bring a Camera (actual camera, phone, or whatever else takes photos) and take plenty photos all around the park. Don’t forget to pose with your favorite Disney characters for a photo or two. After all, you’ll want to have photos from Disney right?
  • Take Breaks – Apart from stopping to eat lunch you might be tempted to keeping walking all day long to get as much out of the trip as you can. But your little kids would not be able to keep up. Naturally, they get tired, hungry and sleepy, just as any other times. The added Florida humidity wouldn’t help the situation much either.  Do stop and take a break in a shady area so you and the kids can rest. There is no point in walking around to activities when everyone is cranky. Hey, even the parents get a little cranky, too.
  • Leave Before Closing – On a given day, thousands and thousands of people visit Disney world. The exit from the parks at the hour of closing is crowded. Let’s repeat that. The exit from the parks at the hour of closing is crowded. Everyone’s trying to get out of the parks and trying to take Disney shuttles and trains to various parking lots. The wait to get a transport is long because they can only hold so many people at once. This trip was the first time we waited just until before closing. It was not by intention – I guess we did not get to Disney until afternoon and probably was trying to get the best out of it and time just caught up with us. Not sure. But either way, do plan to leave before closing. We were at the Magic Kingdom Park which was closing at 10:00 pm and although we left around 9:15 ish – the exit lines were already packed with thousands of people trying to get out. If you want to stay as long as you can, it might be best to leave 2 hours before they close.

What Not To Do 

  • Don’t plan to visit all the parks in one day – Just don’t! Each park is huge and has it’s own unique set of fun and amusements and requires it’s own tickets. Although tickets can be combined and bought to visit all four parks in one day (more money, of course). But like as I mentioned, it’s best to buy separate for different days. The span of Disney itself is 40 square miles and although a small percentage of this size is undeveloped, four themed parks in one day is just too much. It’s so big that you cannot walk from one park to the next. You have to take a Disney shuttle (bus), or a Disney train, or a thing that looks like a train, or even a boat. Yes, a boat!!!! We’ve taken a boat to the Magic Kingdom twice before. Some people take a week to tour Disney.  Note: If you plan them all for one day, you’ll find yourself rushing, you’ll miss out on a lot, you’ll tire yourself and your family out, and you may not even get to do a few of them (you cannot save the ticket if you already bought it and used some of it for that day). That’s why I find it best to do one park in only one day.
  • Don’t let the negatives of Disney scare you – I mean, I mentioned above how the sun gets hot and the lines get long, but that does not mean that you cannot enjoy Disney. It just gets a little too much sometimes with very small kids. I have heard many people ask about going to Disney with small kids. We gone with small kids all the time. They may not always remember it but if you want to go and think you could handle it, then why not? Just try to use some of the tips and prep. It is a big event for sure.
  • Don’t Panic – plan well and try not to panic. Overall, Disney World is just one big magical type of amusement park that you really can’t find any place else. So if you go, try to make the most of it.

There are so many more dos and don’ts when planning a big trip to Disney World but I think I have covered some basics. 

And now, check out some of the fun things you can do at Disney from our photos from the themed parks below. We did not get to do the Hollywood Studios (all things movies,TV, music and theater). Hope you enjoy.

Epcot – Our first stop on the trip

This is the park where you’ll find global world attractions, under the sea attractions, outer space attractions and things of that nature. You can also meet certain princess in different “parts” of the world (meaning that they are in scenes that look like different parts of the world). We didn’t spend a lot of time at Epcot because we were hurrying to get to the Animal Kingdom and of course, the Magic Kingdom for the sake of the kiddos. We barely got to see anything and I don’t have much photos of it from inside of it at all – probably one:(( Most of the photos following were taken outside of it except the one with the fish.

Orlando Vacation - Disney - Disney Park Epcot - At Home With Zan

Orlando Vacation - Disney World - Epcot - At Home With Zan

Orlando Vacation - Disney - Epcot Park - At Home With Zan

Orlando Vacation - Disney Parks & Epcot - At Home With Zan

Orlando Vacation - Disney - Epcot - At Home With Zan

Orlando Vacation - Disney World -Trip - At Home With Zan

Orlando Vacation - Disney - Epcot Park - The Sea with Nemo - At Home With Zan

Orlando Vacation - Disney - Epcot Park - The Seas - At Home With Zan

Orlando Vacation - Sea Life Aquarium - Beautiful Reef - At Home With Zan

Animal Kingdom – Our second stop on the trip

We spent a bit more time exploring the Animal Kingdom than we did Epcot. This is the place to view so many beautiful and unique safari animals, scenes of nature (cool rocks, trees, waterfalls), and entertainment such as those of African musicians and dancers. Can you feel the Lion King coming on? Further down below, you’ll see what I’m talking about. We got on an opened vehicle (pictured further down) that took us around the Kilimanjaro Safari. It was like driving through a kind of fairy savanna viewing all of the beautiful animals and wonderful scenery. The kids were in awe. And us parents too (see the cool scenery down below).

Orlando Vacation - Disney World - Buses - At Home With Zan

Orlando Vacation - Disney World Fun - At Home With Zan

Orlando Vacation - Disney - Disney Park Animal Kindgom - At Home With Zan

Orlando Vacation - Disney World - Animal Kindgom Park - At Home With Zan

Orlando Vacation - Disney - Animal Kingdom - Rainforest Cafe - At Home With Zan

Orlando Vacation - Disney - Animal Kingdom - At Home With Zan

Orlando Vacation - Disney - Animal Kindgom - At Home With Zan

Orlando Vacation - Disney's Animal Kingdom -Parrots - At Home With Zan

Orlando Vacation - Disney - Animal Kingdom - Flamingos - At Home With Zan

Orlando Vacation - Disney - Animal Kingdom - Animals - At Home With Zan

Orlando Vacation - Disney Land - Animal Kingdom - Interesting Rocks - At Home With Zan

Orlando Vacation - Disney's Animal Kingdom -Interesting Animals - At Home With Zan

Orlando Vacation - Disney - Animal Kingdom - Birds - At Home With Zan

Orlando Vacation - Disney - Animal Kingdom - Upside Down Tree - At Home With Zan

Orlando Vacation - Disney - Animal Kingdom -Zebras - At Home With Zan

Orlando Vacation - Disney - Animal Kingdom - Zebra - At Home With Zan

Orlando Vacation - Disney - Animal Kingdom - Zebras in the Field - At Home With Zan

Orlando Vacation - Disney - Animal Kingdom - Very Interesting Rock Formation - At Home With Zan

Orlando Vacation - Disney - Animal Kingdom - Elephants - At Home With Zan

Orlando Vacation - Disney - Animal Kingdom -Brown and White Bulls - At Home With Zan

Magic Kingdom

This is the park that is probably mostly associated with Disney World since it was the very first one created. It’s where the “magic’ begins with all things enchanting! Meet your favorite Disney princess or prince or favorite cartoon characters. Go on rides, view 3-D Disney movies, experience live shows and parades, etc. In short, it really is a magical place to explore.

Every time we’ve gone to Disney, we’ve always only visited this park with most of the time taken to visit all the princesses (kids in tow) and Disney characters such as Mickey and Minnie Mouse and the other cast members of the show. My husband would sneak away for an amusement ride at one point but mostly, we’ll walk around take meeting and taking photos with the characters. And then in the evening, we’ll catch a parade. Overall, those were fun things but eventually, we’ve come to the point where we felt like we’ve always done the princesses so we wanted to do other things there. And that is what we did this time around. So on this trip, we did not see visit much princesses and characters since we got to this park late in the evening. I think we even forgot to go see the Mickey Mouse characters once we got to the Magic Kingdom because we were hurrying. We did see a couple of the princesses – the girls mainly wanted to see Cinderella and Belle. How is it we missed so many of them this time? What happened to Anna and Elsa? Ha!! Check out the photos we got below!!

Orlando Vacation - Disney - Train - At Home With Zan.


Orlando Vacation - Disney - Disney World - Summer - At Home With Zan

Orlando Vacation - Disney - Mickey Mouse Photo on the Ground - At Home With Zan

Orlando Vacation - Disney World Magic Kingdom - At Home With Zan

Orlando Vacation - Disney's Magic Kingdom - Buildings - At Home With Zan

The famous Cinderella’s Castle in all it’s magic

Orlando Vacation - Disney World - Disney's Magic Kingdom - At Home With Zan

Orlando Vacation - Disney World - Magic Kingdom - At Home With Zan

Orlando Vacation - Disney World - Magic Kingdom Park - At Home With Zan

Orlando Vacation - Disney's Magic Kingdom - Pretty Shops - At Home With Zan

Orlando Vacation - Disney's Magic Kingdom Park - Shops - At Home With Zan

Orlando Vacation - Disney's Magic Kingdom - Disney - Park - At Home With Zan-

Orlando Vacation - Disney's Magic Kingdom - Disney Park - At Home With Zan-

Orlando Vacation - Disney World Magic Kingdom - Merry-Go-Round Ride - At Home With Zan

Orlando Vacation - Disney's Magic Kingdom - Merry Go Round Ride - At Home With Zan

Orlando Vacation - Disney's Magic Kingdom - Merry Go Round - At Home With Zan

Orlando Vacation - Disney's Magic Kingdom - View - At Home With Zan

Orlando Vacation - Disney's Magic Kingdom - Park - At Home With Zan

Orlando Vacation - Disney's Magic Kingdom - Tangled Tales - At Home With Zan

Orlando Vacation - Disney's Magic Kingdom - Lovely View - At Home With Zan-

I’ve got to add, that the Disney characters are always so welcoming to the kids. They would talk to them and take photos as if they already knew them. So fun to watch the interaction. Princess Belle here was actually putting on a small show where the kids got to put on costumes on act out with her. I thought I had photos somewhere but cannot find them.

Orlando Vacation - Disney Magic Kingdom Park - Belle's Castle - At Home With Zan-

Orlando Vacation - Disney's Magic Kingdom - Princess Belle - At Home With Zan-

Orlando Vacation - Disney's Magic Kingdom - Princess Belle - At Home With Zan

Orlando Vacation - Disney's Magic Kingdom - Princess Belle's Castle - At Home With Zan-

Orlando Vacation - Disney's Magic Kingdom - Princesses Castle - At Home With Zan

Princess Elena

Orlando Vacation - Disney's Magic Kindgom Parkk - Princess Elena - At Home With Zan-

Orlando Vacation - Disney's Magic Kingdom Park - Princess Elena and the Kids - At Home With Zan

Orlando Vacation - Disney - Magic Kindgom - Park - Princess Elena - At Home With Zan

Orlando Vacation - Disney's Magic Kingdom - Princess Elena - At Home With Zan

Cinderella 

Orlando Vacation - Disney's Magic Kingdom - Cinderella and the Girls - At Home With Zan

Orlando Vacation - Disney's Magic Kingdom - Cinderella and the Girls - At Home With Zan-

Orlando Vacation - Disney's Magic Kingdom - Cinderella's and the Kids - At Home With Zan

Orlando Vacation - Disney's Animal Kingdom - Princess Cinderella - At Home With Zan

Late at night, we were able to catch the holiday (July 4th week) fireworks. I’m telling you, it really was a site to see. I got a few photos and videos (where are my videos) but they do not do the fireworks justice. We did not see parades this time but the evening parades and fireworks are really something to see!!

Orlando Vacation - Disney's Magic Kingdom - Evening View - At Home With Zan-

Orlando Vacation - Disney's Magic Kingdom - Fireworks - At Home With Zan

Orlando Vacation - Disney's Magic Kingdom - Fireworks at Night - At Home With Zan

Orlando Vacation - Disney's Magic Kingdom - Night Fireworks - At Home With Zan -

Orlando Vacation - Disney's Magic Kingdom - Fourth of July Fireworks - At Home With Zan-

Orlando Vacation - Disney's Magic Kingdom - Views - At Home With Zan-

Here is a 3-D show with Frozen from Cinderella’s castle. It came on night when we were on the way out so we did not see much. People stood in the streets to view it.

Orlando Vacation - Disney's Magic Kingdom - Frozen Show - At Home With Zan

Orlando Vacation - Disney's Magic Kingdom - Night Views - Park - At Home With Zan

Orlando Vacation - Disney's Magic Kingdom - Night Views - At Home With Zan -

My overall thoughts of Disney is way more than I could write. What I wrote is truly nothing compared to what you can truly experience if you plan well and spend a few days exploring. But I hope that it gave some insight of that Magical place if you’ve never been there and would like to go. I sort of wish I had all clear photos but evenings views are gorgeous too, right?

Orlando Vacation - Disney World - Disney's Magic Kingdom - At Home With Zan

Disney World - Dos and Don'ts When Planning a Disney Trip-


Have you ever been to Disney World before? What would you add to the dos and don’ts list? Please share in the comments.

Home

Orlando Vacation Part 1 – Three Free or Low Cost Things to do in Orlando, FL

In early July, our family took a small trip to Orlando for a week’s vacation. My husband had been crazy busy with work and work travels plus refereeing basketball and we needed some family downtime. So he planned a family get-away to Orlando Florida. We knew of some famous places we’d like to visit even before we left but others, we figured out while we were there. I’m sharing part 1 of our trip and three of the places we visited the first few days on the trip. Two of these were free and one was very low cost. If you’ve been to Orlando at all or know anything about it, you’ll already know that it is a very popular place for vacations with many different attractions and things to do. And you may also know that most things don’t come free. But there are some free and low cost activities you can do with your family that would not break the bank if you do a search to find them.

Orlando Vacation - Hotel - Homewood Suites - At Home With Za

We left home around 3:30 in the morning to catch our 6:00 am flight, with three sleeping kids in the making (6 and under). Hectic? Yes! But once we were on board a flight, they watched shows on the iPad and phones for a bit, then dozed off to sleep again. This photo is when we were coming back – not sure what happened to the ones on the way there. Maybe we were all too sleepy to think about it:) Anyway, it’s been a little while since I shared our family outings and travels (I used to share them weekly) so here are some photos from our this trip along with doing them for almost nothing.

Orlando Vacation - Airplane - Southwest Airlines - At Home With Zan

We traveled just before Independence day and spent July 4th exploring Wild Florida and Sea Life Aquarium. We’ve been to Orlando before but these two places were new areas to explore.

Orlando Vacation - Wild Florida Route - Wild Life Park - At Home With Zan

Wild Florida – Free Admission

We spent the morning of Independence Day exploring Wild Florida. It is a Gator and Wildlife Park that was free to explore from June 2017 until December 2017 in celebration of their 7 years of adventure. Wild Florida is home to some wild life creatures (various birds, snakes, goats, monkeys, zebras, etc.) and a swamp with a ton of alligators. The area span is not too big, like a mini zoo, and one can explore the entire place in just a couple hours. The park also hosts air-boat rides and animal shows during certain times of the day. It really was a nice little activity to do as a family, not so hectic, not un-usually hot and the walk around the park was do-able with the little kids. We did not do any air-boat rides (not sure if there was any that day either) and we did not stay long enough for the animal show. But we enjoyed exploring around slowly, seeing the animals, and the kids loved feeding the birds and goats and playing in the playground.

Orlando Vacation - Wild Florida - Wild Life Park - At Home With Zan

Orlando Vacation - Wild Florida Reservation - Birds - At Home With Zan

Orlando Vacation - Wild Florida Park - At Home With Zan

Orlando Vacation - Wild Florida - Wild Life Park - Deer - At Home With Zan

Orlando Vacation - Wild Florida - Wild Animals and Gator Park - At Home With Zan

Orlando Vacation - Wild Florida - Birds - At Home With Zan

Orlando Vacation - Feeding the Goats - At Home With Zan

Orlando Vacation - Wild Life Park - At Home With Zan

Orlando Vacation - Wild Florida - Park - Play - Wild Life Park - At Home With Zan

Orlando Vacation - Wild Florida - Park Play - At Home With Zan

Orlando Vacation - Wild Florida - Park and Play Area - At Home With Zan

Orlando Vacation - Florida Wild Life - At Home With Zan

Orlando Vacation - Wild - Florida - Park - At Home With Zan

Orlando Vacation - Wild Florida - Water - At Home With Zan

Orlando Vacation - Wild Florida Reservation - At Home With Zan

Orlando Vacation - Wild Florida - Park for Wild Animals - At Home With Zan

Sea Life Aquarium – Low Cost

Before we left for the trip, we had looked into a possible trip to SeaWorld. While we were in Orlando, we just could not bring ourselves to purchase these tickets so we looked into other options. We needed to find another aquarium since we had already told the kids we were planning on going to SeaWorld. My husband found an alternative which costed just a fraction of the price and so much smaller to tour. I’m sure, it’s nothing compared to SeaWorld as in the grandeur and fun, but we were OK with only seeing some sea creatures for a lower price.

Orlando Vacation - Sea Life - Aquarium Trip - At Home With Zan

Sea Life Aquarium is not very big and it is tucked in a little re-creative area with social shops such as Ben and Jerry’s. I had to mention Ben and Jerry’s because they have some of THE BEST ice-cream. I don’t have a photo to show the actual shop but here the girls are on the other side of Ben and Jerry’s with the Sea Life Aquarium in view.

Orlando Vacation - Sea Life Aquarium - Fun- At Home With Zan

Orlando Vacation - At Sea Life Aquarium - At Home With Zan

Orlando Vacation - Ben and Jerry's Ice - Cream - At Home With Zan

While there are not a ton of sea animals at the aquarium, there are enough for a smaller family event, especially if there are tiny kids involved. It was not crowded and our kids (and us) enjoyed looking at some fish, sharks, a hug turtle swimming and doing flips, and they also enjoyed touching some starfish.

Orlando Vacation - Sea Life Aquarium - At Home With Zan

Orlando Vacation - Sea Life Aquarium - Fish - At Home With Zan

Orlando Vacation - Sea Life Aquarium - Fish Tanks - At Home With Zan

Orlando Vacation - Sea Life - Aquarium - Fish Tank - At Home With Zan

Orlando Vacation - Sea Life - Aquarium - At Home With Zan

Orlando Vacation - Sea Life - Aquarium Visit - Fish Tank - At Home With Zan

Orlando Vacation - Sea Life - Aquarium - Sharks - Fish Tank - At Home With Zan

Orlando Vacation - Sea Life - Aquarium - Family Trip - At Home With Zan

Orlando Vacation - Sea Life - Aquarium - Star Fish - At Home With Zan

Between Wild Life Florida and Sea Life Aquarium, I’d say our day was fun filled with low or no cost activities to enjoy. Once we were back at the hotel later that evening, we chose to skip going back out to watch the fireworks. The kids were already tired so it was better to just chill with s’mores (I made) and watermelon, of course. It was the fourth of July after all:)

Cocoa Beach – Free

What’s a trip to Florida without going to the ocean? You just got to! Plus as someone who grew up with lots of oceans, I just had to. So we went to Cocoa Beach – a free activity (except for parking). It was about a 40 minute drive from the hotel we stayed at but well worth the drive. The kids had So MUCH fun!!!!! Especially our 6 year old daughter and 2 year old son. Our 4 year old little daughter was a bit skeptical this time around so she just played on the sand with sand toys. (I think the waves scared her a bit because recently, we went to a lake and she thoroughly enjoyed playing in the water – no crashing waves).  Here are just a few photos from Cocoa Beach. The water was beautiful, just the perfect temperature, and it was just a beautiful evening to be at the beach.

Cocoa Beach House - Orlando FL - Vacation

Orlando Vacation - Ocean

Orlando Vacation - Ocean View - At Home With Zan

Orlando Vacation - Cocoa Beach - At Home With Zan

So these are some of the free and low cost activities we did in Orlando while on vacation back in July. I’m working on Part 2 of the trip which costed us some but all in all, we do feel that it was a week of fun. . .  with some tiredness, too:)

3 Free or Low Cost Family Activities to do in Orlando Florida-

Have you been to Orlando on Vacation? Did you discover anything you could do for free or for a low cost? Would love to hear about them in the comments.

Decor & DIY

Home Tour – The Family Room

Hello guys, I’m back to share another room in our home with you today. I’ve shared the porch, the kitchen, and now I’m sharing shots from the family room. Along with the family room photos are my thoughts on how we feel about renting. I’ll share the images first and I’ll share a little bit of our thoughts at the end.

If you asked what my decor style is, I tend to love things that don’t look rustic. Everything I have ever tried that looked too rustic or farmhouse-y, did not last too long. They always made me feel like I needed to upgrade them for a smoother look. I do love things that are stylish but as you’ll notice, I have a bunch of random collectibles as I’m still figuring my way around this home. The one thing though is that you probably won’t see any rustic/farmhouse in our family room.

The green little room at the front, is very unfurnished. What you see back there is what has been placed there for a while, nothing more. I used to have a console table on the opposite wall of this bench but I’ve moved it to the dining room.

Home Tour - Hallway - Opened Entry - At Home With Zan

Home Tour - Corner - Hallway Shelf - At Home With Zan

You can see more of it’s emptiness from this angle. If you’ve seen some of my previous seasonal posts, you may have noticed this room decorated and furnished. Those things were temporarily placed in this room for seasonal purposes.  At this point, I have no idea what I want to do with the green room. When we first moved in, I had a plan which has long fallen by the wayside:(

Home Tour - Opened Room - Hallway - At Home With Zan

Home Tour - Front and Family Rooms - At Home With Zan

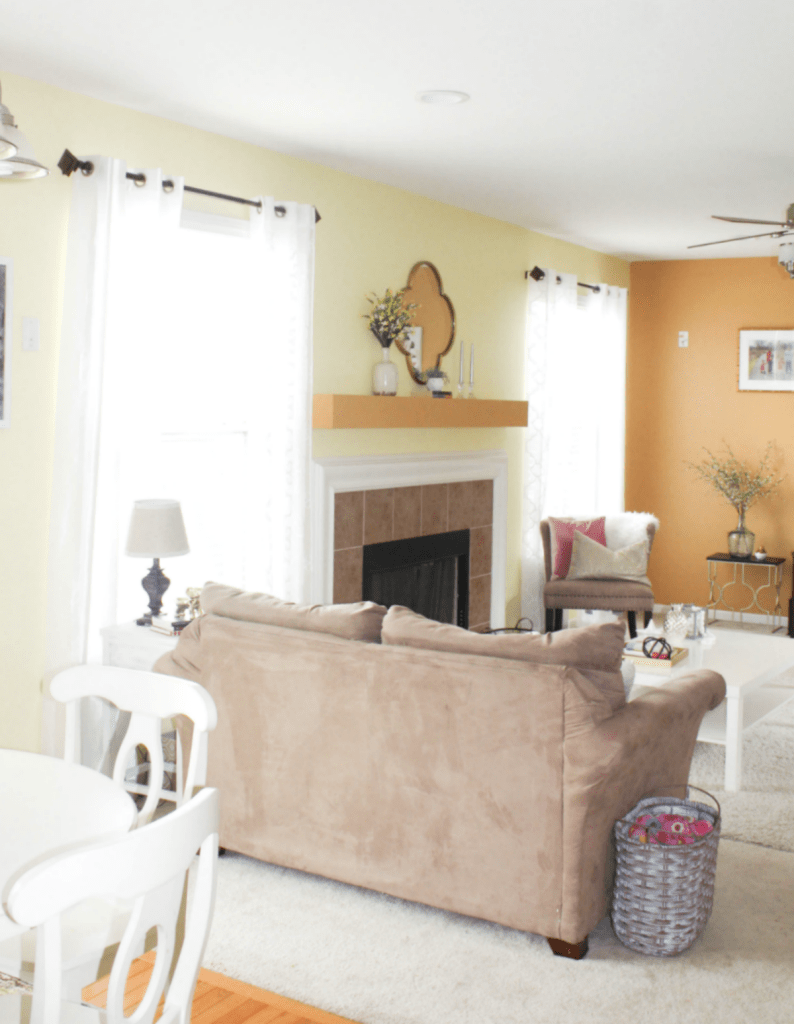
The Family Room – It’s very yellow and orange and I don’t like it (I’ll explain why below). But this is what it looks like.

Home Tour - Mantle - At Home With Zan

Home Tour - Coffee Table - At Home With Zan

Home Tour - The Family Room - At Home With Zan

Up until recently, the wall behind the TV was empty. I added a few pieces I had to spruce it up a bit but it is not exactly how I’d like to have it decorated. But for now, that is what it looks like until I figure something out. The cute end tables are actually side tables that I used to fill the sides of the TV.

TV wall - home

I’m still figuring out how to decorate around the mantle. I love the mirror though and it was such a steal at Target’s clearance.

Home Tour - Family Room - Mantel - At Home With Zan

Home Tour - Single Chair - At Home With Zan

This is the other side of the room leading to the kitchen. You can see the hallway at the back with a few doors leading to the bathroom, unfinished basement (which I sometimes forget about), the laundry room (behind the wall), and the dining room in the far corner.

Home Tour - Family Room - At Home With Zan

Home Tour - Couch and Pillows - At Home With Zan

I had this little play/books area set up for the kids here because when we first moved, they did not play in the playroom so much. They read and played a lot with the books and toys but the toys seemed to always end up in the walkway here so I moved it out. I recently moved it here again and the are always in it – and making a hug toy pile on the floor here. At least they play with it here rather than it being in the playroom plus it’s much easier to read when the books are in view.

Home Tour - Kids Play Corner - At Home With Zan

If you are interested in seeing the kitchen close-up with before’s and after decorated shots, you can click on this link. Find the post to the breakfast nook here.

Home Tour - Family Room & Kitchen - At Home With Zan

Home Tour - Couch - Kitchen - At Home With Zan

Home Tour - Family Room into Kitchen - At Home With Zan -

Thoughts after renting for a year already

When we first announced our move, some of you were eager to see what we would do with this house. Well, I’m here to tell you, we really have nothing much to show for it. This is NOT a pity post – rather a reality of part of why we have not gotten far along. After all, a home takes a while to create and if it is a rental house, then there is only so much so you can do. So without being too opened, here is the quick summary of our thoughts.

The Negatives (Quick Summary)

After we’ve owned homes, it’s taking us (both hubby and I) a while to get used to renting again. We rented town-homes and apartments when we were newly weds, but once we upgraded to buying our own home(s), it’s a bit challenging to go back to renting, especially a house. I used to wonder how others did it and thought I would never find myself doing this. In fact, I always thought it was a silly idea, until I found myself renting again. The saying goes, “Never judge a book by it’s cover” and it really is such a true saying. You never know why families make certain choices.

Organizing & Decorating: It’s only recently, I’ve started to feel like a couple areas are sort of coming together. For the past year, we’d had restrictions as to wall hangings, painting, and such. There is not much we could do about painting so the yellow (oh the yellow in the family room) and all the colors are staying but we have a bit more freedom to decorate the walls within reason.

I knew there are things we would not be able to do to a home while renting but at the same time, I do feel like you have to make a home yours whether you are owning or renting. Plus as an online influencer who loves sharing all things home, some things plus not knowing what to do for a while have put a stump on my style and on my blog’s growth. I’ve been trying to find my around and have been so out of it for quite a while. It’s also another reason why I decided to put the Spring One Room Challenge (ORC) on hold:)

Could I have inquired of these before moving in? Maybe so but you know, you don’t always want to be the nit-picky one, ya know. But like I mentioned, we have a bit more freedom now so I’ve been organizing some rooms to make them more functional.

The Positives (Quick Summary)

Lessons Learned: We are learning differences between owning and renting and learning is good for us. I’ve learned some new ways to get around (through trial and error that is) but it’s coming along. Now note that we are not too far away from things but just a little further than where we were previously. Given my personality, I’m always kind of frazzled trying to get used to know new roads but it’s coming along.

Area: The area is very pretty area and we love walking around the neighborhood. We’ve met some of the neighbours and even had of their kids in our home.

House: The house is large with lots of space and recently I’ve started to feel like a couple spots are somewhat coming together. Now that things can go on the wall (within reason) and I’ve gotten some organizational items, I’m slowly working to make a few rooms look more put together and for better functioning, of course. I’ve ordered online and bought so many organizational items from the stores recently that my husband says the neighbors are going to think we’re selling something:) Gotta to get organizing!!

Home Tour - The Family Room - At Home With Zan

Have you moved from owning to a rental? What are some of the challenges you faced? How did you deal with them?

Decor & DIY

Kitchen Tour

Hello friends, I’m sharing another area of our home that I have shared before in some seasonal tours – the kitchen. It’s definitely the heart of the home and since we’ve been here a little over a year, I thought I would share some updates (as in decor mainly, since we are in a rental). I also shared the front porch a few days ago which you can tour here.

Kitchen Tour - At Home With Zan

So we have a very brown kitchen, contrary to popular demand and all that white that’s going around. From the laminate flooring to the cabinets, nothing’s white and bright or high contrasted with (navy or black) as is the trend these days. But that is not a very good reason to not show it right? Since we are in a rental, there is nothing much we could do about changing colors and style, though. I’m just happy that the kitchen is big enough, has lots of cabinet storage, is not rundown, and is not dark as far as lighting. Most of all, we could happily prepare and eat meals in it! I’m sharing it as part of the updates since our move last year. You can tour the front porch here which I shared a few days ago.

This tour shows how the kitchen looked earlier this summer and now. The BEFORE photos were taken very early in the summer when I was figuring out what to keep on the counters. Generally, I tend not to keep too many big appliances on the countera coffee maker is good enough for me. While the setup and colours of the kitchen you see is the same, I have changed around and re-arranged the decor on the counter top since I took these photos. It took me a while to figure out how to set it up because there are so many options and ways to add a bit of style to the counters tops. But one trip to a favorite store solved a lot of my issues. Recently, I popped into Home Goods and got some cutting boards and a couple other kitchen stuff that I think look much better on the counter. They have already toned down the cute-sy stuff and brought out that kitchen feel (if there is such a thing). Sometimes it helps to spend focused time shopping to find what you need. These items shown i n the AFTER Photos and what the kitchen looks like now.

BEFORE And AFTER Looks of the Kitchen Decor

(While the after looks clean and minimal, I admit, I love the pops of colour more in the before photos – will need to add some).

BEFORE

Kitchen Tour - At Home With Zan

After

Kitchen - Tour of the kitchen - At Home With Zan-

kitchen Tour - Breakfast Table - At Home With Zan

As an example, this is the angle where I prep veges and fruits so it makes sense to keep cutting items here. But it just looked too cluttered in my opinion so I have switched things up a bit already.

BEFORE

- Kitchen - Tour - At Home With Zan -

Kitchen Tour - Coffee Station - Drink Station - At Home With Zan-

AFTER

Kitchen Tour - Coffee Station - At Home With Zan -

kitchen Tour - Bar - Plants - At Home With Zan -

All the beautiful flowers were part of our little kindergartner’s graduation so I decked out with some of them. How multi-colored is this one?

BEFORE

Kitchen Tour - Kitchen Decor -At Home With Zan

AFTER

Kitchen Tour - Counter -At Home With Zan

kitchen Tour - Cutting Boards - At Home With Zan -

This is the other side of the kitchen with storage on top that I just started using. I had some wall decor sitting on the floor in the dining room and I figured these shelves were empty so I might as well use them. You can get a tiny peek of the dining room from this angle. When I took the photos, the room was set up with left over decor and table things from our daughter’s Kindergarten party so I opted not to show it. It needed to be organized:)

BEFORE

Kitchen Tour - Our Kitchen Decor - Kitchen Office - At Home With Zan-

AFTER

kitchen Tour - Kitchen Island - At Home With Zan

This spot though, was just perfect for a menu board  – easy tutorial here. Find out how the pantry is organized in this post.

Kitchen Tour - Chalkboard Menu Wall -At Home With Zan

These bar stools are a recent addition. We bought some last year but they turned out a bit too tall and a little unsafe for the kids, so I returned them and got these ones. While I would have loved the fancy two colored ones (ya know), those things are not the cheapest. I had to tell myself, these are cute enough to fill the space. It’s not about who has the fanciest bar stools. My husband and kids love to sit on these and chat while I am in the kitchen. The kids also love to snack on them but because we only have two to go around 3 kids, sometimes they have to take turns or just sit on the table. The stools are adjustable but we find them too a little too high when we extend the legs.

Kitchen Tour - With Bar Stools - At Home With Zan-

kitchen Tour - Two Bar Stools - At Home With Zan

Kitchen Tour - Bar Stools - Metal - At Home With Zan

This little corner has become a catch all for all things paper, keys, and nick-nacks! I have been trying to figure out how to control this corner but it seems to be a favorite for all. Even the kids like to sit there and draw or make crafts.

BEFORE

-Kitchen Tour - Decor - Kitchen Office - At Home With Zan

AFTER

Kitchen Tour - Refridgerator - Oven - At Home With Zan

Kitchen Tour - Office Space - At Home With Zan

So this is the kitchen in a nutshell. You can catch more about the breakfast area in this post. I’m still working on how to set up everything (desk area included) but you know, things take time. I’m re-learning that a home does not get built in a day and the kitchen will come together in a way that we enjoy it most.

Kitchen Tour - Decor - Breakfast Nook - At Home With Zan -

Source List:

  • Bar Stools – The Mine (Formerly ATG Stores)
  • Breakfast Table and Chair Set – Amazon
  • Desk Chair – At Home Stores
  • Rug – At Home Stores
  • Food Storage Jars – Walmart
  • Utensil Holder – Marshalls
  • Keurig – Amazon

If you are interested, I’ve linked to several similar items below. You can check them out by clicking on each one.

Thanks for touring around. I had more images of each angle but had to cut some out due to poor image quality. I’m working on one more room for this series of tours. Hopefully, I’ll get it done soon and share some of our thoughts about renting.

Decor & DIY

Front Porch Tour & The Essentials for Decorating a Porch Beautifully

I also wanted to share some official home tours of our current house. Starting with the front porch. I have done seasonal tours and I’m not quite sure I want to call this one a seasonal tour, although this post may say otherwise. But we’ve been here a little over a year so I wanted to give an update of what things look like (decorating/organizing wise since we are renting and cannot do remodels). I don’t think I’ve given a full view of the porch before. Last time, I did a Fall tour but held back on showing the full front. Sometimes it takes me a while to build up courage to show full areas around the house.

-Summer Wreath - Spring Wreath - Summer Porch - Home Exterior - At Home Wtih Zan -

When I think about porch decorating these are the basic essentials that come to mind. Of course, things can be taken off the list and others can be added but I think these are some of the basics to get an inviting, pretty and comfortable look.

  • comfy chairs
  • cushions/throw pillows
  • small table
  • small outdoor or indoor/outdoor rug
  • small mat
  • planters (varying sizes)
  • pretty flowers and plants
  • door wreath
  • Optional: Additional decor and lighting such as porch signs and the use of lanterns

My porch decorating skills are not perfect but I think the porch looks good enough. On this tour, you may notice a lot of imperfections, but I do my best to make it look pretty and comfortable otherwise. You may note things like porch walls and light switches that need a good cleaning, small parts of the door frame that has chipped off, uneven bushes that needs a little trimming, rose bushes with brown spots, a couple cob-webs here and there (I’m always cleaning off those things) and other imperfections around here. Yikes, I had not realized there were so many imperfections until I wrote them out!

Note: I do clean and scrub our porch walls all the time but I think it needs a good paint job. By the way, don’t look at our porch plants too hard. I took the photos a couple days after we returned from a week-long’s vacation! So the plants had dried and needed watering to help them spring up again. And while we were gone, my husband scheduled someone to come out and mow the lawn plus trim the bushes a day before we came back. He usually does it himself but will have someone come over if he feels he won’t get around to it at a point. That thing grows fast! The lawn got mowed but bushes did not get cut. I guess there was some miss-communication. So my husband pulled out weeds and cut the bushes a bit a day or two after we got back. And I took some quick photos before they started growing back again. Anyways, Welcome! Hope you enjoy the tour:)

-Summer Wreath - Spring Wreath - Summer Porch - Exterior - At Home Wtih Zan -

Summer Wreath - Spring Wreath - Porch Decor - Potted Plants - At Home With Zan -

-Summer Wreath - Spring Wreath - Porch Decor - At Home With Zan

Summer Wreath - Spring Wreath - Porch Decor - Wicker Chari - Pillows - At Home With Zan

Spring and Summer Wreath - At Home with Zan

Summer Wreath - Spring Wreath - Porch Decorating - At Home With Zan -

Summer Wreath - Spring Wreath - Porch Decor - Porch Flowers- At Home With Zan

Summer Wreath - Spring Wreath - Porch Decor - At Home With Zan

I shared the tutorial for this lovely DIY wreath here. I just love the gorgeous colors, how they pop and how the wreath ties the porch together.

Summer Wreath - Pretty - Spring Wreath - Porch Decor - At Home With Zan-

Summer Wreath - Spring Wreath - Summer Porch Decor - Exterior - At Home Wtih Zan -

Summer - Wreath - Spring - Wreath - Porch Light - Porch Decor - At Home With Zan

Summer - Wreath - Spring - Summer Porch Decorating - At Home With Zan

Summer Wreath - Spring Wreath - Porch Decor -Porch Chairs and Pillows- At Home With Zan-

Somehow, the the padding on the bottom of these single chair legs got worn out. As a result, the legs have gotten a bit weathered and they are marking the walls with rust. I ordered some padding for them but they did not fit. I need to get the correct size of chair pads and I think I need to look into a small outdoor rug, too. So many things to think about!

Summer - Wreath - Spring - Wreath - Porch Decor - At Home With Zan

Summer - Wreath - Spring Wreath - Porch Decor - At Home With Zan -

Summer Wreath - Spring Wreath - Summer Porch Decorating - Exterior - At Home Wtih Zan -

Despite all the imperfections mentioned above, the porch is long enough and it is just a perfect spot to hang out! Especially in the early morning and early evening when the sun is not too hot. The kids will play there and I usually will sit and watch them (sometimes with a cup of coffee in the morning).

Front Porch Tour - Basic Essentials for Decorating a Porch Beautifully-

Source List:

Wicker Chair Set: At Home Stores

Small Wicker Table: At Home Stores

Round End Table: Walmart

Chair Cushions: At Home Stores

Tropical Pillows: At Home Stores

Blue Pillow – Thrifted

White, Purple, Silver cans: IKEA

Clay Planters/Plants: Home Depot

Lantern/Mat/: At Home Stores

Grapevine Wreath/Apple Blossoms: At Home Stores

I’ve linked some similar items below.

Thanks for viewing the front porch. I’m planning to share at least two more rooms for this tour. You can see more rooms here or by clicking on the home tour tab which I’ve recently added.

Home

Rose Petal Bath Salts

Long summer days call for long evening baths and relieving tired muscles with some pretty dried Rose Petal Bath Salts.

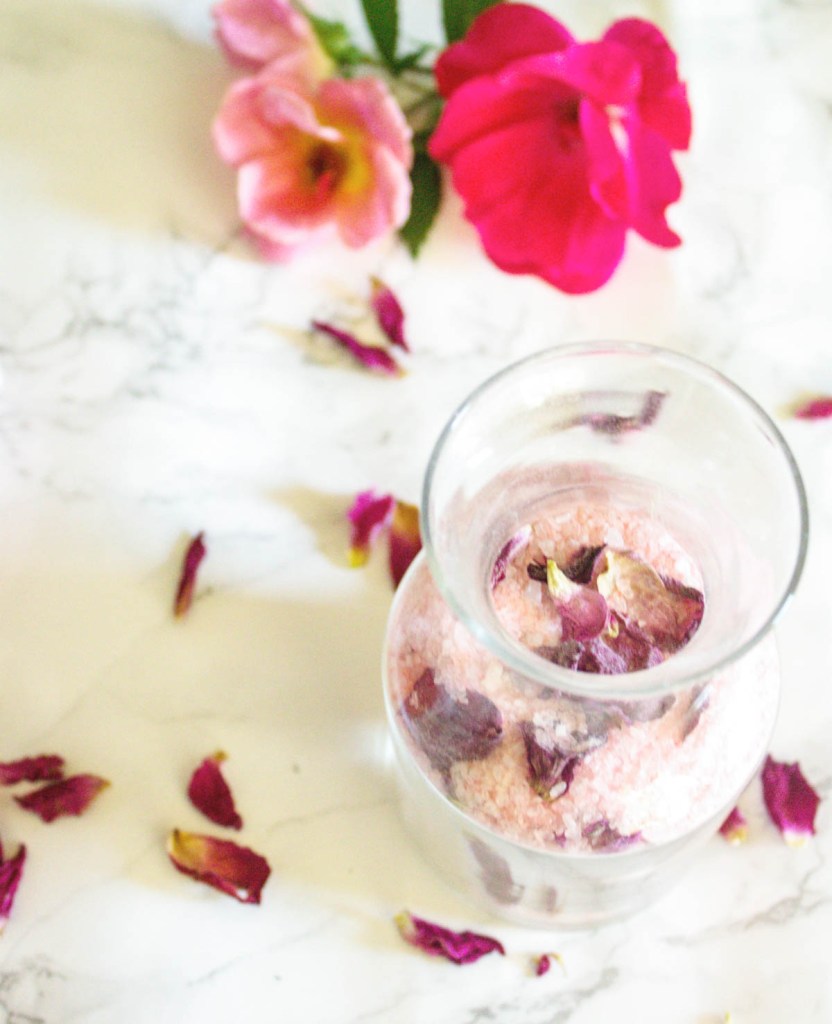
How has the summer being to you? If you are running around daily with work, kids activities, outdoor family events, or just working around the house during these warmer days, I’m sure most evenings you’re probably wanting to get a good soak in the tub. I know I do. I’m not always able to soak but when I do, I cherish the moment (even if it is only for about 15 minutes). I love adding bath salts to help relieve tired muscles. There are so many ways to add a personal touch to bath salts. I made this quick jar of bath salts using Epsom salts as my base and could not help but add some pretty dried rose petals to it. Also, I added a bit of food coloring to change the color.  It’s so pretty “in person” and so fun to add to a tub of warm water for a luxurious bath.

Dried Rose Petals Bath Salts - At home With Zan

Note: Not sure if Epsom salts are a good fit for everyone so check on that before adding to your bath.

Rose Petal Bath Salts - At home With Zan -

Another ingredient I love adding to bath salts is Essential oils. They come in various flavors and have various uses. Lavender essential oils, for example, is usually used to calm and sooth the body. I did not add any to this recipe but you can find my tutorial for lavender & rosemary bath salts here and winter skin care here.

Here is the quick recipe – Enjoy!

Ingredients:

  • 1 cup Epsom salts (double the ingredients for a larger batch)
  • 1/4 cup dried rose petals
  • A couple drops of pink food coloring
  • Optional: Drops of Essential oils

Directions:

  • Pour Epsom salts in a glass mixing bowl.
  • Add in food coloring and mix well until the desired color is achieved.
  • Stir in dried rose petals until all are combined.
  • Store mixture in a small glass storage jar.
  • Dilute in a tub of warm water before soaking.

Optional: Stir in drops of your favorite essential oils, if desired.

Rose Petal Bath Salts - At home With Zan-

This is so easy to make, beautiful to look at, and wonderful to add to a good tub soak. The whole family would enjoy soaking in this so making a big batch by doubling or tripling the ingredients may be ideal!!

Rose Petal Bath Salts - At Home With Zan -

If you love bath salts, check out my other creations by clicking on the following links.

Related Lavender and Rosemary Bath Salts

Lavender and thyme bath salts - At Home With Zan -

Winter Skin Care

winter-skin-care-for-dry-skin

Do you enjoy adding bath salts to your bath (if you have a tub)? What is one of your favorite flavors to use? Please share in the comments!!

Home

DIY Front Door Wreath (In 3 Quick Steps and 10 Minutes)

Hi friends, hope you are enjoying the summer! I’ve purposefully taken a break from blogging over the past few weeks to focus on home and family responsibilities. I also felt the need to grow and learn more for blog development. So many things to do sometimes. I just cannot do all things at all times, so I had to step away. It was needful. I am still working on learning new things and finding overall balance. I said ‘finding balance’ loosely because if you are a blogger and manage home, family, and maybe even an outside job, you already know things are not always smooth sailing. A few years ago, I could not understand why people said summer was so busy for them. After all, I was just always home with no kids in school. Now that our eldest is 6, has started school and the others are no longer tiny babies, we’ve been doing all kinds of outdoor activities. Plus we took a trip to Orlando which I have yet to post about. Hopefully, we can get back on a schedule soon.

Even though I have not posted for a while, I have worked on some DIYs projects for the home (and room tours), some of which to post about, of course and including this easy DIY Front Door wreath.

DIY Summer Wreath - Spring Wreath -Front Door Wreath - At Home With Zan

I’ve been wanting to create a wreath for our front door since Spring but so many areas in this house became a priority. Instead, I used a simple grapevine wreath I had on hand to hang on the door. But it looked a bit borin and non-summer-y. While I was out shopping for some greenery to spruce it up a bit or maybe even buy one that looked great, I came across these pretty pink Apple Blossoms from At Home stores and thought they’d be great for summer. The wreath took about 10 minutes or less to make. Seriously! And we could not be happier with how it turned out. My husband was rather impressed! Every time I open the door or walk up to it, this wreath brings a smile to my face.

Summer Wreath - Spring Wreath - Porch Decor - At Home With Zan-

Summer Wreath - Spring Wreath - Summer Porch Decor - Exterior - At Home Wtih Zan -

If you are looking for something easy for your front door for what is left of the summer, try this wreath – less than $10 and about 10 minutes. Or are you already looking into Fall? The stores are surely reminding us about it early. But I can’t help but let summer be summer. So while I may be late on the bandwagon with this DIY wreath, I still felt like sharing the tutorial. Hey, the colors are easy to switch off seasonally. So if you are thinking about Fall, just use Fall colors and you are going to be good to go!!

DIY Front Door Wreath (In 3 Quick Steps & 10 Minutes)

Materials:

  • 1 Grapevine Wreath (already had on hand but previously bought on sale for less than $3)
  • Pretty Artificial blossoms (I got Apple Blossom Spray on sale around $1.50 each)
  • Wire Cutter (or something similar)
  • Hot Glue Gun

Note: I made this quick wreath in the early evening when the sun was not so bright so you may see some slight darkness in the photos.

DIY Summer Wreath - Spring Wreath - Faux Flowers - Grapevine Wreath - At Home With Zan

Instructions:

DIY Summer Wreath - Spring Wreath - Faux Flowers - Faux Foliage - At Home With Zan

Step 1: Use the wire cutter to separate each blossom branch, (if needed) and to cut each one to desired size.

DIY Summer Wreath - Spring Wreath - Faux Foliage Flowers - At Home With Zan

Step 2: Take each branch and push it into the grapevine wreath.

DIY Summer Wreath - Spring Wreath - Faux Flowers - At Home With Zan-

DIY Summer Wreath - Spring Wreath - Grapevine Wreath with Faux Flowers - At Home With Zan

Step 3: Secure branches with splotches of hot glue, if desired. I did this to ensure the flowers won’t fall off.

DIY Summer Wreath - Spring Wreath - Faux Flowers - Gapevine Wreath - Tutorial - At Home With Zan

All done! Hang up your pretty wreath on the door.

DIY Summer Wreath - Spring Wreath - Faux Flowers - At Home With Zan

DIY Summer Wreath - Spring Wreath -Front Door Wreath - At Home With Zan

The loose blossoms are my favorite look on this wreath. Our front door looks so much prettier with the colors rather than with the grapevine wreath only. Once again, this wreath can be customized to match any season by using corresponding seasonal colors.

DIY Front Door Wreath - Spring Wreath - Summer Wreath - At Home With Zan

Have you tried making your own front door wreaths? There are so many easy ways to make them and all you need is about 10 minutes or less once you find the right pieces. I’d love to know your thoughts in the comments!

Home

Easy Summer Dinner Ideas Plus Mixed Berry Infused Iced Tea

This shop/post has been compensated by Collective Bias, INC. and The Coca-Cola Company, all opinions are mine alone. #ServeWithACoke #CollectiveBias

What’s better than a quick and easy dinner on a busy warm summer day? Nothing! My family loves enjoying good home-cooked meals together and while I lenjoy cooking, I’m always in for a good dinner short-cut.

Mixed Berry Iced - Tea with Gold Peak - Signature Chicken Dinner - Jewel Osco - At Home with Zan -

Whenever I’m menu planning, home-cooked dinners always take priority over take-out. But there are inevitable occasions when I don’t get around to making dinner at home. Some days I get caught up with other home responsibilities and don’t get to start dinner early. Other days, I may just be a bit exhausted to think about making dinner. Or we may be out and about running errands or just enjoying these long summer days. Skipping dinner is not an option because my family still has to eat. That’s when I start thinking about what is quick, tasty, and satisfying, without the dinner prep hassle.

On days like these, I’ve frequently asked my husband to make a quick stop by Jewel Osco to pick up one of their Coca-Cola™ family meals. Their chicken meal deal is a quick and easy dinner option without all the last minute dinner prep hassle. Basically, we chose our favorite flavor of Rotisserie Chicken along with our favorite sides (salads, mashed potato, Hawaiian rolls, etc). Dinner is on the table in minutes! There is no additional heating up of the kitchen during these summer days and no loads of pots and pans to clean up! But we can still sit down together to enjoy a complete meal because rather than snacking on empty calories. Plus there is something about sitting down together that makes food tastes better.

Gold Peak Tea and Jewel Osco At Home With Zan

Mixed Berry Iced Tea - With Gold Peak - With Complimentary Chicken Meal -At Jewel Osco - At Home with Zan

The chicken meal deal also comes with a large bottle of Gold Peak® to serve along with our dinner. Gold Peak tea comes in various flavors, tastes great and goes with everything. It’s perfectly balanced flavors complete our meal so well.

Note: Just a few days ago, we were in the midst of running errands and packing for a family vacation. I had no intention of cooking anything else after breakfast. I just did not have the time to prep, cook, and clean in the mist of this busy day. This chicken meal deal totally saved the day! We left for vacay with a clean kitchen!

Gold Peak Tea and Jewel Osco At Home With Zan

Gold Peak Iced Tea - Complimentary Chicken Dinner - Jewel Osco - At Home With Zan

But because it is summer, I decided to add some summer flavors to the Gold Peak tea to create something special for our family. I added in some berries, lemon juice, and a garnish of mint sprigs for a mixed berry infused iced tea. It was so tasty, so refreshing, and very easy to make. We can literally drink cups upon cups of it.

Mixed Berry Iced - Tea with Gold Peak - Jewel Osco -At Home with Zan

Mixed Berry Iced - Tea with Gold Peak - Jewel Osco - Lemon Juice - At Home with Zan

Mixed Berry Iced Tea - With Gold Peak - At Jewel Osco - At Home with Zan

Mixed Berry Iced Tea with Gold Peak Tea- Jewel Osco - At Home with Zan

Mixed Berry Iced Tea - Gold Peak Tea from Jewel Osco - At Home With Zan

Mixed Berry Infused Iced Tea

Ingredients:

  • 1 64 oz Gold Peak tea
  • 1 cup each of raspberries, blueberries, blackberries
  • 1/4 cup fresh lemon juice
  • Mint sprigs for garnishing

Instructions:

  • Pour Gold Peak tea in a large mixing bowl. Add 1/4 cup lemon juice and mix well.
  • Gently stir in mixed berries.
  • Divide tea among drinking glasses. Garnish individual drinks with mint sprigs.
  • Serves 8 – 10.

Note: You can also pour the tea in a pitcher and set out on the table for serving.

-Mixed Berry Iced Tea - With Gold Peak Tea - At Jewel Osco - At Home with Zan-

Mixed Berry Iced Tea - With Gold Peak Tea - At Jewel Osco - At Home with Zan

Mixed Berry Iced Tea - From Gold Peak - At Jewel Osco - At Home with Zan

This mixed berry infused iced tea was such a hit and balanced out the flavors of the chicken meal so well. I was so thankful that I did not have to cook and do additional cleaning during the midst of a busy day.

Mixed Berry Infused Iced Tea & an Easy Summer Dinner Idea

Do you have Jewel Osco stores in your area? Don’t hesitate to check out all the other delicious chicken meal deals and Coca-Cola meal pairings for those busy summer evenings when you do not get around to cooking at home. Your family will still enjoy a delicious meal without you spending much time preparing it. What do you think?

Home

How to Paint a Small Wooden Chair – Using Latex Paint

Every now and then when we needed a piece of furniture, I would check out the thrift stores to see if they had any excellent products for a very low cost. However, I just don’t visit thrift stores like I used to. Not that we have “arrived” or anything, but I’ve found that after a while, I tend to not like some of the thrifted finds I take home. Although, there’s still the occasional visit when something comes up. Back in the Fall, we were out thrift store hopping and I spotted this little chair at a favorite thrift store in the area. Do you all have savers where you are? They always seem to have some good finds (even though I may not always buy them). I thought this small chair would make a great accent seat or children’s chair. It only costed about $3 or $4 bucks and with some paint, it got a whole new look.

Chair Makeover - Painted White Chair

It was not a bad little chair at all. But it had some scratches that needed to be covered up. At first, I was not sure exactly what paint colour I should use so it sat around for a while. In the middle of painting a dresser for the girls’ room, I decided to use the same colour on the chair. So between the painted dresser’s drying time, this little chair got it’s new look.

I’m sharing a quick tutorial on how I painted it (and it was easy). By no means am I a furniture painting expert. In fact, I really do not have the patience to even attempt painting furniture sometimes. And many times I do (big or small), I find myself rushing to get the job done. However, taking my time to paint anything yields much better results as proven by this little chair.

Small Chair Made Over

How to Paint a Small Wooden Chair Using Latex Paint (Not Chalk)

  1. Choose type (Latex), finish, and colour of paint (If you’d like a different type of paint but are unsure of what kind of paint would work on furniture, you can always ask the guys at the paint shop). Also, get a primer, if needed or choose a paint already mixed with primer if you want to work faster. Tip: I love to choose paint that works on multiple surfaces. That way, I could use left over paint on whatever surface I desire. Also, I always choose outdoor/indoor and rust preventing paint all in one. If I take indoor furniture outside, I won’t have to worry that the paint will rust or wear out with the weather changes.
  2. Choose all painting gears (brushes, paint holder, plastic to cover the area, etc). Get some sandpaper if you will be sanding your piece before painting – you will need the correct texture, too. Don’t be afraid to ask the people at the paint shop for help if you don’t know about something.
  3. Clean your furniture and sand if necessary. I did not do any sanding for this chair since the primer and paint were going to do some great coverage. And it worked!!
  4. If you are priming first, then apply one or two coats of primer. Let the chair dry between each coat.
  5. Apply paint. I applied 2 coats of paint on this small chair to get this perfectly white finish. So far, the paint has not be coming off and the chair still looks brand new.
  6. I think I covered it all. Once paint has fully dried, simply style and use your small chair as needed. (I did not apply any sealer but that is always an option. I usually do whenever I paint something like decor (candle sticks, trays, glass jars, etc).

Note: When you are painting a small chair like this (or furniture), always start from the top and work downwards. The paint will be applied better plus it will prevent drips and spills from getting into what you have already painted. Here are the paint and primer I used.

Small Chair Makeover - Primer & Paint - At Home With Zan

Small Chair Makeover - White Paint - At Home With Zan

Chair Makeover - Black Chair

Here is the chair with primer. Since I did not do any sanding, I applied two coats of primer to get a good coverage of the black below.

Chair Makeover

Once the primer was dried, I applied two coats of paint and the chair was done (for the most part). I still had to do something about the metal parts at the bottom of the legs.

Small - Chair - Makeover - At Home With Zan -

And then I remembered I had a can of gold spray paint. I used painter’s tape to cover and protect the finished painted legs from getting sprayed with gold. Then I sprayed the legs and allowed them to dry. It’s a tiny detail but the legs look so cute with the gold accent.

Chair Makeover - Spray Painted - Gold
Painted Chair Legs - At Home with Zan

Small - Chair - Makeover - At Home With Zan -

Overall, I think the chair turned out really cute. I’m loving the smooth finish and the white would go with any kind of decor. I’m not quite sure where I want to use it yet since I’m still figuring out the set up of this house. But the chair currently sits in one corner of our little son’s room.

I hope my few painting tips helped a little if you are unsure about painting a small chair or small piece of furniture.

Pin - It New

How to Paint a Small Wooden Chair - Using Latex Paint - At Hme With Zan

Have you painted furniture using latex paint before? Do you have any painting small furniture tips you’ll like to add? Would love to hear about it!!

Affiliate links were used in this post. If you make a purchase through any of these links, I would receive a few pennies at no additional cost to you.

Decor & DIY

Small Bathroom Refresh With Modern Decor & Pretty Storage Accessories

This shop has been compensated by Collective Bias, Inc. and its advertiser. All opinions are mine alone. #MegaSummerRefresh #CollectiveBias

Our downstairs bathroom got some modern touches for a quick summer refresh and we’re loving it! It’s our most used bathroom in the house because it is on the first floor (AKA the hangout floor). Which means it’s not only used by us but also by those who visit. Since moving here, I’ve already added a shower curtain and organized this bathroom. That’s been such a big help. But the plain walls and vanity sink accessories were some things I wanted to change. In fact, recently I was taking inventory of how I could make all our bathrooms pretty and functionally organized (there are four full ones)! While I really wanted to work on our Master bathroom for this refresh, it made sense to try to finish one bathroom at a time rather than jumping all over the place, leaving things half-finished.

Small Bathroom Refresh - Modern Decor - At Home With Zan

For this summer refresh, I added a modern touch to what seem like a basic standard bathroom. Since this was not a remodel, all I needed were decor and storage accessories. When choosing modern decor to refresh your bathroom, keep these few quick tips in mind:

  • Clean Lines – Modern decorating takes on a clean approach. Lines are cut straight and spaces are generally neutral and opened to provide an airy feel. I know this bathroom is tiny and does not have an all out modern design, but it’s not far from it. I’m was only focusing on a quick refresh and not a remodel so ding my best to make it feel light and airy was key.
  • Less is More – Less is more when considering a modern approach to decorating your bathroom. A tiny bathroom do not need a lot of decor. The less ‘things’ you display, the bigger your bathroom would look and feel. Clutter could accumulate very quickly in a tiny bathroom. Think about creative ways to store necessities without making the bathroom feel over-crowded with nick-nacks everywhere.
  • Not boring – Modern bathroom decorating does not equal boring decorating. Add an accent towel or two, pretty storage, or some pretty flowers to add a pop of color and to brighten up the room. Think about your bathroom as a sanctuary or retreat after a long tiring day and use all things in moderation.

I found everything I needed for our bathroom refresh at Target! It’s no surprise! We’re ALWAYS there and during our many trips, I always see some fabulous bathroom decor that I think would really pull our bathrooms together. So I knew they’d have everything I needed to decorate and add some pretty functional organization to this one. I’m all about one-stop-shopping when I have three small kids in tow. It’s so much easier than having to load them up in the car and take them back out three or four times just to find what I need. I based the color pallet and patterns around the shower curtain, previously purchased at Target. I was not ready to change it out; it really is lovely. I tried my hardest to get the best shots – why are bathrooms so difficult to photograph, ya’ll?

Small Bathroom Refresh - Modern Decor - Modern Decor - Quilted Northern Ultra Soft & Strong - At Target - At Home With Zan

While at Target, I also picked up two packs of Quilted Northern® Ultra Soft & Strong Mega Rolls of toilet paper. Because what bathroom refresh is complete without toilet tissue? LOL! It’s the one bathroom item we always have to stock up on but it’s also the one item we tend to run out off (at least in one bathroom) before heading to the store. Every so often, we’ll have to grab a roll or two from one bathroom to use in another until that store run.

Small Bathroom Refresh - Modern Decor - And Quilted Northern Ultra Soft & Strong - At Target - At Home With Zan

Small Bathroom Refresh - Quilted Nothern - Target - At Home With Zan

During the summer, we are always finding ways to make things run smoothly so we can spend as much time in the sun as possible. But there are times we would be outside in the front or backyard playing and inevitably, someone would have to go inside to use the potty. And then I would hear a tiny voice saying something like, “mommyyyyy,  there’s no toilet paper!” That means, I’ll have to gather all the kids and take them inside or send a kid inside just to find an extra roll. Quilted Northern Mega Rolls are much more fuller than the regular rolls. Each roll is equivalent to 4 rolls in one. That means, you get more for your money plus less worrying about having to change the rolls ALL THE TIME. You may have remembered my post about Quilted Northern Mega Rolls here. Currently, we also have a family guest who tends to use a ton of toilet paper. And I’m not kidding! It’s one of the items I knew I would have to stock up on before she arrived. I actually bought an entire pack of rolls just for that guest bathroom and it feels great not have to worry about it.

Small Bathroom Refresh - Modern Decor - With - Quilted Northern Ultra Soft & Strong - At Target - At Home With Zan

Once I got what I needed from Target, refreshing the bathroom was pretty easy. It really helped that the bathroom was already organized with products from Target. Here is what I did:

Added a Piece of Modern Art and a Beautiful Wall Clock – I think this piece of art just had to come home with us. I walked the art isles a few times (not knowing exactly what I was looking for). I had picked up something previously but knew I should look carefully at least one more time. This framed canvas was exactly what I needed to pull the colors together. It was confirmation that the grey and gold pallet I was going for really works. Yes! It actually comes in a set of two. This one was by itself and one of the managers mentioned that someone may have taken out the other one (since it’s no where to be found). She sold it to me for half the price of two. I only needed one since the bathroom is already so small. Too much art on the walls would make it look and feel even smaller. The beautiful golden clock on the opposite side was another awesome find that compliments this piece of art and for telling the time, of course. The colors really blend nicely and pulls the room together well.

Small Bathroom Refresh - Modern Decor - Wall Art - At Home With Zan

Small Bathroom Refresh - Modern Decor - Gold Wall Clock - Gold Soap Dispenser & Toothbrush Holder - Target - At Home With Zan

Used Pretty Storage to Corral & Organize Items – This bathroom holds all things skin and hair care. It’s so easy to grab something on the way out rather than having to head upstairs, you know. We tend to buy at least two or more of whatever skin care product we need – one for our bathrooms upstairs and one for downstairs. It may sound kind of silly maybe but it saves us so much time when we are trying to hurry out the door, rather than having to go back upstairs to find what we need. The problem is that it can become unorganized pretty quickly. I’ve been using baskets to corral these products plus all the extras under the sink and glass jars for tooth brushes and hand soap on the vanity. I’ve been wanting to switch out the jars for something more “classy” and this toothbrush holder and soap dispenser set is exactly what I needed.

Small Bathroom Refresh - Modern Decor - Gold Wall Clock - Target - At Home With Zan

Small Bathroom Refresh - Modern Decor - Soap Dispenser Set - At Home With Zan

Small Bathroom Refresh - Modern Decor - Target - Quilete Northern Bath Tissue - At Home With Zan

Small Bathroom Refresh - Modern Decor - And Quilted Northern Ultra Soft & Strong - At Target - Storage - At Home With Zan

Changed out towels – It is amazing how changing out the towels in a bathroom could instantly make it look like a new bathroom. While I was changing out the towels in this bathroom, the kids walked in and said it looked like a new bathroom. I couldn’t agree more.

Small Bathroom Refresh - Modern Decor - Shower Curtains- Towels - Target - At Home With Zan

Small Bathroom Refresh - Modern Decor - Shower - At Home With Zan

Added Pretty Flowers – Flowers add instant beauty to any room. These are faux but the good thing is that the bathroom now has it’s own little pretty, at all times. I wouldn’t have to worry about changing it out every few days.

Small Bathroom Refresh - Modern Decor - Vanity and Vanity Lighting - At Home With Zan

Small Bathroom Refresh - Modern Decor - Pink Faux Flower - At Home With Zan


I also love mixing faux flowers with fresh. My fresh cut roses are from the yard. I placed them in a candle holder I also got from Target a while ago. It did the trick! Having a pretty and refreshed bathroom always gives me that desire to soak in the tub. Especially on those long summer days when we’ve been outside all day and I want to relax my tired muscles and have a good soak. I’m not the only one who love soaking in the tub around here. Even the kids love it. But a good soak is really not fun if the bathroom is disorganized and quite messy. It’s why I’m always looking for ways to make it clutter free and just the right place to relax after a tiring day.

Small Bathroom Refresh - Modern Decor -With Modern Decor - Quilted Northern Ultra Soft & Strong - At Target - At Home With Zan

Small Bathroom Refresh - Modern Decor - Gold Wall Clock - Modern Decor - Towels - At Hoem With Zan

If you’re stuck in a route not knowing how to make your small bathroom pretty and functional, I hope these tips would help you. Also, don’t forget to stock up on Quilted Northern Mega Rolls so you don’t run out of toilet paper all the time. And if you have guests and visitors during the summer months, you know you will need the extra. Download the Target Cartwheel app, to save 10% off Quilted Northern Mega Toilet Paper on Cartwheel 6/20-7/8. And if you buy 3 Packs of Quilted Northern Mega Toilet Paper, you’ll get a $5 Target Gift Card (valid 6/18-6/24.) Those Target gift cards really do come in handy.

Small Bathroom Refresh - Modern Decor - At Home With Zan

You can also check out these Quilted Northern character-inspired bathroom [Daddy Gator, Little Miss Puffy Tail & Sir Froggy] and vote for a chance to win a $1,000 Grand Prize or $250 Target Gift Card! Sweepstakes runs from 6/19-8/1.” Click here to vote.

#MegaSummerRefresh #Sweepstakes (6/19 to 7/31)

Pin - It New

Small Bathroom Refresh With Modern Decor & Pretty Storage Accessories - & Quilted Northern Mega Rolls -At Home With Zan

Could your bathroom use a little refresh this summer? I’d love to know how you keep things organized while still pretty in your bathroom.