Subscribe to stay up to date plus get 5 Free Home Productivity Printable Planners!
Home

Taming Shoe Clutter – A Simple Shoe Organizing Solution

Sometimes organizing an area of the home presents itself in the simplest form though it may have taken quite some time to figure that out. Something out of the ordinary. Such is the case of our organized shoes and winter boot wear in our entryway.  

Entryway organization - organizing shoes

I mentioned in an earlier post a few weeks ago about some areas in our home that needed organizing. I’ve gotten some of these areas under control but some of them still baffle me as to how to organize them. Our entryway though was on the list of areas to organize. It was in a constant state of disarray. Shoes needed a place to call their own. Finding a matching pair of shoes always took a few minutes. Kids jackets and winter coats were thrown over any spot they could find until a parent hang them up (the kids can’t reach the hangers in the closet). When they asked where to put their jackets, I would tell them to put it “there” or “here” until later. This system was not a functional system – it was rather frustrating and not so pretty.

Here is a photo of what the space may have looked like on the daily. I did not take a full photo to save some of the shoe embarrassment in the entry closet. The entryway is sort of split with the front room on the other side so that too was proving itself to be difficult to organize. But it needed to be done.
Entryway Disorder

In our previous home, I used a small basket for the kids to keep their spring/summer shoes in the entryway (which worked well). The shoe closet itself needed much help. I’m not a fan of flimsy shoe stands where the shoes seem to fall over the place. I chose to add a cubical storage system which solved a bit of the problem. I still felt that it took up too much room and the dividers tend to cut down on some of the shoe space. What did not fit in the cubical ended up in bins. When we moved here, I still used the cubical/bin system temporarily while I consistently searched for that ‘perfect’ shoe organizing system. When winter rolled around, I needed something that could also fit our boots and taller shoes. (I kept our Spring/Summer shoes in a bin and removed it from the closet area – we’re not wearing them now anyway). 

Many of the shoe stands (shoe systems) out there tend to be smaller side and not made for winter shoes. I’ve seen some DIY stands that seem to work but did not look like they would fit a few boots. I’ve also seen some fabulous customized shoe closets within clothing closets. I knew that was not an option – I just wanted something to keep our everyday shoes in the entryway neat. Something made of wood or that looked like wood (real or fake). Feeling a bit hopeless and not liking our entryway, I almost ordered a shoe stand (affiliate link) that probably would have been fine for smaller shoes but not for taller shoes. It looked like this one in the following image but taller with more stands. See how small the height between the stands are on this one – around 6 inches or so. Not even a foot. How I am supposed to organized boots on a shoe stand with heights so small? Maybe I should have DIY- ed something? (That’s not always possible).

Entryway Organizing shoe stand

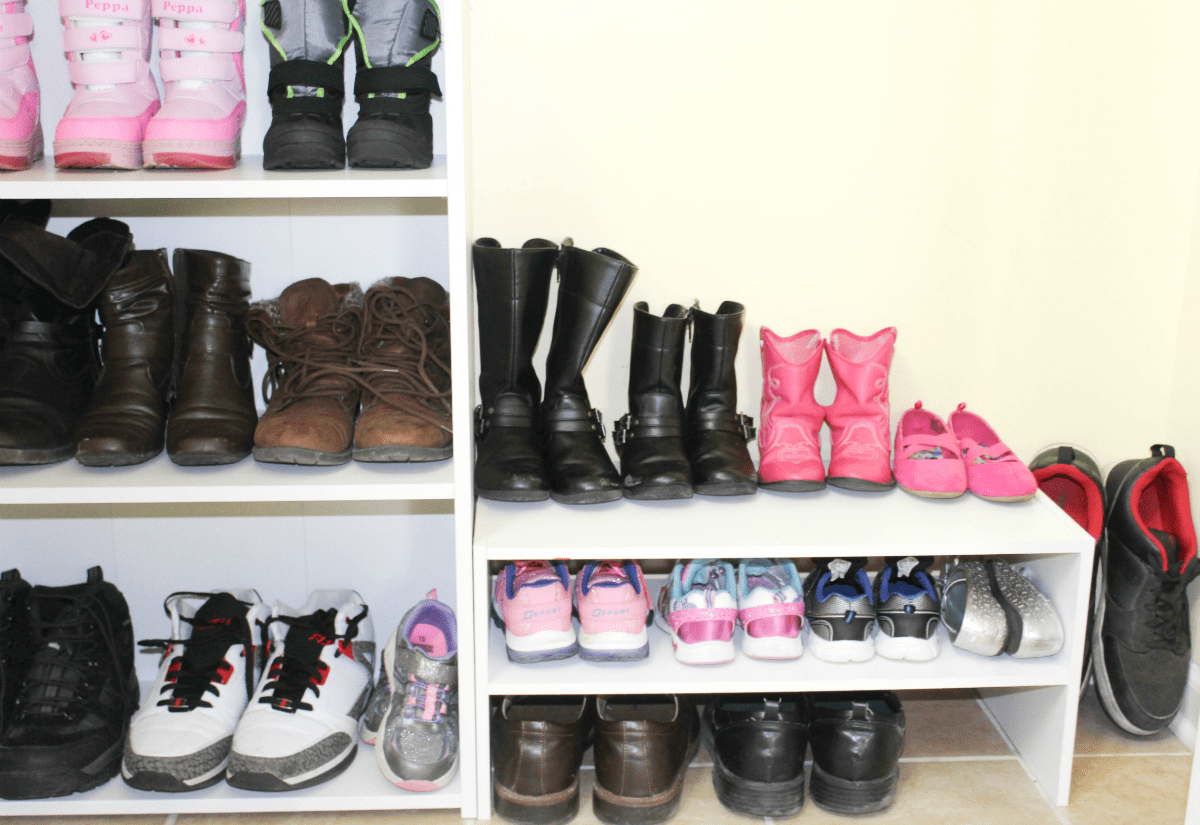
Anyway, I picked up this little one at Target for around $11. I figured I would use it as my tester to determine the exact height of the shelves and how the shoes would fit for smaller shoes. If it did not work out too well after I had already assembled, I could always return it or forgo the $11 and use it to organize something small. It fits the kids shoes well and about 2 -1/2 of my hubby’s bigger shoes on a stand (see how I placed a few of his under the stand). But the rest of our winter big shoes still remained unsolved.

Entryway Organization shoe stand

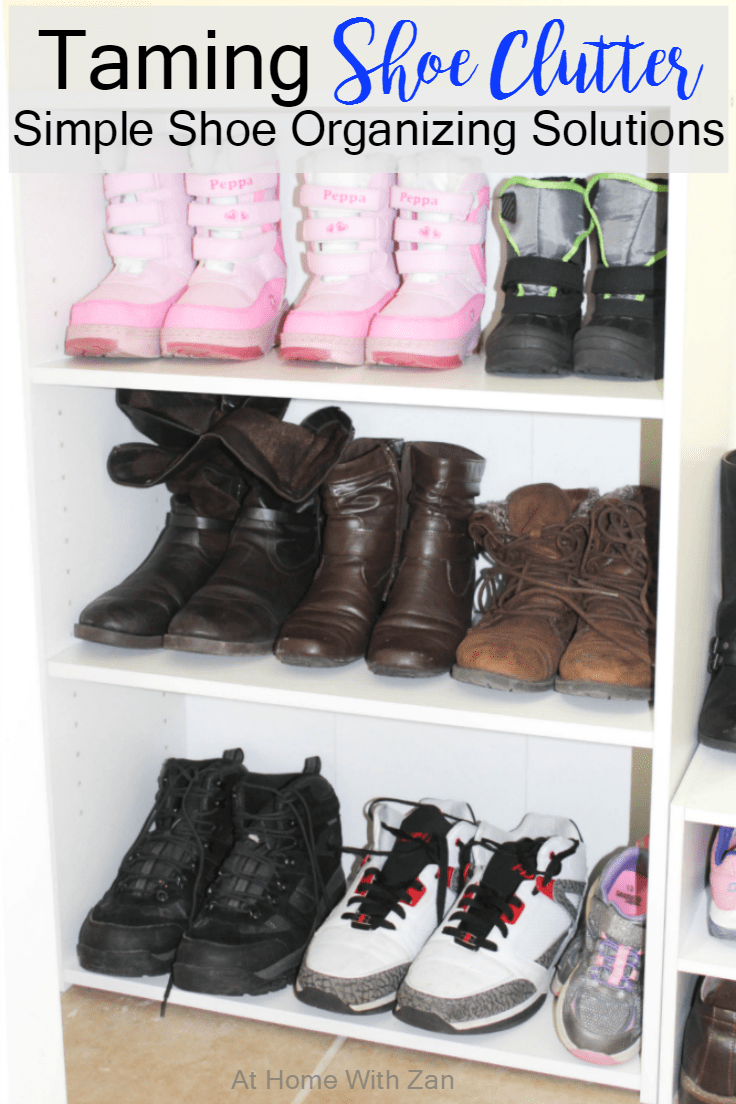
During my search, I decided a simple bookshelf may be my solution. I calculated measurements, I ordered this one from Amazon. It’s not real wood, it’s laminate. It’s a shoe stand substitute so I am OK with it being something less pricey. But it came in some pretty paper to protect the pieces and it only took a few minutes to put it together.

Entryway organization - with small bookshelf

And the problem for our shoes was solved especially for these cold weather type of shoes. The nice part about this is that the bookshelves could be adjusted. Note: Wet shoes will need to be dried on the front door mat first before placing on the stands. This is not all our shoes, but they are the ones we frequently throw on during the winter (everyday wear, some snow shoes to keep the kids feet warm, a couple sneakers, etc). It makes sense to only have them out and keep the other rarely used or seasonal ones in a bin. 

Here is the funny part. It’s being so nice and warm here it may already be time to rotate the shoes. Or maybe not?! When we rotate and put away the winter boots, the shelves will have more room for narrower shoes. Although we’ll still need to add the rain boots but those are are only kids and won’t take up much room. We’ll see how that plays out but for now, that’s the simple shoe solution.

Entryway organization - bookshelf for shoes

If you have a smaller entryway and need some shoe solving solutions, here are a few ways to go about doing so:

  • don’t chose anything just because it is labeled “shoe stand” – search around to see what is out there and what might work for your space 
  • think outside the box if you need to and don’t pressure yourself to have a stand that would not work anyway
  • stop looking at what everyone else has in their entryway and find something that will work for your family’s needs
  • DIY a customized shoe organizer if you need to (I didn’t but that is an option if you can)
  • rotate shoes so they are not out all at once making things more disorganized
  • once you find a solution, make it a habit to put the shoes back in place

Our solution is definitely the most swoon worthy organized shoe idea you may have seen. I used a cheap bookshelf and a cheap little organizer – both laminated wood. But I tell you, this has been keeping our shoes in place! Our entryway is no longer a place of sheer disarray. The kids shoes are so easy to find now and they are pretty good at putting them back in the exact spots. BTW: I didn’t necessarily dedicate a spot for each kid’s shoes but I guess they saw how it was first organized and just kinda went with the flow. I’ve even heard them claiming “their” shoe spot when someone else takes “their” spot. Well, at least they are wanting to put things back in place so that’s great. 

And the jackets and sweaters? I have a simple solution for those too. I am working on a post to show you how it all work along with the shoes. Again, not the most swoon-worthy but definitely organized and functional and no longer frustrating.

Entryway organization - shoes
Pin - It New

Taming Shoe Clutter Simple Shoe Organizing Solutions

What do you think of this simple idea to keep our shoes organized? Do you struggle with organizing your shoes? Then maybe you might just need a simple bookshelf or two:)

Home

End Table Makeover

I always love how paint can instantly transform things and give them a fresh new look. This little end table received a few coats of white paint and I am loving the ‘new’ look. It is cute, skinny and can fit in any little corner of the house.

Small table end table makeover

I don’t consider myself much of a thrifter like I used to be. In fact, it’s been a while since I’ve thrifted any kind of furniture. We were out browsing around a thrift shop and I spotted this table in a shade of brown for only $10. While I would have liked to buy it for like $2, I thought $10 was reasonable for such a sturdy piece in good shape. I was not necessarily looking for a dark brown table (not sure I was even looking for a table) but I took it anyway because there are lots of empty furniture-less spots throughout the house. You know, it’s easy to like the style of an item that we may see in store and opt out from purchasing it because it’s not in the right color. I have done that a bunch so I am speaking to myself too. But a little paint can do the trick. I am talking mainly about items thrifted or items on clearance such as this table. I knew it had some potential so I took it home.

Small table makeover - end table

Albeit, it’s one of those smaller projects that I don’t have all the photos to show. This was back in the Fall. I took photos of the original table and some during the makeover process to post about it but I must have deleted them. The inside of the drawer is what the table looked like before. It’s a sturdy piece made of real wood but it needed a little sprucing up. I chose to go with white to coordinate with two other side tables that I have also repainted a few years ago. 

Small table makeover

What I used: I love chalk paint and have used it in various colors on smaller decorative projects around the house. It’s easy to apply and gives a nice matte finish. I also love that it could be used as is or diluted a bit to thin it out to my liking. And sanding the item before is not necessary unless I want to. When I am at a paint store, I buy several small bottles of chalk paint in all colors and sometimes a large can like the Linen White for my every once in a while ‘larger’ project. I will also buy spray paints in a few shades too. I just like to have them on hand for when inspiration hits! I’m currently low on paint and have spotted a few smaller things around the house that I’d like to give a makeover. These were previously purchased from a local Home Depot but you can find the links to the exact ones at the end of the post.

What I did:

  • washed and cleaned the table well (sanding was not necessary for the type of paint used – think I skipped it)
  • removed the drawer 
  • painted the table white (2 coats)
  • painted the drawer white (2 coats)
  • taped the area around the drawer pull and spray painted the pull (Gold)
  • Let everything dry
  • I did not apply any wax

NB: I always work from top to bottom when I’m painting anything. It makes the most sense and will prevent paint that may drip from getting into areas that are already painted.

End table painted white

You may notice a little imperfection here and there on the table. I’m OK with it as I was not necessarily going for perfection although I still wanted it to look nice. The drawer pull itself has a small dent but I have not focused on changing it out yet.
Small end table makeover


End table makeover

If you could bypass the fact that my lighting for pictures may be poor in this area, then the table itself is a beauty. It does not really stay in this location (was only for the picture) because I have it someplace else. But I think it’s cute here too. 

Small table end table makeover

Here is where it was used originally. Don’t it look cute all dressed up back in the Fall? Seriously. It’s currently in another location as it is just so small and can be placed in any corner.

choosing-window-curtains-for-the-living-room

What do you think of the makeover? Do you paint furniture at all? I’d love to know your thoughts on what paint you use.

Pin - It New

End Table Makeover with Chalk Paint Finish - At Home With Zan

You can shop these paints by clicking on the following images (affiliate links) and have fun painting and giving your decor a new look!!
Affiliate links were used in these post. I will receive a tiny compensation if you make a purchase by clicking on any of these links at no extra cost to you.

Home

Budget-Friendly Valentine’s Gift for Classmates Plus Free Gift Tags

What is it about Valentine’s that make kids go all “crazy”? Well, I guess I can understand. Even as adults we find Valentine’s exciting. Maybe it’s the aspect of love? We don’t throw parties and do all kinds of stuff for Valentine’s but the kids enjoy doing some themed crafts.  And now that we have a little one in school, I know it would be exciting for her to take a small gift to her classmates for Valentine’s. I thought I would put together a simple gift idea that is ‘non-sweet’ and very budget-friendly and without including the extra sweet. I know you are probably thinking what is Valentine’s without sweet. Isn’t that the whole point? Well, while the kids won’t mind getting loads of candy from their friends, their parents may not always feel the same. So we are keeping things simple. We may even add a small tasty grocery store bought treat along with each pencil. 

Valentine's Day Printables

The Dollar Tree is always a favorite spot to find fun little gifts for kids. Isn’t it? Not to mention, many of the gifts are sold in quantity packs. It is definitely a one-stop shop for parents who want their kids to gift a Valentine to their classmates without spending a ton.

Valentine's Day Gift Idea

So with that in mind, I bought 2 packs of pencils from the Dollar Tree – $1 each per 12 pack. I mean, how frugal right? Those pencils don’t rot easily either. Our kids still have a few from what we bought last year. The girls love all things pink and purple so we bought some “just because”. The kids have been using them and they don’t fall apart when we sharpen them. They are a favorite; even I love the cute colors and fun decorations on them. So $2 for two packs of fun Valentine’s pencils enough for each student and some leftovers. It’s good to send in extras to make sure there are enough for everyone.

Then I created these tags to attach to the pencils with ribbon. I got the ribbon from Michaels Craft store for 50 cents each. I also needed to buy white cardstock paper since I ran out of it. I grabbed a few packs at $2 each (both all white and some colorful packs). I only needed a few white sheets for the tags but I love to stock-up and love having fun cardstock for kids art and other fun stuff. 

Valentine's Day Printables for Kids

I made 2 heart shaped designs and kept the saying simple with “Happy Valentine’s Day. I also created a heart within a circle that says “A sweet treat for someone sweet”. This one could be used both as a gift tag or a cupcake topper for other sweet treats. The hearts are a little over 2.5″ L x 2-3/4″ H and the circles are a little over 2.5″ L x 2.5″ H or a tad larger. So they are a bit on the larger side for one little pencil are a good size for larger items and may be a good size for kids who like to “hang on” to things like these. Download them here: Valentine’s Day Gift Tags.

Once the tags were printed out, I cut out each one, punched a whole, attached a piece of ribbon, and tied them around the pencils.

Valentine's day pritnables
Heart Printables for Valentine's

Happy Valentine's Day Heart Printables

Heart Printables - Happy Valentiens's
Valentines Day Printables and Pencils

I used a blue ribbon around the whiter pencils for the guys. Think some of them would want an all purple pencil? So fun!

Valentine's Day Heart Printables

Valentines Day Printables Hearts

I hot glued the cupcake topper to a popsicle stick and stuck it in a cupcake.Such an easy idea. Guessing that toothpicks would work for this too. 

Valentines Day Sweet Treat Cupcake Topper


Valentine's Day Cupcake Toppers

And there you have two really easy ideas that are so frugal. In total, this costed around $3 bucks (not counting the cardstock because I needed the pack anyway). If we add in an extra treat we’ll still try to keep things on the budgeted side.

Free Valentine's Day Gift Cards - At Home With Zan

How do you do Valentines for your kids classmates? Do you go all out or do you keep things on the simpler side?

Home

10 Organized Command Centers

I’ve got a tiny spot that I have been working on as a command center. It is already the landing spot for all things mail, kids art, papers to sign, etc. I’d like to think that it’s already acting as a command center – it just needs some organizing. It is a heavily trafficked area from the mudroom into the kitchen and from the hallway or living room into the kitchen. It’s also become a mini office for us too. I’m not quite sure if I’ll make it an official command center or an official mini office or organize the area better for a combination of both. I may even consider moving both ideas to other areas if I could come up with something but for now, that little area is operating as both unofficial tiny office/command center.

10 Organized Command Centers

Because I am in the process of organizing our small area, I thought it would be fun to peek at how others create their own. I’ve gathered a few from around the web that do not look crowded. This round-up is mainly for ideas and inspiration. Each one will look different in each home based upon the operation of each family. Though each of these little areas look differently, they all have a few basic items in common. 

  • Paper holders – So many forms of paper come through homes on the daily (mail, magazines, coupons, school papers, etc). Having something to contain them will help keep the area organized.
  • Clear Labeling – Labels give direction as to “what goes where” and keep things organized nicely. This will (at least in theory) keep the “junk” piles at bay. 
  • A Calendar – Calendars help to keep up with events, appointments, special dates, etc. Chalkboard calendars are becoming popular due to the fact that you can easily erase and rewrite on them. A large enough chalkboard may even be able to provide extra room for writing menus.
  • Bins or baskets – These are great for holding small items such as keys, phones, random little gadgets, etc.

Like me, you may already have an unofficial spot as a command center that may simply need a bit of organizing to make it more functional. Here are some inspirational ideas that I’ve gathered from around the web. Check them out and customize them to suit your family’s needs. Don’t try to make an exact copy because it may not be a good fit for the operations of your home. 

10 Organized Command Centers

Giant Command Center – Beneath My Heart

Giant Command Center

Hallway Family Command Center – Our House Now a Home

family-command-center-diy

Command Centeral Station – The Happy Housie

Command-Central-Station-Creating-a-Command-Center-in-a-Closet-at-The-Happy-Housie-24

DIY Family Command Center – Mom on Timeout

diy-family-command-center-project

Organization Basics – BHG

family-command-center-6

Kitchen Command Center – Domestic Imperfection

Kitchen Command Center

Updated Family Command Center – Hi Sugarplum

Organized Drop Spot

Command Center – Jen Wood House

command-center

Budget Friendly Family Command Center – Simple As That Blog

command_cntr13copy

Organization Family Command Center – See Vanessa Craft

Family-Command-Center

Do you have a spot like this at your home that happens to be the ‘main home operating’ center or are you in the process of getting yours organized?

Gift Ideas

Cool Watches for Men & Women and A Giveaway – JORD Wood Watches

Thank you to JORD Wood Watches for Sponsoring this post. All opinions of this product are 100% my own. See more of my disclosure policy here.

I love receiving gifts from my hubby. Don’t we all love it when our husbands shower us with gifts? In the past, I used to expect my hubby to give me a gift for every occasion and maybe non-occasion, too. There were times I would even jokingly tried to make up an occasion to receive a gift. Such as if I needed something new, I’d say something like this: “Well, I just spent the entire day cleaning; how about a little appreciation gift for all that labor?” And then I’ll hint at something I wanted to buy. Not that I couldn’t just buy it myself but it’s always more fun receiving a gift from the hubs, right? Wrong, not when I tried to make up an occasion for one. I always got “the look” from him and then it became a laughing matter afterwards. While this may have been funny to us, I have to admit that when it comes to buying me gifts my husband does a good job with his choices. I Especially loves it when he rolls out the jewelry and diamonds (hello upgraded wedding band for our anniversary a few years ago) and even other practical gifts that I can use around the home.

JORD Wood Watch Reece Series Golden Camphor & Khai - At Home with Zan

Although my husband buys me great gifts, I sometimes find it difficult to know what kinds of gifts to give to him. After all, it’s not always easy figuring what type of gift(s) a man would like and what types of good gifts are out there for men! I even feel like some of the gifts I give to my hubby recurs over and over. Often times, when I am stumped for gift ideas for him I would throw out sneaky (and even not so sneaky) little hints to get him to give ideas. At times I’d get the “I don’t really need anything reply” and other times I’d get a few ideas. Despite it all, I know he appreciates good gifts from me just like I appreciate the awesome gifts he gives to me. But for our anniversary back in December I couldn’t decide what to get him. I know he loves a good watch and was out of one for a while. It’s pretty much the only extra piece of jewelry besides his wedding band he’ll wear. So it was truly convenient (and I was delighted) when JORD Wood Watch offered to send me one of their beautiful timepieces. I knew exactly what I was going to put it towards – a lovely gift to hubby, of course.

JORD All-Natural Wood Watch

JORD Wood Watch carries an incredible selection of modern high quality wood watches for both men and women. I’d first become aware of these unique watches when I saw a few of them floating around on Instagram. I didn’t think I had seen a wood watch before so I was a bit curious and clicked over to Wood Watch. Once I hopped over, I couldn’t stop clicking around and checking out all the wonderful collection of watches. The colors, the faces, the quality, everything was just so eye-catching! They are 100% natural and are made from the best types of wood such as bamboo, sandalwood and maple to name a few. They are not going to chip away easily. Choosing a men’s watch was not an easy choice when there are so many competing options. Each one is so unique. I love this statement from JORD’s story:

“We are focused on creating timepieces that are modeled after a modern lifestyle. We value sustainability, efficiency, and experiential living. We make our watches for people who don’t just have somewhere to be, they have somewhere to go”.

Judging by the quality of the watch that my husband has I can tell that they truly hold up to their mission. We chose the Golden Camphor & Khaki watch. It’s well-made and has that two toned effect from Dark Sandal and Camphor Wood that were used for creating it. Just look at that finish!! We also love that it is splash proof and while it may not be wise to fully immerse it in water, it certainly will hold up to everyday general use. Another feature that we love about the watch is that it is mechanical so does not need battery. It truly is a cool watch and such a beautiful piece for any lifestyle.

JORD Wood Watch Eco-Friendly

Even the packaging it arrived in was well put together. It was securely packaged in this little wooden box and nestled between a tiny pillow. There was no way it was going to be damaged via shipping. There was also a cleaning rag and full instructions for using and taking care of the watch in a separate drawer at the bottom of the box. If that isn’t caring about a product you make then I don’t know what is!

JORD Wood Watch - Wooden Box

JORD on Pillow

Jord Wood Watches

JORD Watch

When the watch arrived it was a tad too big and my husband needed to remove one link. JORD had already resized it but we left an extra link to ensure that the watch did not arrive too small. When my husband went around trying to find a watch repair shop or jeweler to remove the link, no one wanted to do it. One jeweler claimed that it was “a special” watch so he did not want to ruin it. He eventually took the link out without any problems and the watch is a perfect fit. It is really is an awesome timepiece that we love!

It’s been a while since my husband has been on the blog but you can see him checking out and wearing his new watch. He is super conscious of what he wears and this watch looks really great with any of his outfits, casual, formal, or informal. And as a college Vice President and Dean of Students, he kinda needs something to make him look awesome when he goes to work. Especially in the busy city of Chicago, keeping up with the “time” is important. It’s great to have something that is well-made, all-natural, and Eco-friendly all at the same time. Think I need one – maybe I’ll throw in a few sneaky hints to hubby?

JORD Wood Watch for Any Lifestyle

JORD Wood Watch as a Cool Gift

If you are looking for a cool watch to gift to a man or a woman or even for yourself you’ll definitely want to check out JORD’s line of watches. One look at their site and you’ll be in awe with all the gorgeous watches. They are nothing short of incredible and are great for any type of occasion, anniversary, birthdays, holidays, you name it and even ‘just because’. Valentines is just around the corner. I’m sure a special someone will love to have one of these cool watches as a gift. Don’t you think? You can even customize any watch with personalized engraving. Pop on over to Wood Watch and you’ll probably want to buy not one but two or three watches! But first, don’t miss the giveaway below.

JORD Cool Wood Watch

The lovely folks at JORD Wood Watch are offering $100 gift code to one reader toward their purchase. All you need to do is enter your name and email address and you will be added to the contest. Only one person will win, but everyone who enters will be given a $25 code at the end of the contest. How amazing is that! Contest closes on 2/5 at 11:59pm.

ENTER HERE to win a $100 gift code toward your purchase of one JORD Wood watch.

What do you think? Have you checked out JORD’s line of awesome wood watches yet? Which one is your favorite?

Luxury Wooden Watch


Home

5 Areas to Declutter & Bring Simplicity to Your Home

I’ve been consistently trying to find ways to cut clutter and bring simplicity at home. When I use the phrase ‘simplicity at home’, I’m not referring to a boring home that is not warm and welcoming. Neither I’m I referring to a home that has been stripped off all its necessary items that make it a home. Too many times ‘simplicity at home’ can come across as boring and having nothing. When I use this phrase, I’m simply referring to cutting out the excess. It means getting rid of the stuff that make your home a place of chaos and confusion and only keeping the things that bring you and your family joy. It means having less (stuff) so you can have more (home) and ultimately less chaos.

clutter free living room

I am totally aware that this may not be an easy concept for some. I too have my struggles. It is not natural to always think “have less so I can have more”. My natural tendency is to want more – such is the human nature. The eye is definitely not tired of seeing… But we can be disciplined and ‘simplicity at home” can only be done through discipline. While I don’t consider myself disciplined in this area, I do love it when parts of the home feel simplified and clutter-free. It means:

  • less chaos (mentally and physically)
  • less organizing
  • less cleaning
  • more home
  • more freedom
  • etc.

If you’ve been wanting to bring some simplicity to your home, have less (stuff) so you could have more (home), and have less chaos, here are some things to try.

5 Areas to Declutter and Bring Simplicity to Your Home

1.Declutter Your Stuff: Ever find yourself having too much stuff at home that do not make you or your family happy? Are your closets overflowing with clothes that you’ve not worn in years because you just have too much.. or outgrew them… or do not love them anymore? Do you spend too much time trying to find something to wear in the midst of the chaos? Why not do something about it to simplify your space and cut the frustration? 

  • Sell or donate what you do not need anymore. If decluttering is a new thing to you take it slowly and evaluate what are needs and what are excess (clutter). But try it and over time you’ll begin to embrace the freedom that comes with it.
  • Cut out impulsive and excess spending: There is no need to have 5 of one item just for the sake of having it. I used to own about 4 different slow cookers, 1 large, 1 medium, 1 tiny, and one with 3 sections. I always thought I needed each one for different sizes of meals. If I was making a regular everyday dinner I used the medium (my favorite) one and if I was making a holiday meal I used the large one (once a year maybe?). That three sectional slower cooker may have only been used one or two times within a period of 2 years. But I need to have it. After all, it was a housewarming gift plus what if friends came over and I needed to make a few different side dishes? It will save time, wouldn’t it? After years of keeping all these sizes of slow cookers I realized that I did NOT need them all. They were sources of clutter. I ended up donating a couple of them. I kept the large one and eventually had no idea what happened to the medium one. I used the larger slow cooker until it stopped working and did without one for a while  until Fall when the weather got cooler. Having just one frees up our physical space and works well. If you’ve got a cooking business at home then more than one may be necessary.
  • Don’t make spending money a therapy. I used to do this when my hubby traveled for business. I’d take the kids and go to some of my favorite stores and buy home decor items on sale. Truth be told, we probably did not need most of them. They did not bring joy as I was constantly trying to make room and find some ways to use them. Many ended up in various donate piles. Here is the thing, I am finding that our location to stores play a big part in how I spend. Previously, we lived closer to various favorite stores so it was easy to pop in often (even just to look or so I told myself). In this area though those same stores are a tad further away so we’ve been staying home. Plus I just don’t always have the desire to load the kids and drive 10 -15 minutes (not far) to the stores. We’ve been doing without what we don’t see in the stores, bringing in less clutter, and saving money!! So cutting out excess spending will definitely help free up your home from all the un-necessaries and help you find some joy in your space again. As a bonus, if you have less stuff cleaning and taking care of your home will seem like a breeze. Less things mean less home to clean. 

Note: This photo is from when I gave our bedroom a tiny makeover. It is not a fancy designed room but it’s pretty much being staying simple and clean and beautiful (at least in my mind). Not too may things in the room to complicate it and make it unwelcoming. As a bonus, cleaning is definitely a breeze with this one.

master-bedroom-dresser-top

3. Declutter Your Social Media: What???? Social media is one of the things that can definitely add clutter to our minds and in return rob us from the joys of home. It becomes a time-waster if it is not balanced. We spend too much time searching and watching what others are doing all the while neglecting our own. What’s worse is that it makes us compare ourselves and our homes to what others have and what we don’t have. Too many times I hear others saying, “I wish I had a room like this” or “I wish I was relaxing in a space like that” or “that person’s home is the best”, etc. While I admire nice homes and love to see how others create their homes, I have to constantly remind myself that each home is different. How many times have you fallen into a trap of MUST having a certain decorative item because it looks awesome in someone else’s home? After all, if it’s trending and looks good in so many homes it’s got to look great in mine too! Well that is an avenue for homemaking fail. We may realize after purchasing and setting up that the stuff do not suit our homestyle after all. We don’t really love it as we thought we would and therefore, only wasted money and added to the clutter. 

I’ve had to set some goals and try to cut back on the amount of time wasted on social media. Instagram for example is a favorite (gotta love Insta) but I just cannot keep up with the daily posting, keeping up with everyone else’s photos, trying to make my photos look perfect and modelling my home after everyone else’s. I feel like it has become more of a chore rather than a ‘fun thing’. Don’t get me wrong, not saying that our feed should look uncoordinated and not appealing (I love seeing great photography). All I’m saying is that on my part, it was taking a bit too much time to keep up with on a daily basis. I had to find balance and cut back some for the sake of my home (working on this).

4. Declutter Your Email Inbox(es): Too many emails in your inbox? You can definitely unsubscribe! I don’t mean to sound harsh but so many companies offer so many ‘sign-up to receive rewards and special discounts’ type of sign-up forms. I feel like some of those rewards never really work. When I go to a store and present my rewards card (which they ask for) all they do is scan and give back. Signing up for everything that’s offered will only crowd our minds and inboxes and cause us to waste time caring for home. I know there were times when I had to wade through my inboxes to find just one email. Or miss important emails because I had so many non-important ones crowding my way. Unscribing from un-necessary emails will give us more freedom, clear the clutter, and allow us to spend less time checking through emails. 

5. Declutter Your Mind: Don’t try to “do it all”. If you try to do too many things at once, you may find yourself not having any direction. Your mind and space become cluttered. I found this to be true when I decided to organize some of the areas in our home. I took everything from the cupboards and closets and laid them out. This created a huge mess and clutter-filled rooms. There was clutter all around and I did not know which area to work on first. Once I put everything back and started focusing on one area at a time, I did not feel as stressed and our home was not in a state of disarray. My mind was not cluttered and the tasks were easier to handle and even more enjoyable. 

6. Declutter Your Schedule: If you don’t add a few minutes to your schedule to unwind you will only be burdened with chores, tasks, with the 5 other areas mention above, etc. Block out a few minutes just to do nothing or do something that makes you feel relaxed. Here are a few ideas to try:

  • flip through a magazine
  • catch a favorite show
  • eat a favorite snack
  • drink from your favorite mug
  • mini mani or pedicure
  • read a good book
  • bake something special
  • take a nap?

The list could go on. . . The idea is to block out time from the daily mundane so you would find time to clear your mind, re-fuel, and re-energize. Like I mentioned above, these are areas that I too have been working on and have seen a bit of a difference in some areas already. 

5 Areas to Declutter & Bring Simplicity to Your Home - At Home with Zan

How are you simplifying and having less (stuff) so you could have more (home) and less chaos? Please share your ideas in the comments!!

Decor & DIY

Around the House Organizing – 5 Areas to Tackle

I’m one of those who tends to thrive in organized spaces. When spaces are chaotic it’s hard to find and accomplish anything in them. I find myself walking around in circles not knowing what task to tackle first. As an example, if I get behind on the dishes, even making breakfast seems like trying to get over some great hurdle of pots and pans and dirty dishes. Then there is the question of should I wash all the dishes or throw them in the dishwasher or clear the counters first? Or should I try to find something clean, make breakfast, and create an even bigger mess?! If the kitchen is clean and organized there is no wasting time trying to figure out what to do first. Especially if we are in a hurry, breakfast it is! (old photo of the kitchen).

new home tour appliances

Chaos does not help anyone accomplish anything beneficial. I have a few areas at home that often remind me of chaos; basically, some rooms that could be better organized. On a general scale, I like to keep our home organized but how to go about organizing the areas in this house is my biggest struggle for a few reasons: 1. we are renting so no rooms can be customized. 2. I don’t want to put too many holes in the walls. 3. I don’t want to use a bunch of baskets for organizing just for the sake of using them. I love using baskets for organizing and have a ton of them already. Too much though can make a space look cluttered. Albeit, that will probably be the solution for most of these spaces. In fact, I have started on some of these projects already. Here is a look at some areas I am working on. 

Around the House Organizing – 5 Areas to Tackle

Front Entryway – Our entryway is just a regular designed entryway split with a front room on the other side. Our shoes need to be better organized for sure. Too many times we find ourselves digging through a pile to find our shoes. I have added baskets at the top shelf and will need to label them because they are so high up and we cannot really see what is in them. Even I forget, most times, which basket has what. I’ve already found a solution for the kids jackets. In the past they put them down on something low such as a storage ottoman (shown here) or a chair or where ever I told them to put it until a parent hung them up. But I found something that they are using and it is so much better. 

Disorg entryway

Laundry room/Mudroom: The laundry room is tiny and there is a measure of storage cabinets and even some storage at the bottom of the machines. But it needs to be organized. My hubby likes to use this entrance from the garage whenever he comes home especially if he parks inside the garage. The kids and I prefer the front entrance but we use this mudroom when we go out and about with my husband.

Disorg Laundry RoomKitchen: On a general scale, the kitchen is pretty much put together except for the pantry, a few top cupboards that hold food items, and some storage drawers. I’m not a huge fan of pantries with shelving like these. The food never stay well on them. Here is a shot from a time when we had just bought groceries. Since there is no real system of organization other than the shelves, everything was thrown in there until I found a temporary solution. Two minutes later and things went back to being chaotic. 

Disorganized pantry These are the cupboards that need organizing. I have already started on them and they look much better (not shown here).

Disorganized Cupboards

Disorganized Cupboard

This is the other side of the kitchen where we have a tiny office/command center. Hmmm….. see the situation for yourself. I do clean the top of the counter frequently but it seems to be the place to collect all. 

Disorganized drawers and desk

Don’t even ask about the drawers. Gasp! Talk about all paper work, mail, art, chords, shattered ipad, you name it all in one hot mess!! This does not sit too well with me and has been driving me absolutely crazy!! Well I guess I sort of created it. I just need a spot to dump everything (and not find what I need right) until I figure out a better system. Sigh.

Disorg desk drawer

Disorganized drawers

Garage: This is one tiny spot of the garage where I have some spray paints, nails, screws, glue, etc…. It could use some help. The rest of the garage is not that terrible but it could look better. Way too cold to tackle garage organization during the winter.

Disorg Garage

So as you can see, we’re not all put together as we’d like to be. There are a couple other areas that are not terrible but could be better and other areas that need to be prioritized such as the entryway. We’ve made some overall progress though and that is always good. 

Around the House Organizing - 5 Areas to Tackle

How are you with home organization? Do you have it all figured out or are you still trying to find ways to make it work?

Home

3 Easy Homemade Winter Skin Moisturizer

During the winter months, dry skin seems to be very common in our household. I’ve especially seen this in the kids once the weather starts to change. Taking a few consistent steps have helped reduce some of that dryness. We’ve been using some homemade skin care that tends to do the trick. If you experience dry skin during the winter, you might consider trying a few simple natural ideas too. They’ll be less harsh on your skin and will definitely help save a few dollars.

winter-skin-care-for-dry-skin

Disclaimer: I’m not a medical doctor or anything related. I’m only sharing the ideas that seem to work for our family in hopes that they might work for someone else too. And just to clarify, we do use other skin products but we love trying natural ideas. That being said, if you are needing some natural dry skin care ideas, here are three ‘supa dupa’ easy ones that we enjoy

All that is needed to create these products are Epsom salts, sugar, cooking oils, and essential oils. Each ingredient has its own benefits. I chose the oils (both cooking and essential) that are healthy and mild on the skin and that are popular for healing and moisturizing dry skin. Please note that this is NOT an essential oils promotion for any particular brand. The oils used here were just a bit more budget friendly and are what I had on hand.

1.Bath Salts Soak (weekly): Epsom salts when used in moderation are a good way to help exfoliate, detoxify, and soften the skin and relax tired muscles. Add some of your favorite relaxing-good smelling essential oils for a special treat. I embrace the opportunity to soak in the tub anytime I can get to. It really does make for a good night’s sleep. I don’t always use this on the kids but when I do, I only use a small amount in a huge tub of water (like 1/4 t0 1/2 cup) and let it dilute. Not sure how much of an impact it has with just a tiny amount but the kids love it!!

Epsom salt for winter skin care

To make Tea Tree bath salts: 

  • Measure 2 cups of Epsom salts into a bowl.
  • Stir in 10-15 drops of Tea Tree (or favorite) essential oils
  • Store in a tightly covered glass jar. 
  • Dilute 1-2 cups of bath salts under running water into a tub. Fill tub to desired amount of water. Enjoy a good soak. 

Note: A 1/2 cup of baking soda could also be mixed in with the Epsom salts such as in this other recipe here.

Tea tree bath salt

2. Body Butter with Coconut Oil (daily): We use an easy homemade all natural skin conditioner to attack those dry spots. It’s made with a few tablespoons of coconut oil and drops of essential oils. It’s something I started using when (our now four year daughter) second daughter was a tiny baby. She was born during the winter months and had some seriously dry skin. This treatment really helped. Coconut oil is a master of all trades and is just so very good for many different uses. 

Coconut butter

To make the body butter: 

  • Melt 1/4 cup coconut oil over very low heat. Do not boil – just until melted. 
  • Stir in 10 – 15 drops of lavender essential oils. 
  • Pour into a storage jar. The oil will firm up if stored under 75 degrees. Either way, it works well. 
  • Rub onto dry skin areas as often as needed.

Natural skin care

3. DIY Sugar scrub (as needed): Sugar scrubs are easy to make and are a natural way to help exfoliate the skin and keep it moisturized. When it comes to using food ingredients on the skin, I think all-natural (organic, no processed) is always the best. But in this case, I used what I had on hand. I first made brown sugar scrub with brown sugar, olive oil, and orange essential oil. I tried it out on myself and on the kiddos. Our eldest kept saying how soft and smooth her skin felt, even days after.

lavender-sugar-scrub-for-face-and-skin

Once we used up the brown sugar scrub, I tried it out with white sugar, olive oil, and lavender essential oil. Both versions of scrubs work fine but I prefer the coarse brown sugar grains to really get a good scrub. I want to try it out using some kind of all natural raw sugar. 

To make this sugar scrub: 

  • Pour 3/4 cup sugar in a bowl. 
  • Stir in 1/4 cup of pure olive oil
  • Add 8-10 drops of favorite essential oil (I used lavender)
  • Mix well. Store in a tightly covered glass jar (I used a Mason jar).
  • Wet face or skin. Scoop out about a tablespoon of sugar scrub and apply over face and neck or other area. Scrub well. Rise and dry. The skin will feel so smooth!!

sugar-scrub-with-lavender

These three quick homemade skin care products would leave your skin soft, moisturized, less dry and feeling fresh. And they are not harsh products on the skin either. Spray some lavender spray (water and a few drops lavender essential oil) for instant room refresh. The area around you would smell wonderful, too. 

Lavender spray

skin-care-in-a-basket

This could make a good little DIY basket for a friend or someone who is into trying these homemade ideas for their dry skin… or just for a spa day at home for a mom or anyone. Before gifting, add in the oils used in each moisturizer so the recipient could create their own once they use up what is in the basket. Don’t forget to add some pretty labels and some instructions.

3 Easy Homemade Winter Skin Moisturizer

If your skin gets a bit dried out during the winter months, how do you keep it moisturized? I would love to know in the comments.

Decor & DIY

Top 10 Posts and Favorites of 2016 And a Reader Survey

Last year, I threw out the idea about discussing more home decor topics here on the blog. You, my readers, loved the idea just as much as I did. Not that I had never done any home decorating posts on the blog. I’ve always shared home tours decor and organizing projects from around the home. But I wanted to do more and you gave me motivation from your encouraging words. As I opened up our home some more, I realized four things:

  • they seemed to be well received (keep in mind that my decor posts are just regular everday normal home – not perfectly designed and staged)
  • they really helped me to narrow my niche some
  • I got more exposure and greater opportunities to work with brands
  • I love these types of posts!!

With these in mind, I thought it would be fun to have a look back at the top posts and personal favorites of the past year. 

top-10-posts

For the top posts, I have to admit that some of them were rather surprising! Meaning, there are a few of them on the list that I did not think would amount to anything. The photos are terrible and the posts themselves look like they need editing. That first one for example has more views this year than any other ones. Not really sure how it made it to the top of the list with more views but I guess it did. Anyway, here are the ones with the top views for 2016. I wrote them in the order of most views to least views (not by month). Hope you find a post that interests you.

  1. Resin Plastic Chairs Makeover 

DIY Kids Table & Chair Set Makeover2. Bathroom Makeover (ORC series)towel rack

3. Fall Home Tour 

fall-tour-cutting-boards4. Summer Dinning Room Summer Dinning Room - Table5. Coastal Master Bedroommaster bedroom makeover 29 6. Simply Seasonal: Five Simple Christmas Decorating Ideas simply-seasonal-gift-wrapped-plant-holder7. Painted Terra Cotta Clay Pots Terr cotta pots8. Merry and Bright Holiday Home Tourholiday-home-tour-christmas-tree9. Holiday Entertaining Made Easy holiday-entertaining-extra-storage-rack10. 8 Weeks to a Decluttered Home Checklist

Here are a few of my personal favorites (there were so many to choose from): 

Summer Backyard

Summer Dinning Room

Fall Table Setting

Fall Home Tour Hop

Mini Bedroom Makeover

Floating Candle Holiday Centerpiece

Christmas Dinner Tablescape

If you are a blogger, have you looked back at which of your posts did well this year?  Were you surprised by the ones that made it to the top.

Also, I would love it if you took a minute to answer a few questions from the survey below. This is a way to help me know what posts you are still interested in and to help me improve this blog. Thanks.

 Click Here to take the Survey

Christmas

Christmas Dinner Tablescape

I love doing a pretty table setting during Christmas. In the past, I have not shared about some I’ve done because we used our everyday tables for the occasion. It’s not practical to setup a formal everyday table weeks or days before an event because we need a place to eat in the meantime. We have a separate dinning room this year so setting it up in advance is possible. I must admit though that I had to remove this setting because our everyday table needs a replacement.

christmas-dinning-room-with-treescape

Those two farmhouse looking chairs are from our old breakfast table. Everything I used to set the table are either items I had on hand or from recent purchases during the Fall (for other uses). I like to bring out all the fancy for the Christmas dinner table. And it usually looks differently each year based on what I have or what color scheme I’m using. Here is a breakdown of what I used to set this year’s table:

  • Tablecloth (Ross Dress Stores early this Fall)
  • Golden Chargers (Dollar Tree early this Fall)
  • White plates with gold rims (Dollar Tree a few years ago)
  • Decorative salad plates (Walmart collection a few years ago)
  • Gold candle votives (Dollar Tree early this Fall)
  • Clear Votives (Walmart recent holiday)
  • Candles in votives (Walmart early this Fall)
  • Gold Tapper Candles (Home Goods early this Fall)
  • Drinking Glasses (Wedding Gifts)
  • Utensils (owned)
  • Ribbon (At Home Stores holiday purchase
  • Faux greenery (Target recent Holiday)
  • Fabric napkins (At Home Stores summer purchase)
  • Ornaments (On hand)

Our plan is to host our own dinner on Christmas Eve. We usually do this on Christmas day but this year, some of our friends would love to have us as their guests. We don’t have family close by anymore so dinning with friends is always fun. But this is what I thought the table might look like this year. I used faux greenery here in the original set up. We have an evergreen tree (white cedar) out front but it was covered in snow when I was setting up the table. I may snip a few branches from the outside and switch out the faux for some fresh if the snow melts off the branches.

christmas-dinning-room-with-light


christmas-dinning-room-with-ornaments


christmas-dinning-room-ornaments

The salad plates have different patterns. I wanted them all in deer print back when I saw them a few years ago but I could not find them all at the one location. I noticed I had one large plate in this collection and only five salad plates for the table setting. Hubby recently picked up another salad plate for me but it has a Christmas tree print. It is beautiful, too.

christmas-table-and-christmas-trees


christmas-dinning-room-storage-cabinet

christmas-table-plates


christmas-table-deer-print-plates


christmas-table-utensils

Notice the champagne glasses are of two different styles. Here is the plain one next to the wine glass. We don’t really do wine so these glasses are there for juice, water, or champagne.

christmas-table-tall-glass

And here is the other design of the champagne glasses. These were all gifted as wedding presents and I like to bring them out during the holidays.

drinking-glass-with-design


christmas-table-candles

This is another angle of the room. Free artwork decor is the best. This fa la la printable is free for downloading here.

christmas-dinning-room-chalkboard


christmas-dinning-room-chalkboard
christmas-dinning-room-tour

The view at night is stunning with the lights from the trees and from the candles. I think we would probably have a candlelight dinner. One of the little votives needs replacing so it didn’t light up but the overall scene in the room is just a beauty at night. The trees were brought over from the family room. I love them here next to the window.

dinning-room-nighttime
dinning-room-at-nights dinning-room-in-the-night


christmas-dinning-room-candle

That’s the table setting in a nutshell. I hope you enjoyed it and I hope you have a Happy Holidays. Here is a look at last year’s table in our previous home.

table-from-last-year

Do you go all out and set up a formal table for Christmas if you are hosting dinner? Or do you have a buffet style because you have way too many mouths to feed?

Decor & DIY

DIY Gold and White Polka Dot Coasters

It’s being a little while since we’ve owned some coasters. I bought some last year from IKEA and they were on the cheaper side. They were neutral and made of cork so of course, they broke apart after a little while. We have not had any since, in part because I am kind of picky about coasters. I have this thing about wanting our coasters to match with our kitchen decor. Maybe weird? But whatever the reason, whenever I come across a set, I always ask myself whether I would really like them and whether they would go with our kitchen decor. Which by the way, I have not really figured out what our kitchen decor should look like. Do I want white with pops of blue, red, or some other color? Not sure. That’s probably why I have not figured out the coaster thing yet. But anyway, I decided to DIY some in a fun pattern using some paint I had on had. Keep in mind, that I still had no idea what I wanted to do with them when I first bought them. This leads back to the undecided kitchen decor color scheme. 

diy-coasters-gold

I bought some unfinished wooden coasters from Michaels craft stores way back in the summer to customize them but it did’t happen. During the fall, I gave them a first coat of paint on one side and then decided I was to busy to get back to them. Then I wanted to do work on them while I was doing some holiday projects, a few weeks ago, but could not find the stickers in the stores we checked. Then Christmas decor and what-nots too over and I had no desire to do the coasters anymore. The other day though, the kids were making ornaments for the tree and I while I was getting their craft stuff ready I saw the coasters and decided to work on them while the kids crafted. It turned out to be such a fun little project.

diy-coaster-gift

Why polka dots? I figured I’d try something new and something fun. Not sure if polka dots are ‘in style’ but I do love the pops of circles that appear on some patterns. Paint is always an easy fix. They say your fashion sense inspires your decor or is it the other way around? Either way, might be so because this little pair of leggings from one of our kids is totally similar to the coasters (except the dots are in gold). When we saw it at Target, we both loved it instantly and this was after I had already decided on the polka dot coasters. So I’m guessing this fashion and decor go hand in hand after all.

diy-coaster-and-fashion

Anyway, here are the materials needed to make these coasters (be sure to use two different colors of paints):

  • Unfinished wooden coasters
  • Gold Spray Paint (or color of choice)
  • White Paint (or contrasting color of choice)
  • Clear Acrylic Sealer
  • All Purpose Labels (1/4 inch round)
  • Small Paint brushes
  • Scrap paper
  • Sand paper (optional)

Don’t let the amount of steps scare you – this is really a simple project. The drying time between the paint coats is what makes this little DIY seem long. The technique I used is one I’ve shared before such as How to Write on Canvas.

diy-coasters

Step 1: Paint the back of the coasters in the desired color in the direction of the lines on the coasters (I used white paint). Let it dry, then add another coat of that same color. Allow it to dry fully. I had a photo of the unfinished coasters as purchased but cannot find it. I took it way back then so just imagine them in normal unfinished wood condition. (Do sand them and clean off the dust before painting if you find some uneven spots).

Note: Generally, I would use better paint but this is the only white I had on hand (regular acrylic paint that the kids use for their crafts). Supposedly, it is all purpose and would not wash off.

diy-coaster-addomg-whiite-paint

Step 2: Once the backs are dried, paint the front in desired color. Be sure to paint in the direction of the lines on the coasters. The front color does not necessarily have to match the color on the back but the first coat needs to be the color of the dots

I wanted the dots to be white so I painted the entire top of each coaster with white paint. To be honest, I was not sure if I wanted the dots to be white or gold but I ended up with white. 

Step 3: Add stickers randomly on the top of each coaster. Don’t cluster them all in one place – leave some room between each one. Add some at the ends too, creating half circles. The stickers will cover the white spots and protect them from the contrasting second coat of paint.

diy-coaster-stickers

Step 4: Shake the gold spray paint well then spray over the stickers making sure that the entire tops of the coasters are covered in gold paint. Let them dry about 5 minutes before removing the stickers. 

Note: Try not to let them dry too long because the longer they dry the harder it will be to remove the stickers. You want to be able to remove the stickers while they are still somewhat wet.

diy-coaster-sprayed-in-gold

The dots should look something like this when the stickers are removed. Some of them came out perfect while the others got smeared. Don’t worry about the little smears on the dots; they are an easy fix.

diy-coaster-stickers-removed

Step 5: Take some paint (same color as the dots) and use a thin brush to polish them up a bit. They do not have to be super perfect either, but they do need to be polished.

diy-coasters-polished-with-additional-paint

diy-coaster-adding-paint

Step 6: I painted the sides of the coasters last just in case there were any paint runs from the top. Choose a paint color and carefully apply. I could not decide between the gold and the white but I ended up using the white to match the dots and the bottom. 

diy-coasters-with-white-paint

Step 7: Once I felt everything was good to go, I applied some clear acrylic sealer over each coaster. You can see how the color got a bit darker but once dried, it brightened up again.

diy-coasters-spray-with-crand-spray

Look how lovely the coasters turned out! They are cute and will go with anything. I think they will make a great DIY for parities – keeping the polka dot theme real. 

diy-coasters-fb

We tested them out on our dinning table and my hubby commented on how lovely they were. Don’t you love it when your husband likes your projects?

diy-polka-dot-coasters-in-the-dinning-room

I mean, these coasters would work in any space, think dinning room, office desk, coffee table, etc. And because they are fairly neutral (gold and whites are neutrals), I think they will go well with any plain color.

diy-coasters-coffee-table

diy-coasters-polka-dot

And let’s not forget that these could make some serious cute little holiday homemade gifts. Who wouldn’t want these? They’re just too cute. The thing is I’m still not sure what exactly I had in mind for the coasters and I’m still not sure if we are gifting them. But they look pretty good on a table and so bold and fun!!

diy-coasters-gold

Pin - It New

diy-coasters-polka-dot

What do you think? Are you digging the polka dot idea? Would love to know what you think in the comments!!


Christmas

Floating Candle Holiday Centerpiece

I’ve always loved the look of Christmas centerpieces with cranberries and greenery. There is just something about the traditional rich red and green mix that catches the eye. I usually mix up some kind of concoction like this during the holidays. I have made snow globes to set on a coffee table using cranberries and I have made a similar centerpiece for our Christmas breakfast table last year. I imagine this is probably not the first time you’re seeing jars with cranberries and candles during Christmas. In fact, you may have already seen this one in our simply seasonal holiday hop. I thought it would be fun to share my take and tutorial on how I made it.

DIY-Floating Cranberry-Centerpiece-athomewithzan.com


The combination of the rich red and green is just stunning and will make a lovely holiday centerpiece. It works really well on a kitchen island, breakfast, or dinning table. This centerpiece is it’s own kind of decor and does not necessarily need to ‘match’ a different holiday home color scheme. It’s just simply beautiful and does not cost much. I spent about $3 between the cranberries and the floating candles. I have some floating candles on hand but they are in orange and red. I chose not to use the red because I wanted them to contrast with the cranberries. A pack of white costed around $1. The ribbon I had for other projects. I really don’t know much about fake cans of snow but I bought a can earlier just in case I found a reason to use it. In total, it may cost about $5 – $6 if the materials including the optional ribbon and snow has to be all new purchases but still not bad for a DIY centerpiece. It’s beautiful, cheap, and will only take a couple minutes. Have you seen the price of ready-made centerpieces lately? They are so pricey and most are of the same style. Not very appealing to me. Here is what you need to make this one:

  • Food jars (Mason/Ball/or empty glass bottles)
  • Fresh whole cranberries
  • Greenery
  • Tea Light candles
  • Decorative ribbon (optional)
  • Fake snow (optional)
  • A food charger/plate/tray

diy-holiday-centerpiece-greenery-materials

Step1. Make sure the jars are clean then add a bit of greenery to each one. snipped off some branches from a White Cedar (I think) tree out front. I got them just in time before the heavy snow covered them!! Don’t just put one little piece of greenery. Use enough to go all around the jar so it won’t look scanty. If you don’t have a tree like this in your yard, use something similar and that won’t go bad quickly or change the color of the water in the jars.

diy-holiday-centerpiece-greenery

Step 2: Add a handful of cranberries to each jar. Add enough so that the candle (when added) could be cradled tightly between them.


Step 3: Fill the jars with water, leaving about an inch room from the top. The water will cause the berries to float to the top and the branches to float somewhere in the middle of the jars. The cranberries and greenery are not heavy enough to sink. I just love how everything floats right up once the water goes into the jars.

diy-holiday-centerpiece-with-water

Step 4: Set a tea light or floating candle on top of the cranberries. It will float on the water and be cradled between the cranberries. It’s a simple science but so stunning! At this point, the jars are basically done. But to make them prettier, check out optional step 5.

diy-holiday-centerpiece-facebook

Step 5 (optional): Tie decorative ribbon around the mouth of each jar. It is not necessary, but the ribbons make the jars prettier especially ribbon that contrasts against the red and green. Aren’t they gorgeous?!!

diy-holiday-centerpiece-with-ribbon

They are even more beautiful once the candles are lit! Nothing like a soft luminary on a cozy day while eating a delicious meal. Or just relaxing with a good book.

centerpiece-for-christmas

To make the centerpiece, I set a wood slice charger in the middle of the table. Then I added greenery around it. Next, I placed each jar on top of the charger then lightly sprayed around them with fake snow for a wintry effect. It was like the icing on top of the cake once the snow was added. Snow on trees are always look great together.

Note: A plate or tray could be used in place of the wood slice. But the wood paired with the snow, cranberries and fresh greens make it feel like a piece of nature on the table. I guess it is actually. Gotta love nature.

diy-holiday-centerpiece-greenery-with-fake-snow

How easy was this centerpiece? Christmas centerpieces really do not have to be pricey to be beautiful. There are so many variations and creative ideas out there; anything could be made into something lovely for a table. For more DIY holiday centerpieces, see my roundup of some creative ones here.

Pin - It New

diy-cranberry-centerpiece-pinterest

What do you think of this centerpiece? Do you make your own? I’d love to hear about them in the comments!