Subscribe to stay up to date plus get 5 Free Home Productivity Printable Planners!
Decor & DIY

Merry and Bright Holiday Home Tour

Welcome to our Holiday Home Tour. This year, I decided to add a little sparkle to my decor so this title fits perfectly. Actually, every year I tend to add a little sparkle!! I just love all things sparkly and twinkly around this time. Don’t you? Our family enjoys the lights and the warmth of the season so it’s always great to add some decor to our home for the holidays.

holiday-home-tree

As an inspiration team member for At Home stores, I’ve received some of their products to use in our holiday home. The main item being our new Christmas tree with a few other items sprinkled throughout. You’ll want to check out At Home’s wide selection of affordable holiday decor. I mean, they basically have a something for every style imaginable! I was so happy to discover it when my husband heard about their opening in our area a few years ago. I’ve been hooked since. If you have a store in your area it’s worth the trip!! I have also linked to all the ladies participating in the Sparkle tour. Be sure to check out how they have brought a little sparkle to their homes this Christmas. Now come on in and have some hot cocoa and a few cookies as I show you around!! 

holiday-home-tour-porch

Our porch is not fully decorated. As we were outside on the first snow day a few days ago, one neighbor asked me if I was not decorating the outside of the house. Well, I guess now I must. You know those neighborhoods where everyone is particular about how their homes look during the holidays? Yep, that’s the one! After all, who wants to be known as the boring neighbor who don’t decorate their front porch for Christmas? Not I!! (Kidding). But seriously though, we really had good intentions to decorate it early. Things are moving slow over here and it does not help that Basketball season has opened back up and my hubby’s schedule got busier since he coaches after work and on the weekends. His plan is to add some lights outdoors. Hopefully, he could get to it soon.

holiday-home-porch 

I went with a gold and soft pink color pallet. Well, at least that was the plan. I think I ended up with more gold than anything else since I had some from last year. It was my color pallet with green in one room. And somehow, my red ended up in another room even thought I was not trying to add red. The struggle was real and the classical colors took over. But this year, I was excited to try a little soft pink since the girls love all things pink and are inspiring me to use it more and more in our home. I’ve got to say thought that I think I’m naturally drawn to a finished look rather than the other way around. I tried it for a few months and while I like seeing it in other homes, it did not work out too well with us. Anyway, back to this holiday’s color scheme. I did not add as much soft pinks to our holiday decor – just a few touches to enhance the main tree decor. And speaking of trees, that seemed to be my ‘theme’ this year. I just can’t seem to have enough tiny ones. They are all over and come in all different shapes and sizes. I also have a few deer throughout the house. There is something about deer decor during the holidays that I love. So overall, I guess you could call it a sparkly rustic type of thing. 

Last year, we lived in a smaller home with some storage but not enough on the inside to hold our Christmas stash. I decided that the garage was a great place to store all the extras. My husband never really got around to putting them in the attic. Certain little animals made their way through our garage and into most of my decor. Not I or my hubby wanted to dig through any of it. At first, I thought of getting a big hose and lots of soap and disinfectant and spraying them all down then letting them dry. Once I looked through some half opened bins that plan quickly changed. Well, by now you may imagine the end of the story. Into the trash most of it went. We were only able to keep a few unopened bins.  

I was a bit sad for my new Christmas tree. After years of having scrawny looking $20 – $40 trees, we decided to invest in a sensible tree and some other decor. The tree and decor altogether weren’t too bad but they just needed an upgrade. That too was gotten rid off as my hubby thought it was best not to take it with us when we moved. I was happy to find a replacement from At Home. The exact color but only bigger. 

Our home is really not full decorated neither is it designed catchy (as far as furniture and placement of things). In fact, you may spot lots of empty spaces throughout the house. When we first moved in, I imagined going all out with decorating. That all quickly changed once we got back into a routine and life got busy. Nope, ain’t happening. If you followed our summer move story, you know that this is our rental home. Our previous home turned out to be more problematic with underlying issues than we imagined and the market was right for selling. This one turned out bigger than we really planned and since we don’t really own it, customizing is not an option. But we do what we can to make it feel like home. And did I mention that the paint colors are really something? I know I keep singing the song about it but hey, it’s helpful to have paint that actually enhances the decor right? You’ve seen the orange and yellow rooms but you’ll see more of the green room today. 

Anyhow, be ready for loads of pictures as I took wide shots and close ups. You are getting some views of spaces that I have not showed before (more so because they are really unfinished). I admit that I do feel a bit vulnerable putting this out there. Not like I have done this in our previous homes. I always show our homes decorated for Christmas. But this one is much bigger with so much more areas and wider shots that I’ve been holding back from sharing. But anyway, hope you enjoy the tour. When I was done taking photos for this tour, I decided that I no longer wanted to be the aspiring photographer that I dreamed about becoming:) Way too many photos and way too tiring!! 

holiday-home-tour-small-stool

The stairs got a tiny bit of decor. Nothing much on the steps since we have little hands and feet running around here. I placed a garland and added some bows. The tree holds some of our ornaments. Most of them are what we each chose to hang on our tree (something we started last year). Some are also handmade salt dough handprinted ornaments from the kids. We’ve been making them each year and it’s always fun for the kids to see how bigger their handprints are now as opposed to the other years. We’ve also made sparkly salt dough ornaments using cookie cutters in the past to hang on their tree.

holiday-home-stairs

Now that you’ve made your way through the entry, let’s head to the kitchen to warm up with some hot cocoa, coffee, or tea (whatever you prefer) and cookies. Shall we? It’s not the most glamorous, but it will definitely keep you warm. I love this little mug holder I picked up from At Home. I’ve always wanted one and was happy to spot it while I was shopping.
holiday-home-tour-kitchen-hot-cocoa-bar


holiday-home-mugs

I added a few holiday touches to the kitchen. Just things I had around the home from previous buys (including some from At Home). Not too much to overwhelm because I love free spaces in the kitchen (notice that all big appliances are not on the counter). The two photo stands holding plates are new finds from At Home.

holiday-home-tour-counter-top-decor


holiday-home-tour-plate-display


holiday-home-tour-kitchen

Our food jars got a bit of a sprucing up with DIY printable labels. No need to put them away. You’ll also notice my small display of cookie globes. They are fun to make and are easy holiday kitchen decor.

holiday-home-tour-kitchen-food-jars


holiday-home-tour-kitchen-plates


holiday-home-tour-kitchen-food-jars-and-plates


holiday-home-tour-kitchen-cookie-globes

The kids made these reindeer while crafting out a few Saturdays ago. I filled them with candy and are displaying them over the sink. I’ve been sneaking and eating them and hoping the kiddos don’t catch me!! Anyone?! I’ve also added tiny bottlebrush trees.

holiday-home-tour-reindeer

This corner of the kitchen leading to the dinning room got a fun ‘O Holy Night’ chalkboard art. I made this easy no paint chalkboard menu wall a few months ago and love having this song and a tiny manger displayed there. I made a printable with the words that I wanted to enlarge but didn’t. This wall worked out great! No special handwriting to go with it at all.

chalkboard-o-holy-night

holiday-home-tour-o-holy-night-chalkboard-art

Our dinning room is simple. Just a few little trees on the table and we’re good for now. I thought of dressing it up just because but I may just keep it this way since our everyday breakfast table got thrown out. It badly needed an upgrade. 

holiday-home-tour-dinning-room


holiday-home-tour-dinning-room-trees


holiday-home-dinning

Back into the hallway, I keep a photo display of each kid at 6 months old. It was nice to capture them when they were able to sit up long enough for a professional shot around that age. I used that wall to display some Christmas photos too.


holiday-home-tour-cards

holiday-home-tour-photo-wall

Enter our holiday family room. I shuffled furniture around so it looks quite spacey. At first, our bigger tree was placed on the left of the fireplace but things looked too cluttered. Christmas trees next to fireplaces look great but I was not feeling the clutter. Moving it to another location is a more functional option for us. 

holiday-home-tour-family-room


holiday-home-tour-christmas-sign


holiday-home-tour-mantel


holiday-home-mantel-cone-trees

The mantle was created from glittered cone trees I already had, new candle stands and a few smaller ornaments both old and new. The standing reindeer are ornaments I had from last year. There is just something about standing reindeer holiday decor that I adore. Both garlands are from At Home. Because the mantle is yellow, I really needed that pop of green to tone it down a bit. The white garland ties everything together. Last year’s mantle had a garland too but certain little people got hold of it after Christmas and that was the end of the white garland. 

holiday-home-mantel-in-the-family-room


holiday-home-fb

holiday-home-mantel-noel-sign


holiday-home-mantel-deer


holiday-home-tour-family-room-view

The coffee table is it’s own special attraction with lots of tiny trees including a candle-shaped one. My lovely gold tray corral them well. I added a touch of decorative silver flowers (or whatever those things are called) to the hydrangeas for a holiday look. 

holiday-home-tour-family-room-coffee-table-styling

Those cute little trees of all different shapes and sizes and styles, are all from At Home. A little rustic, a little glam, a little fancy and a little plain. Seriously, I just can’t get enough of little Christmas trees. They are so fun! Who knew?

holiday-home-tour-family-room-tray


holiday-home-tour-family-room-candle


holiday-home-tour-family-room-fireplace

My ‘Merry & Bright’ sign is a printable I made, downloaded, and printed out. It took bout a minute or two! I love creating free printables to use in my decor and have about 6 or 7 of them that I created for this holiday.

holiday-home-tour-merry-bright-sign


holiday-home-tour-family-room-small-table

We are in love with our mini wonderland! Those white trees came in a pack of three. I snagged them form At Home on Black Friday weekend. My hubby loves them even more than I do!! A few pieces of ribbon later and that is all they needed.

holiday-home-tour-white-trees


holiday-home-tour-small-trees

The other side of the room is not visually appealing by any stretch of the imagination. A couple bookshelves and TV and that about sums it up. Nothing special and my bookshelves could use some more decor and books. 

holiday-home-family-room


holiday-home-tour-family-room-coffee-table-with-tray

The family room and the front room is one big opened space. I’m taking you back to the front room (green room) where I have the bigger tree. Naturally when you come in you’d see the front of course but because this is virtual tour, I chose to do it the other way around.

holiday-home-tour-stick-tree

I created a manger scene on the entry table. The wooden tree is the kids Advent calendar with numbered ornaments. They’ll put on ornament on the tree each day. You can read more of that here. The deer and manger are At Home finds and so is the large glass jar earlier this summer. Everything else I had on hand. And my kids and I made the glittered stars. 

holiday-home-entry-table


holiday-home-sitting-room-entry

holiday-home-sitting-room-ornaments


holiday-home-tour-star-mobile

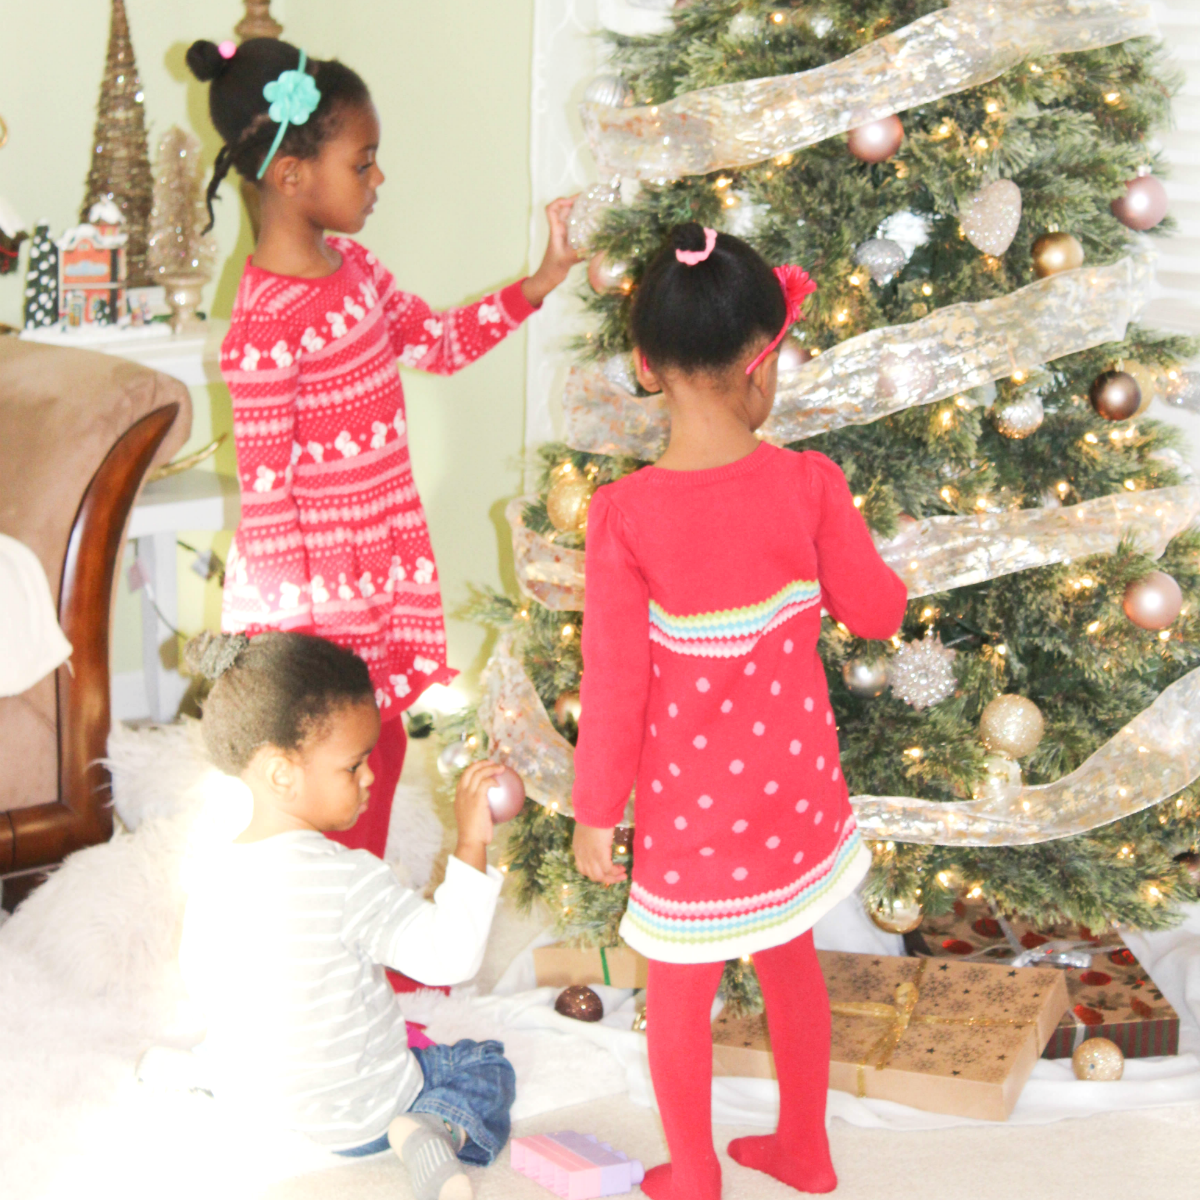
The other side of the room holds the star of the show. Our new tree from At Home is such a statement in the room. They have a wide selection of all different shapes and sizes. I chose a 7 ft. Bradford Spruce tree pre-lit with 500 lights I shuffled the furniture around in here to create the look. The tree was so easy to set up. The branches literally dropped into place once I connected the three large pieces. Of course, I still had to fluff it out a bit not too much. But as I mentioned earlier, I think the tree works well here rather than next to the fireplace. 

holiday-home-tour-feature

For the tree decor, we chose soft pink, gold, and silver ornaments. I also love the ribbon around the tree look – it’s easier for me to do than those complicated yet beautiful designs. The topper is ribbon too. I don’t know that the ribbon topper and the ribbon around the tree is a “thing” but I loved them both and did not know which one to use. So I decided to use them both and kept the topper from draping down the sides of the tree.
holiday-home-tour-christmas-tree


holiday-home-tour-the-couch

There is nothing like cozy-ing up a room with lots of pillows and blankets during the winter. Most of these pillows are from At Home earlier this Fall but I love that sparkly snowflake holiday one that I found there. The soft blanket is another new find there, too. And so is the gold mirror on the wall.

holiday-home-tour-deer-pillow

I made this DIY wooden tree using paint sticks and a piece of ply (a tad smaller than 16×20 or so) and added gold glitter to match the rest of the Merry and Bright sparkly theme. I really can’t take credit for it. I looked at a similar example online using pallet wood and then threw something together one evening. I had that other ‘Merry & Bright’ printable in the space but it looked a bit tacky. This looks better in the space, at least in my opinion. My family seems to really love it too. Must be the glitter!!

holiday-home-tour-the-couch

Here is the close up of it!! What do you think? Of course, mine looks nothing like the original but I like mine better for a customized look. And it’s more sparkly!!

holiday-home-sparkly-rustic-tree


holiday-home-more-tree


holiday-home-entry-small-chair


holiday-home-tour-sitting-room-bench

holiday-home-bench


holiday-home-tour-stocking


holiday-home-tour-ornaments


holiday-home-kids-at-the-tree

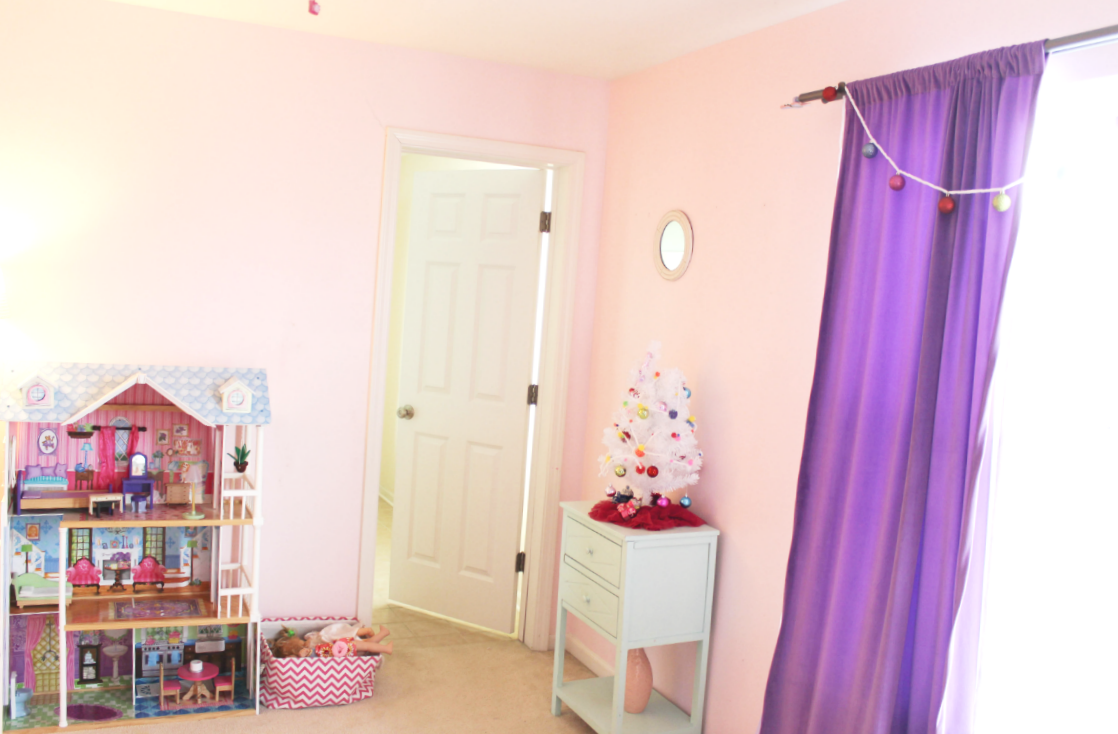
That’s basically the decorated downstairs. We don’t have much upstairs. I started to do my room but decorating got too much too handle. But the girls shared room got a small tree and color banners. Something pretty and kid-friendly to look at! I have not showed you this room before. There is really nothing much to see anyway except their new bunk bed. And they have a walk in closet. I’m in the process of collecting items to make it better with organization and decor (in my mind’s process, that is).
holiday-home-tour-ornament-garland

We love having their yearly tree in their bedroom. They added some new colorful ornaments and a DIY pom pom banner to the tree. They decided that they wanted this year’s chosen ornaments on their tree. They each did a salt dough hand print ornament too but it’s on the smaller tree on the stairs. And don’t you just love their tree skirt (AKA) one of their tutus. It’s called coming up with a new idea after I accidentally threw away their glittered purple one. I had it in a small bag along with some of our holiday pom pom banners and thought the bag was trash. Oops!!

holiday-home-tour-kids-room

holiday-home-tour-kids-tree


holiday-home-kids

That’s all the holiday touches upstairs. Really!! I was going to put a tree in our little son’s room but I don’t think it is necessary. Plus the kids have a Jack and Jill room situation going on here so it’s easy for the tree to be seen from his room anyway (as if he cares – he’s only 23 months old). I consider the tree in the girl’s room his too despite the colors!! He loves it and all their special chosen ornaments are on or around it. This guys wants to take down all the ornaments. So far, he’s done well by keep them up.

Here is a ‘skyscraper’ view of the front room from upstairs. It is a cozy little spot and we enjoy sitting over there and gazing at that beautiful tree.holiday-home-top

And at night – nothing like the sparkly lights of a Christmas tree at night. I love that it is by the front window, too!! It’s nice to see others Christmas tree lights from their window view.
holiday-home-tree-at-night


holiday-home-white-tree-at-night

Well, I hope you enjoy the tour with all things gold and glittery and sparkly!! It took me a while to get it up but I’m finally glad to have it done. Once our home looked holiday ready, I felt so free to just be me again. I mean, don’t get me wrong. I love ‘all things’ Christmas decor, but a bigger home is more work for this mom who is constantly chasing after little ones:)merry-bright-holiday-home-tour

Do you decorate for the holidays and do you go all out or just sprinkle in a few touches here and there? I’d love to hear about it in the comments.

Also, I’m linking this post to the Sparkle Holiday Home tours. These other ladies are sharing their holiday homes and would love a visit! I love touring homes during the Christmas time. It’s so much fun to see what others come up with for their homes and to hear their reason behind the decor. 

Open House Begins Dec 8th at:

Of Faeries and Fauna Christmas Tour

Momma Can shares a Christmas Home Tour
Red Shutter Cottage shares her Christmas Fantasy Land

Dragonfly and Lilypads invites you to tour her home

Open House Begins Dec 9th at

Chatham Hill on the Lake shares Christmas Trees in her home www.chathamhillonthelake.com

Life on Pearl Street invites you to tour her Beautiful Christmas Home

From her home to yours, The Domestic Realist shares her Christmas

My Family Thyme at Christmas!

Open House Begins Dec 10th at

Sledgehammer Queen at Christmas!

Around the Firepit, a Christmas Home Tour

Raggedy Bits at Christmas!

At Home with Zan, come in to the wonderland of Joy!

Open House begins Dec 11th at

Our Homestead Where My Heart is Christmas Tour

Eccentricities by JVG invites you to see her Christmas Home

Fiona Loves Organising and Christmas too!

Crafty Lily Pad has a Christmas Tour


Home

Holiday Tea Party & A Movie

This post is sponsored by At Home stores. All opinions of their products are 100% my own. Thank you for supporting the brands that help keep this blog running.

I have a fun post for you today! I’m teaming up with some favorite friends to share our Christmas traditions with you. It is no secret that Christmas and traditions go hand in hand. It’s the time of year when families gather together to do activities that they generally wouldn’t do other times of the year. This year, I’m showing you how At Home stores is helping me to create these fun traditions. Be sure to check out how the other ladies use products from At Home to create their traditions. We also have a fun surprise so you too could make your traditions happen with wonderful products from At Home stores. 

christmas-traditions

One of the things we love most is tea parties. After all, I grew up in a home where tea was a thing all the time. Our little tropical island was once owned by the British so I’m guessing that we’ve acquired many of their traditions. My husband and I started having tea parties with our first little one when she was around one year old. She just turned six (oh my) and still loves tea parties just as much. Her sister and little brother are the same. What kid doesn’t? When you have younger kids, you create activities that they too could enjoy during the holidays and not just what we parents enjoy. It’s one of the reasons I love keeping this tradition. #myreason It makes sense that this time of year, when it’s cold outside, to stay indoors and do fun activities with the kids. 

I have hinted about it in various posts in the past and even shared one on my Instagram page with their dad. There are so many other traditions we enjoy this time of year such as loading up the van with hot cocoa and blankets and heading out to watch Christmas lights. But I had to narrow it down to share just one. So of course, we picked tea parties and added a movie to it. I know the movie Frozen is so last year (or soooo years ago). We pull it out every once in a while especially around the holidays when it is snowing outside and we have a tea party while watching it. It’s really is a fun time for the kids especially on cold wintry days. My husband was at work for this one but when he’s home he loves joining the kids for tea.

christmas-traditions-tea-party-cookies

We decided to bake some Christmas cookies, a cake, finger foods, and drink hot tea. My girls love helping me bake and we typically do some cookies each holiday. It gets a bit harder to have bake sessions with more than one kid. Having all of them standing on chairs or small stools helping is not the most practical. My strategy is to take them all to the table and have them sit and help. On occasion, I would pre-make the cookies and have them help cut it out if I want to avoid the mess. That is my easier solution to have them involved because they really do enjoy it whenever I let them.

I was delighted to find everything I needed from At Home to create a small tea party for the kids on a snowy afternoon this past week. I’ve linked them below. At Home does not have e-commerce at this time but it is always helpful to search the store online. Their products are fabulous and so affordable! You could basically find all your home decor needs just by shopping with them.

I  picked up some serving dishes as I have been slacking on buy them and more baking pans too. I don’t know what happened to my previous serving plates and such but I had like zero or really just one that I use all the time. And then when I needed to serve more than one dishes, I used wide plates. They are OK but not as fun. I loved finding this 3 tiered pedestal serving set. I’ve wanting to buy one but never could find the right one at the time – for the right price:) They will be great for hosting all kinds of parties. Oh how I love them already!! 

bake-and-serve-sets-from-at-home-stores

I also picked up some bar stools from At Home was such a big help to us during the baking sesh! I love the kitchen island but we had no bar stools for it so when we baked, we’d use the breakfast table. But our breakfast table needed an upgrade. We ended up throwing it out a few days ago because it was time to go! Did not even bother to resell it. After all, we got it used anyway. We do have a separate dinning room with a table but taking all the baking to that room is just a process. We did that earlier this month and it got a bit messy in there with the carpeted flooring and all. These bar stools  are helping a bunch to keep everything in the kitchen. And the counter top is just so huge, too! 

bar-stools-from-at-home-stores

They are a tad high but they are tall enough for little bodies. At home has so many sizes and variations to choose from. The girls sit comfortably on these. One of them was fascinated with the gingerbread countdown and had a time playing with it before she started baking. And since our breakfast table gave way, this has really become a fun spot!! All the messes will stay right in the kitchen. 

christmas-traditions-girls-making-cookies

christmas-traditions-at-home

christmas-traditions-kids-baking-cookies

christmas-traditions-cookie-baking

christmas-traditions-baking-cookies

We baked and frosted one day and then when everything was ready, we got dressed up and had our party on the next afternoon. My husband was at work for this one. But having what we need now will help us create more tea parties. I I set everything up for the kids right there on the kitchen island. This side of the kitchen is a bit tricky for pictures as you may notice.

christmas-traditions-food-set-up

christmas-traditions-food

christmas-traditions-cookies-on-a-tray

christmas-traditions-cake

They had fun helping as they told me. And they definitely had fun eating all the goodies things and drinking tea! I threw in some veges and crackers to help off set all the sweet (if that’s a thing). 

christmas-traditions-tea-party

Even our tiny son enjoyed trying a frosted cookie – he generally does not like sweet. I guess it was fun for him too. He also ‘helped’ decorate some cookies and tried frosting then too. I love his little expression here!!

christmas-traditions-baby

christmas-traditions-kids-eating

Here is peek into my holiday home which I’ll be sharing this evening. Would appreciate you popping in for this one too (also using a bit of holiday decor from At Home). You can see the empty spot where the breakfast table used to be in the background leading to the family room.

christmas-traditions-girls-eating

christmas-traditions-movie

christmas-traditions-kids-watching-frozen

christmas-traditions-kid-and-cookie

I hope you enjoyed reading about one of our Christmas traditions. Find all the products from At Home listed here. Be sure to join us in the fun by also sharing your finds from At Home and using the hashtag #myreason for celebrating holiday traditions and tagging At Home when you share. They’d love to see what you found!

Bar Stools

5 Piece Baking Set

Serving Trays

Tiered Pedestal Serving Plates

Gingerbread Pot Holder

Gingerbread Countdown

And don’t forget to stop by the other ladies participating to see how they too are using products from At Home to make their Christmas traditions this year.

At Home with Zan

Sunshine and Munchkins

My Life from Home

An Alli Event

Restyle it Wright

Craftivity Designs

Blue i Style

Loveland Lodge

Making Joy and Pretty Things

Remember that fun surprise I mentioned earlier? Our friends from At Home is giving away $100 in gift cards to one winner, will it be you? I know you’ll love their fabulous products just as we do to help with your Christmas traditions. To enter the giveaway, simply follow the instructions below for a chance to win a fun little Christmas shopping spree to At Home stores. 

a Rafflecopter giveaway

Thanks for stopping by. What are some of the traditions you do each holiday? I would love to hear about them in the comments below!!


Christmas

Simply Seasonal: Five Simple Christmas Decorating Ideas

Welcome to the Simply Seasonal holiday hop! I’m excited to have teamed up with a group of ladies to bring you this season’s Holiday Edition hosted by the wonderful Caroline from Organize Nashville . If you are coming over from Creatively Homespun welcome. So glad to have you.

If the stress of decorating for the holidays weigh you down, then this series is for you. I love decorating for the holidays but last year, I did so much decorating that I got a bit burnt out. This year, I was determined to find simpler ways to decorate for the season without going overboard. I’m sticking to one ‘fully’ decorated room with a few pops of simple holiday decor in other areas. While I don’t consider our home holiday ready, I will give you some ideas and sneak peeks of what I’m using to make decorating simple. At the end of this post, you will find the links to the other ladies participating in this series. You definitely will want to check them out to see how they are getting their homes holiday ready without the overload.

simply-seasonal-holiday-edition

Simply Seasonal: Five Simple Christmas Decorating Ideas

1.Shop your home. This may not be a new statement but it is such a practical one when it comes to decorating. Instead of thinking about taking a trip to the store, first sort through a stash or simply look around the home to see how things could reused and re-purposed. Don’t put away everything that is not related to the holiday season. Instead, look for ways to incorporate them into your decor. Just because an item doesn’t ‘say’ Christmas does not mean it cannot be displayed during the holidays. Here is an example of one of our bookshelves. Not all the items on it are ‘holiday’ per say but mixing them with holiday decor seemed to work well.

simply-seasonal-bookshelf

2. Elements of Nature – When it comes to holiday decorating, who doesn’t like something free? And one of the best places to find that ‘free’ is outside. Use natural elements such as fresh greenery, sticks, pinecones, etc. in your holiday decor. I have this large evergreen tree out front that has become one of my sources for decorating this season. I’ve been snipping off branches to add to various places around the home.

simply-seasonal-pine-cones


3. Make easy centerpieces – I love creating my own centerpieces. They are easy and save me a ton of money. Plus, I get a customized look by making my own. A couple days ago, I shared a roundup of 8 decorative elements to include in holiday decor. There are so many great ideas out there. I made this easy beautiful one and plan to share the oh so easy tutorial soon.

diy-holiday-centerpiece-with-cranberries-and-greenery


simply-seasonal-centerpiece

4. Create vignettes –  Along with making my own centerpieces, I also love creating little vignettes because they are simple yet visually appealing. Mix and match items of varying sizes, shapes, and heights to create a focal point. Ornaments are not just for hanging on trees. They are great for creating vignettes in areas such as a coffee table. Place them in a basket, add two to three other decorative pieces such as candles and reindeer to create something beautiful.

simply-seasonal-ornaments


simply-seasonal-kitchen

5. Embellish – Do you have decorative items that could be embellished to match your holiday home? Use holiday ribbon, gift wrapping paper, and things of that nature to embellish them. I took this simple white candle (for example) and tied a piece of glittered ribbon around it. I did not make a bow because I did not want one but seriously, it was like instant holiday decor!!

simply-seasonal-candles


Also, I started to look for a flower pot to change out my not so pretty one for the holidays. Then it occurred to me that gift wrapping was my solution. While a new flower pot would have costed me at least $10, the gift wrap costed around $2. And now I have extra for other other uses including wrapping gifts.

simply-seasonal-gift-wrapped-plant-holder


simply-seasonal-plant

simply-seasonal-plant-area

You might also find it helpful to embellish already made holiday decor such as adding ribbon to a wreath. The possibilities are endless.

simply-seasonal-christmas-wreath

So these are some of the simple ways I am getting our home holiday ready. I hope you found an idea to inspire you and get you off to a good start.

simply-seasonal-holiday-edition-hosted-by-organize-nashville

There are so many more ways to get to get your home holiday ready without the additional overboard. Be sure to hop on over to Uncookie Cutter to hear how she readies her home for the holidays. I’ve added a link to everyone else participating {and the day they post} so you can be sure to check out all the amazing blogs in this series.
myholidayhome

Monday, December 5

Organize Nashville

Creatively Homespun

At Home with Zan

Uncookie Cutter

Tuesday, December 6

Timeless Creations

Craftivity Designs

Green with Decor

My Life from Home

Two Purple Couches

Old House to New Home

Wednesday, December 7

Our Crafty Mom

A Purdy Little House

Roots North & South

Pender & Peony

Organize & Decorate Everything

Thursday, December 8

Flourish & Knot

Rocky Mountain Bliss

Pocketful of Posies

Recreated Designs

Knock it Off Kim

The Interior Maven

Little Bits of Home

Friday, December 9

Love My Simple Home

Simple Nature Decor

2 Bees in a Pod

Country Design Style

Finding Your Joy in The Journey

How do you plan to make your home holiday ready this season? I’d love to know in the comments!! Thanks for stopping by and happy holiday decorating!!

Decor & DIY

8 Decorative Elements for Holiday Centerpieces

I’m always looking for easy ways to create holiday centerpieces. There are so many ways to make a table beautiful without breaking the bank. In fact, I don’t remember the last time I bought a pre-made centerpiece. Actually, I did earlier this Fall but returned it to the store (just couldn’t do it). Pre-made centerpieces are just too high priced. There are so many easy creative ideas with simple things in and around the house (both real and fake). Check out my roundup of ideas from others below. I hope you find something to inspire you.

8-decorative-elements-for-holiday-centerpieces

8 Decorative Elements to Include in a Holiday Centerpiece

1. Candles 

Homebnc

15-diy-christmas-table-decoration-ideas-homebnc

2. Cranberries

BHG

101839473-jpg-rendition-largest-1-cranberries-and-candles

3. Ornaments

Midwest Living 

ornament-centerpiece

She Leaves a Little Sparkle 

img_6126-1024x683-she-leaves-a-little-sparkle

 4. Trees 

An Alli Event

diy-holiday-centerpiece-a-9-660x584

Dear Lillie 

christmas-centerpiece-simple

5. Wood

Jenna Burger

birch

6. Pine Cones

Stone Gable

mercuryglass-greens-stonegableblog-com_

7. Lanterns

Midwest Living

lanterns

Worthington Court

how-to-decorate-with-lanterns-tie-a-sprig-of-faux-greenery-and-pinecones-with-pretty-ribbon-for-a-charming-christmas-lantern

 8. Greenery

Julie Blanner

greenery

Weren’t these so beautiful yet creatively simple? I hope you found some ideas to help you create easy beautiful centerpieces this holiday. Which element is your favorite to incorporate in your decor?


Home

Christmas Tree Advent Calendar (Free Biblical Printables)

Last year, I made an Advent calendar but was not too thrilled with it. Plus it was not very practical as I wanted it to be. I decided to do a simpler one this year and make it a bit more interactive. Our kids are still too young to be able to understand dates so a visual of some sort makes the most practical sense to help them understand. Our first daughter in particular, loves the idea of a count down calendar. In fact, she is using a small chalkboard visual to count down to her birthday which is Tuesday. It usually falls right after Thanksgiving. Basically, she’s been counting down to some type of holiday or event since October. 

tree-advent-calendar

advent-calendar-interactive

My original plan for this new one was very much like this that I saw in a magazine a few years ago. I ended up deciding against it for this option. I used what I had around the house to create a different idea. Personally, I’m not sure if it is my favorite idea but it is more interactive and the kids seem to be loving it already even though we have not officially started it yet. 

How I mad the Christmas Tree Advent Calendar and How we are Planning to Use it

I used sticks from the outside and specked them with white paint. Our 5 year old thought it gave the tree a snow-ish effect. Kids have such great imagination! The sticks are not too thick because I need them to fit into this bottle.

tree-advent-calendar

tree-for-advent-calendar

Then days 1 through 24 were written on gold ornaments with a Sharpie. The kids picked glitter and plain ornaments so I interchanged them by starting with a plain one, then a glitter, then plain again and made a pattern. We picked out a red ornament to represent Christmas day. The marker on ornaments technique is something I learned back in college. We used to have “campus parents” and I remember one year when a group of us students went to our friends campus parent’s home for a Christmas party. While we were there, we helped decorate the tree and they had each of us choose an ornament to write our names. It’s a simple technique but not one I tend to think about when it comes to decorating for Christmas.

advent-calendar

Although, the Sharpie worked better on the smoother ornaments. The glitter was a bit trickier to write on so I ended up using a black crayon to write on its rougher surface. All the written ornaments will be in a basket right beside the tree so the kids could find them. To avoid the fight over who gets to put up when, we’ll just have them take a turn each day. 

advent-calendar-with-ornaments

After I made the tree, we hung all the ornaments to see how it would look. At that point, I wondered if we should leave them up and have the kids take out one down each day until there were no more. Once I gave it more thought, I decided to stick with the original plan and leave the tree bare so they can fill it each day rather than the other way around.

advent-calendar-with-sticks 

Activities and Gifts

It took a bit of thinking before I concluded how I would connect the tree with activities and small gifts. I ended up using a board to display gift boxes to represent gift days and fabric bags to represent activity days. Each box has a coordinating number with specific coordinating ornaments for when they will open a gift. For example, day 5 on the ornament coordinates with day 5 on a gift box letting us know that it will be time to open a gift. The little bags have numbers that coordinate with the ornaments too. Each bag has a tag with a picture of a chosen activity. That will let us know what activity we will do on the days chosen (they are still learning to read so pictures help). Day one for example has a picture of a Christmas book meaning we will read a Christmas story or a few stories. Day 12 has a picture with a hot cocoa mug and a candy cane letting us know it will be time to make hot cocoa. Some days in between I left open for anything random. Because we all know how busy the season could become. Putting up the ornaments may be just enough on certain days.

advent-calendar-feature

advent-calendar-chalkboard

advent-calendar-with-red-ornament

Biblical Christmas Story

And of course, I could not leave out the most important part – our bible study. Yes, there are gifts, activities and all the magic of the season. But it’s great to teach the kiddos the real reason of Christmas. Smaller kids learn best through doing activities. 

We’ll go through these worksheets that I created a couple years ago. They are great for Kindergartners and pre-schoolers. My kids enjoyed these last year; one had just turned five and the other was about to turn three. There is an activity sheet for each day from Dec 1 through Christmas day. Find this set here – it’s very interactive. I did not include these in the Advent calendar activities because it is just something we’ll do. Some days we may complete one worksheet completed and other days two if they are motivated and want to get ahead. It all depends on how well everyone co-operates and what’s on the agenda. We’ll just do our best. Last year, they wanted to do a few of them each day and we did on some days. So even if we got nothing done on a day, then we had already worked ahead anyway. 

christmas printable 2

This is another one I created a few years ago.  It was the first Christmas pack like this that I created. It’s one of my most pinned printables during the holidays. Our first daughter was only around 2 when I created it and seemed to be very advanced. Amazingly, she was able to answer the simple questions and do the simple activities (with some prompts, of course). It’s only a few activities because they were made with the smallest of kids in mind and they will only cover a few days.  

Note: This pack may be more suitable for kids around 3 to 4 years old. It all depends on how much you think the kids could understand. When I saw how much this set is pinned during each Fall and leading up to Christmas, I thought of redoing it and adding more activities for smaller kids. But the more I look at the activities, the more I love their simplicity. Find them here to download. 

christmas-printable-pack-for-preschoolers

So the Advent calendar is really not complicated.

  • On day 1, put up ornament with number 1 on it (do the same for the rest of the days until Christmas)
  • Do an activity or open a gift that coordinates with the number on the ornament (if there is an activity for that day) 
  • Daily study of the birth of Jesus story (daily or whenever the kids will sit still to listen)

It would have been nice to have something like stickers to add to the ornaments for gifts. I did not have any and figured we could just look at the board to see if there is a coordinating number.

interactive-christmas-tree-advent-calendar

What do you think of this one? I know there are so many beautiful well made ones out there. But I just could not decide and had to get going with something simple.

blog-sign-grey-with-comma

Christmas

Hot Cocoa Mix in a Jar – Christmas Gift Idea

I’m such a fan of hot cocoa and all things cocoa mixes. I have fond memories of drinking hot cocoa nightly before going to bed while growing up. Now that it is colder outside, we’ve been drinking plenty hot cocoa. We just love it so much. Did you miss my hot cocoa and snack bar (station)? Check out the post here.

hot-cocoa-mix-in-a-jar

Hot cocoa mixes are great for giving as gifts during the holidays. It’s a simple thoughtful and practical act. While it’s nice to give and receive expensive gifts, sometimes it’s the simple practical ones we end up using and appreciating the most. Think about it for a second. Do you have an expensive gift from years past sitting in one corner of your home that you barely used or never even opened? On the other hand, did someone gift you with a box of rich chocolate that you ate just within a few days of receiving it? See, sometimes it’s the simple things.

There is something I love about dry food gifts. I love looking at them and eventually taking a bite or two or three until all is done. At times, I may even admire them for a few days before digging in just because I know they will be gone quickly once opened. Hot cocoa mixes in jars are one of my favorite dry food mixes. I love looking at the layers in the jars and there are so many good ideas of how to layer them. In reality, the layered mix will have to be dumped into another bowl to be make it easier for using. But it looks pretty layered for now.

hot-cocoa-mixes-in-jars

I chose to keep this hot cocoa mix easy. It’s creamy, delish and does not require a bunch of ingredients. I used Hershey’s cocoa because I love real cocoa – and not the fake stuff. I use the word ‘real’ loosely because no cocoa is real unless it comes straight from the tree, dried, then grounded into powder. Don’t ask how I know that. I love my cocoa real creamy too. Nothing is worse than hot cocoa that tastes watery. Follow the simple steps below to make it. Then grab the free printables (if desired), print them out with the best quality ink on cardstock paper, cut and attach to the jar(s) with pretty ribbon.

hot-cocoa-mix-with-free-printables


Hot Cocoa Mix in a Jar – Christmas Gift Idea
Ingredients
  • 1 cup good cocoa powder
  • 2 -1/2 to 3 cups confectioners sugar
  • Marshmallows
  • Semi sweet chocolate chips
  • Decorative holiday ribbon
  • Gift tags
  • Food jars
Instructions
  1. In a large bowl, mix cocoa powder with confectioners sugar until combined.
  2. Pour mix in jars for storing.
  3. Ideas for storing:
  4. Large jars – Layer 1/2 cup cocoa in a large food jar.
  5. Top with semi-sweet chocolate chips then with a handful of marshmallows. Repeat layers.
  6. Cover jar tightly.
  7. Attach a gift tag to decorative ribbon and tie it around the top of the jars.
  8. Small jars – If using smaller jars, create only one layer or use less ingredients to make multiple layers.
  9. To serve: Bring 1/4 cup water and 3 tablespoons mix to a gentle boil, stirring constantly about 1 minute.
  10. Pour in 1 cup milk.
  11. Continue boiling and gently stirring until milk is hot.
  12. Pour hot cocoa into a mug.
  13. Top with extra toppings and enjoy.

I purposely left out adding dried milk to the recipe because I know not everyone could use any kind of milk. It will be easier to add whatever milk someone prefers in their hot cocoa. Basically add any kind of favorite stir-ins and toppings such as marshmallows, semi-sweet chocolate pieces, peppermint, etc for a customized drink. It’s a gift that does not take long to make but is great for bringing warmth and cozy on colder days.

hot-cocoa-with-mix-in-a-jar

Pin - It New

hot-cocoa-mixes

Download the free printables by clicking on this link, wishing-you-a-merry-christmas-printables. Writing out the instructions for making the hot cocoa from the mix is also another good option for the tags. I skipped this step, though but I made these in two sizes. Download them as many times to get the desired amount.

wishing-you-a-merry-christmas-free-printables

Do you enjoy drinking hot cocoa on colder days? What do you think of putting a mix together for someone who enjoys it just as much?

Birthdays & Parties

Hot Cocoa & Snack Bar

A hot cocoa bar is such a fun activity during the Fall and Winter months. Why not go beyond the normal cup of cocoa and create a fun bar with lots of toppings and goodies?  

hot-cocoa-bar-with-whipped-cream

Set up a hot cocoa and snack bar at home on a chilly evening for your family or even friends to enjoy. It will be such a fun treat and everyone will enjoy it. Add a variety of toppings and seasonal goodies to top things off. If you are only serving your immediate family, it may be easier to have the hot cocoa already poured out in mugs especially if you have small children who cannot fix their own. But if friends are coming over and you want to go the extra mile, the hot cocoa could remain in a teapot or thermos. Setting out cocoa mix in a jar with hot milk in a thermos is also another option. I’ve always loved hot cocoa even growing up in a warmer climate. It’s not something strange to me. So it’s only natural that I would enjoy drinking it even more so when the weather is cooler. We also have a kid who can’t get enough hot cocoa when it is cold outside. Last Fall, we must have drank it on the daily (well may not but often enough).

hot-cocoa-bar-with-cookies

Decide where you’ll set it up the station. Any little corner of the home would work. It would be really nice to have something like this to greet guests who visit you as they come in from the cold. It does not even have to be this extensive – something simple with just hot cocoa and a topping or two will be just as appreciated.

The table I used was kind of narrow because it’s a console table. But I tried to pack a bunch of toppings and snacks all in one place. We were so excited to dig into this bar. My husband started getting into the snacks right away before I could even lay them out. A “hot cocoa” bar sign with a few additional holiday decor will make the table more inviting.

hot-cocoa-bar-all-set-up


hot-cocoa-bar-with-all-kinds-of-goodies

The “hot cocoa bar” words on the chalkboard is kind of hidden behind the wrapping paper but it shows close up.

hot-cocoa-bar-feature

hot-cocoa-bar-chalkboard-sign

hot-cocoa-bar-choolate-syrup

The Winter Oreo cookies were a big hit! I discovered them last year and forgot all about them this year until our three year old pointed them out on a shelf during a Target shopping trip. What kid wouldn’t spy Oreo cookies in the store especially the rich red and black mix? I could not leave the store without some of it.

hot-cocoa-bar-with-mms

Other fun goodies such as sweet homemade popcorn, homemade snowball cookies, sprinkles, peppermint sticks, peppermint M&M’S, peppermint marshmallows, were added to the table. Who knew I had so much peppermint goodies? All I really wanted were the reds and whites. But everything together tasted great with mild peppermint flavors, nothing overwhelming. I also added chocolate and caramel syrup and whipped cream and some fun plates, napkins, and cocoa stirrers for serving.

hot-cocoa-bar-caramel-syrup

The chocolate dipped spoons were definitely another favorite that I’m already thinking of making another batch. The kids wanted the sprinkles. I on the other hand, wanted one of each.

hot-cocoa-dippep-spoons

hot-cocoa-bar-dipped-peppermint-spoons

I almost forgot to mention those cute printables. I really love the colors and how they added that extra touch to the cans of goodies and the bowls with toppings. Not that we did not know what was in them. If you are having guests over, it would be nice to have the printables just to be clear about the flavors.

hot-cocoa-bar-free-printables


hot-cocoa-bar-with-printable

I think I might have added “the whole nine” but I’d say that the hot cocoa bar was well received. It was great having a variety of pretty options to choose from. I made this last week and I think I’ve been drinking hot cocoa everyday since, with or without toppings. But since we still have some toppings left over, it’s easy to throw in whatever flavor I feel like drinking. Seriously so good for ‘chillaxing’ on a cool – ish day.

hot-cocoa-bar-seating-area

These can be downloaded, printed on cardstock paper, cut and use only if the same toppings and goodies are going to be served. Download hot-cocoa-and-snack-bar-printables if needed.

hot-cocoa-and-snack-bar-printables

Other Decorations:

  • Large black and silver cans with buffalo check ribbon – New from Target (Dollar Isle)
  • Small Christmas trees with burlap wrapping – New from Target (Dollar Isle)
  • Tiny Christmas trees – New from Target (Dollar Isle)
  • Small red trucks –  New from Target (Dollar Isle)
  • Small glittery clothespins – New from Target (Dollar Isle)
  • Buffalo Check Blanket – Last year’s from Target but had never used (Dollar Isle)
  • Chalkboard – On hand from Kohl’s
  • Red pom pom banner – Last year’s find at Target (Dollar Isle)

Pin - It New

hot-cocoa-snack-bar

Do you make hot cocoa bars during the colder season? What are some of your favorite toppings and snacks to go along with it? Stay tuned for a hot cocoa mix you can give as a gift. It was also another fun one to create.

blog-sign-grey-with-comma


Decor & DIY

Mini Update in the Master Bedroom – With New Curtains and Bedding

Thank you to Designer Living for partnering with me for our Master Bedroom Mini Update. All opinions of their awesome products are 100% my own. Thank you readers for supporting the brands that support this blog.

Hi friends, can you all believe that November is going by so quickly and that the holidays are already in full swing? It’s still considerably warm here as opposed to past times. I feel like the weather has been playing tricks on us – some days cold, some days so very warm, and other days somewhere in the middle. But we’re not complaining. We’re taking all the warm we can get because winter here is no joke!! Anyway, in preparation for cooler nights, I’ve spruced up our master bedroom a bit by adding more bedding and window curtains.

master-bedroom-with-updates

FINALLY, walls that’s not orange or yellow! It’s the only room color that makes me happy. Actually the guest room is this color and the the kids rooms are kid friendly pink and blue so those are great, too. You all know my struggle! But this lighter color gives me all the freedom to throw in WHATEVER decor color scheme without it clashing and looking out of sorts!!

Anyway, I don’t think I’ve shared our room since the Spring makeover in our previous home. Our summer move has thrown everything out of wack and it’s taking a while to make this house feel like home. That’s understandable. It’s considerably bigger than our former and there are so many little spaces to organize. Our living room, front sitting room, kids rooms, entryway closets, etc have been priority and I’m getting ‘no where fast’. But our bedroom has been put on the back burner with no intention to work on it quickly. Here are a few shots of the space. It’s like a master suite in here.

master-bedroom-side-one

master-bedroom-side-two

master-bedroom-side-2

Although I was trying to spruce up other areas of our home first, I knew it was getting colder and the room was not warm enough. So I was super excited to concentrate on it a bit and add some necessities from Designer Living to make our room more cozy and warm during this season. It’s not fully decorated yet and it’s still pretty much a grey and white room with plenty empty space. But it is much better than what it was and I am loving walking into – puts a smile on my face every time. Not to mention, it does not feel as cold at nights now that I’ve made it a bit more cozy.

Designer Living has really great quality home decor products for very low prices. They are budget friendly and are a collection of top brands. It’s like having designer stuff without paying designer prices. No kidding!! I mean, I’m all about saving a penny or two on things that are durable and look nice. Aren’t you?!

master-bedroom-with-dresser

The extra layers of bedding were much needed in this space. This microfiber sheet set and pillow cases are the best, so light weight but yet so soft an comfortable. And I’m always happy to climb into bed under that large plush grey blanket. For real!! Did I mention it’s for less than $20? Seriously. We’ve only had just one quilt and one set of sheets from back in the Spring. I’m not embarrassed to say it because honestly, I was quite content to use, wash, and re-use and have less clutter. Until it got colder, temps dropped, and that cold air started  to circulate our room during the wee hours of the night (morning). No one wants to climb out of bed to pump up the heat. What was I thinking?! This super plush blanket and sheet set makes the bedding feel less “thin” and a bit fuller for a comfortable night’s sleep.

master-bedroom-update

master-bedroom-girls

I also added an oh so soft fur throw and it’s the next best thing ever!! There is just something about having a soft throw against your face while you get cozy. Seriously, am I the only one who does that? This fur throw blanket is soft as a cloud! It even looks soft here in the photo. I love that it has double softness on both sides. Ever had a blanket that has only ONE soft side? Nope, not this one! Our kids think it’s the softest throw ever and want to claim it as their own. Not that they don’t already have enough blankets on their own. Did I use the word SOFT so many times? Yes, because it really is?!!

master-bedroom-cozy-throw-on-the-bed

master-bedroom-cozy-throw

And how about those curtains? I love love love them! I think they are beautiful and so elegant. I have a thing for elegant decor. That’s why I love things like pedestal candles and tall decorative vases. Maybe it has to do with my height!! But either way, these curtains are just the right touch to our bedroom. I don’t think I’ve ever seen curtains with ties like these. But from the moment I saw them, I did not want anything else. Where oh where were these when I was searching for curtains earlier this Fall? They are made from faux silk and come in various sizes up to 120″ long. They would be a perfect fit for our really high windows downstairs. But they are staying up here because they really make our bedroom lovely. The photos do not do them justice. I chose the size 108″ – drives me nuts to see “too short” curtains such as I have downstairs.

master-bedroom-with-beautiful-curtains

Our windows extend to the other side of the room which only has a TV as you may have seen in one of the before photos. My husband and I are thinking of adding a small sitting area to that corner. But again, everything takes time.

master-bedroom-more-curtains

master-bedroom-curtains

The curtains are lined which helps them to drape much better and also helps with privacy and keeping the heat inside. But they still let plenty of light in and do not make the room dark at all. My kind of curtains. I love having the shades up and the curtains drawn, but my hubby likes them all the way closed. So when he’s at work, I’ll put them up but once he comes home, he puts them down. By then it’s night time anyway so we both are having them just the way we like them.

master-bedroom


master-bedroom-pillows


master-bedroom-baby

For the larger window, I ended up using three panels because the ties make them spring back just a tad. So when closed, there are no tiny little spots peeking through. Nothing major but I just love seeing them full.

master-bedroom-window-curtains

I also spruced up the room a bit with additional decor such as the mirrors above the night stands. Remember these nightstands that I did not get to put up during our room makeover in the Spring? I finally put them together while my husband was away on a business trip back in the summer. “Gotta” have nightstands.

master-bedroom-updates


master-bedroom-other-side-of-the-room


master-bedroom-dresser


master-bedroom-with-flowers

If I may say so myself (as if I have not already said it enough), the new bedding and curtain have made the room so welcoming, warm, and cozy for us. We are really loving them; my hubby even helped me figure out how to tie the curtains . They were really easy once I got the idea.

master-bedroom-curtain-knots

Have you checked out Designer Living before? It’s worth checking out for awesome products at really good prices.

You can get 15% off all items mentioned in this post by clicking here and using code ZAN15 until 12/31/16. Note that this code cannot be combined with other offers and it’s not valid on specials, steals, or boutique items. One time use only.

Also, the fun does not stop here!! Do you enjoy Black Friday and Cyber Monday shopping? You can save up to 80% off multi piece bedding sets! Deals kick off Wednesday, 11/23. Choose your own deal with codes EXTRA25 (11/23 – 11/27) and CYBER25 (11/28 – 12/4) for an extra 25% off most items site wide!

Now if these aren’t some fantastic deals with their already low prices, I don’t know what is. Think I’m gonna get shopping for some more awesome bedding and curtains myself. I really love those soft blankets:) And now that it looks better, I’m motivated to decorate it for the holidays.Pin - It New

master-bedroom-mini-updateI hope you enjoyed the tour and don’t forget to check out Designer Living for some awesome finds this holiday season. What do you think of my mini bedroom update? I’d love to know in the comments!!!

blog-sign-grey-with-comma

Decor & DIY

Holiday Entertaining Made Easy (with these extras)

Thank you to At Home stores for partnering with me for today’s post. All opinions of their fabulous products are solely my own.  Thanks for supporting the brands that help keep this blog running.

Are you entertaining extended family or friends this holiday season? The holidays can be busy and sometimes stressful. Get your home Entertaining ready and avoid the last minute frazzle with these “extras”.

holiday-entertaining-extra-storage-extras

1.Extra planning ahead – Planning ahead for entertaining is always ‘ great way to make sure things are in place and ready for when your guests arrive. Don’t try to just “wing it” if that is how you usually operate. Planning is the safer way.

  • Whether you use an app or write on paper, make a note of how many guests are coming and keep a list of what you will need for hosting. 
  • Make a menu and grocery shop early.
  • Prep certain foods ahead to avoid the cooking overwhelm all in one day.
  • When possible, plan for easy hassle free meals. 

These free planning printables are so pretty and so well laid out for easy holiday planning. I snagged them here

holiday-entertaining-extra-storage-planning-printables

2.Extra sprucing up –  Spend a few minutes sprucing up your space.

  • Clean areas that need to be cleaned. There is always that extra bit of cleaning that needs to be done before having guests over. Dust and wipe down corners of your home that you don’t clean everyday. 
  • Add a bit of decor. Something as simple as a jar of fresh flowers makes all the difference in a room.
  • Organize the areas that your guests will be using to make moving around easier and avoid a sense of confusion, think entryways, bathrooms, food area, etc. An entryway has such a big impact for what guests see first when they walk into your home. Create areas where they can put shoes and hang jackets (even if you are the one hanging them). 

A few weeks ago, a friend and her kids were visiting for a play date and she commented on our entryway. I had a different set up than this here but I guess it was enough to catch her attention in a good way. She actually did not even mention it immediately but did later while I was giving her a tour of the other rooms. So get that entryway organized and looking pretty for when your guests arrive.

entry

  • I’ve been trying to figure out the best way to organize the rest of our front entry. I have not yet come up with the perfect solution but I have done some things to make it functional. For a while I had no floor mat at the front door just because I could not decide on the kind of mat I wanted. I have this thing about mats and I like them to be just right.

holiday-entertaining-extra-storage-floor-mat

holiday-entertaining-extra-storage-entry-bench

  • I also added some baskets for smaller items such as hats, gloves, and scarves. I love the size and shape of the baskets – they seem to work well.

holiday-entertaining-extra-storage-storage-baskets

3.Keep extra supplies on hand – It’s always helpful to have extra supplies on hand even more so during entertaining. 

  • Think about things like dinnerware whether you are using real or fake (A.K.A. disposable). Keep them handy and keep them nearby so guests could easily find them. Nothing worse than sitting down to eat and having to get back up a million times to grab a plate, cup or a napkin for someone.

holiday-entertaining-extra-storage

This Baker’s Rack comes in handy for my extra supplies. It’s right next to the dinning table where food will be served so the extra supplies will be in view and in reach. It is such a cute little stand with just the right amount of shelving for holding our extras.

holiday-entertaining-extra-storage-rack

  • Extra toiletries – Who does not need them right?! 
  • Extra sitting. Even if you have to move things around to make room for extra sitting, do so. Grab a few chairs from another room and add to the room(s) where you plan to keep your guests entertained. It’s what I do all the time, especially in the dinning room.   

My front room (A.K.A. the green room) is one of the areas that lacked any kind of sitting. My husband and I have been planning to make it a sitting/reading/guest friendly area since we move. He suggested using two accent chairs in one of the corners. Everything in a new home takes time to come together so the room is a work in progress. I’ve played the moving chairs around game in this room but nothing permanently. Earlier during the Fall, I searched around for some chairs and stuff to fill the room then kind of gave up on it after being out all day one day and online for a long time. But then since the room is right at the front, I really wanted to make it a lovely little spot and a welcoming avenue. For the most part, it’s still fully furnished and not where we would like it but I’ve created this small sitting area that’s already made such a difference. 

holiday-entertaining-extra-storage-sitting-area

Now how about these fabulous chairs from At Home stores? I told my husband I wanted to go to At Home and he suggested looking at their online site first. He saw these chairs were on sale and showed them to me. Of course, I’d seen them in the store before but could not pass up the 50% off guys!! For $200, I’d say they were a total steal and we could not be happier to have these in the front room. I love love love the sales and affordability of the products from At Home stores. Now when guests come over, our front room would be somewhat ready and welcoming.

holiday-entertaining-extra-storage-extra-chair

4. Extra time – Give yourself extra time for the unexpected especially if you have young children who will need care and attention. Have a plan B just in case something does not work out as you have planned. 

Pin - It New

holiday-entertaining-made-easy-with-these-extras

Hope these will give you some ideas and make your holiday entertaining so much easier. Now I’d like to know what kind of extra would you keep on hand for entertaining guests?

You can find most of the products I’ve listed from At Home stores over on their site by clicking on each link below.

Accent Chairs

Baker’s Rack

Storage Baskets

Mats

blog-sign-grey-with-comma

Home

New Kitchen in the Playroom

Thank you to Step2 for letting me test this item as part of the Step2 toy tester program. All opinions of the product are solely my own.

It’s always nice to have a play kitchen at home for small children, especially during the colder months when they spend more time inside. Our kids love to play pretend cooks and restaurant hosts and hostesses.  We’ve added a new play kitchen to their play room and they are enjoying using it. It’s so fun to watch them get creative as they cook and serve. Sometimes they’ll even bring me “food” and will have a name for the “type” of food.  

play-kitchen-in-the-kids-area-step-2

The former play kitchen was coming apart from various moving around and I just did not have the time to figure out how to fix it. But it was getting colder and my kids were wanting to play with their kitchen. I was ecstatic that Step2 allowed me and our kids to try out their Contemporary Chef Kitchen. It arrived within two days after I placed the order. When my husband called out to me saying that my “stuff” arrived, I had no idea to what he was referring. I was not expecting the kitchen to arrive so quickly. The kids were so excited and could not wait for it to be set up. 

play-kitchen-with-step-2

It was an easy assembly but it would have been even easier if I assembled it while the kids were asleep. They kept taking the parts and playing with them as I was trying to put the kitchen together. Once I got it set up they began playing with it right away. They have played with it on a regular basis since. 

play-kitchen-kids-playing


step2-play-kitchen-fun

Look at all the centers in the kitchen, sink, fridge, stove, etc. It’s very compact – such a nice bonus to encourage lots of play. Even the utensils, cookware and serving dishes came with the kitchen. I also love that there are separate baskets and places to keep things tidy. All the kids enjoy playing with this kitchen although it is more suitable for young toddlers. Our 5 year old doesn’t mind because she loves to be a pretend cook. Baking is one of her favorite things to do just like her mom. 

play-kitchen-sink-and-stove

Having the stove light up and make cooking noises is a plus. It’s like an imitation of a real stove without the real fire. This makes it interactive and at the same time fun for the kids. 

play-kitchen-sove-light-up


play-kitchen-bowls

There is even a spot for a doggie. How fun is that! This little stuffed doggie has found its own spot in our home. 

play-kitchen-stove-and-fridge

Some other bonuses of the Step2 Contemporary Chef Kitchen are that it is not very big and not heavy. It’s made from hard plastic so is very durable. This all make it easy to move around and fit in tiny corners of the home. It’s one that will not take up lots of space in a room. The neutral color is is not only gender friendly but it will not show up too bright in a room that’s not specifically made for play, such as a living room. The kitchen could be placed in a tiny corner behind a couch or any place that the kiddos could feel free to be kids and play with their kitchen.

play-kitchen-table

It’s really a neat little addition to the playroom. I’ve added a video so you could check out the demo of my girl demonstrating the use of the kitchen.

Pin - It New

step2-contemporary-chef-play-kitchen

What do you think of this new little kitchen? Do you have young kids who play with Step2 play kitchens? I would love to know in the comments. 

blog-sign-grey-with-comma

Decor & DIY

Copper and Gold Thanksgiving Tablescape Plus Free Printable Tags

Hi friends, hope the time change has got you off to a good start. Me on the other hand, I’ve been a bit thrown off and hoping to spring back into action soon. But today, I have something special for you. I’ve teamed up with some of the most creative women to bring you lots of Thanksgiving tablescape inspiration! Thanks to Sabrina at Meet our Life and Kelly from North Country Nest for the invitation and for putting everything together.

thankful-table-with-lighted-candles

I’m still not sure if we are hosting Thanksgiving at our home this year. But it’s a great idea to have some things ready just in case. So I decided to come up with an idea of what the ‘feel’ of our table setting might be. You’ve seen my Fall table setting here where I used pinecones and gathered a few things around the house to create the table soup and salad style. For this Thanksgiving table idea, I changed out the look and made it a bit more sophisticated with lots of candles, gold, copper, and DIY items. I’m going to try to give you a quick explanation how I created this look.

fall-table

thankful-table

I first planned the table around a copper and gold base, some items I had on hand, others I bought for a couple bucks, and others I DIY-ed. Then I covered it with a white linen tablecloth and dressed it up.


I used a copper bowl I had on hand, filled it with tiny lentils, and added a mixture of faux flowers to create a centerpiece. My rustic wood charger came in handing for adding some height to this beauty. What do you think?

centerpiece

I have a thing for pedestal candles and I just really love them on a Thanksgiving table setting. I gathered some that I bought earlier this Fall for my mantle to add to the centerpiece. I also mixed in a few smaller votive candle holders from the Dollar tree.

thankful-table-centerpiece-with-lots-of-candles

Tiny faux pumpkins were placed randomly to finish off the entire centerpiece. Vintage metallic paint was used to repaint a couple of them.


fall-table-centerpiece

Let’s talk about the dinnerware and the rest of the table. The plates, silverware, and Mason jars for drinking I already had on hand. I used golden chargers from the Dollar Tree (you all) as placemats. I was super happy they brought them back this year. In the past, I owned some of them but I think thy got misplaced or thrown away in a bundle when we moved back in the summer.

thankful-tablesetting

The napkins got a little sprucing up with some DIY napkin rings. I used ribbon, faux fall leaves, acorns, and hot glue to whip them together. I did not put the tutorial on the blog but as you may imagine, they were super easy to do.

thanksgiving-table

I’m excited about these Thankful Prayer cards. It’s a good way to get family and friends to remember to be thankful for the many many many blessings that surround us.

thankful-prayer-card

Download these 5 x 7  thanksgiving-prayer-cards for free. I was able to finally stock up on Cardstock paper a few weeks ago and I am enjoying using them to print things like these using the best printer settings. I finally decided to go against my husband’s don’t use up all the ink to print all your stuff and just do it. Ha ha.. I joked with him about it so he knows.

thankful-prayer-cards

The final DIY on the table are the gift tags. If you have extended family or friends coming over, surprise them by adding a small gift to the table. Or you can do it for your own household. They’ll appreciate it. I filled small mason jars with colorful M&Ms and tied a “Thankful for You” tag around each one. Download thankful-for-you-place-cards, print out on cardstock paper, cut and attach them to the gifts with twine or ribbon.

thankful-table-thankful-for-you-printable

You can also snag these other Fall printables on the wall for free, too. You’ll be able to see them up closer by clicking on the links here.

dinng

window

Before your guests arrive, add some rolls and fill the cups with drinks so they can start off while they await for the rest of the dinner (restaurant style). Don’t forget to light the candles!!
thankful-table-top

So that’s the table in a nutshell (a huge nutshell). I really love how it all came together. And I hope you enjoyed it too. We already ate on the table this past weekend. But of course, I saved the gifts for later.

thankful-table-with-lighted-candles

thanksgiving-dinning-room

Pin - It Newcopper-and-gold-thanksgiving-tablescape-with-free-printable-tags

What do you think of the table? Are you hosting Thanksgiving this year? I would love to know your thoughts in the comments. And don’t forget to check out these other Thanksgiving table setting ideas from some very creative ladies by clicking on the links below. I know you will enjoy them!!

blog-sign-grey-with-comma

thanksgiving-tablescape-short

Thanksgiving Tablescape Blog Hop

Monday

Craftivity Designs / North Country Nest / 2 Bees in a Pod / My Life From Home / Dazzle While Frazzled / The Crazy Craft Lady / What Meegan Makes

Tuesday

At Home With Zan / Our Crafty Mom / Blue i Style / Life on the Bay Bush / The Magic Brush Inc / Designers Sweet Spot

Wednesday

Meet Our Life / Celebrate & Decorate / Corner 52 / My Creative Days / Frazzled Joy / An Alli Event


Decor & DIY

5 Essentials for a Holiday Guest Bathroom Including a Decor Update

This shop has been compensated by Collective Bias, Inc. and its advertiser. All opinions are mine alone. #QuiltedHoliday #CollectiveBias

Are you prepping your home for guests during the holidays? I have been slowly making our home feel like home. But during the holidays there is always that extra spruce up that I love to do. It usually involves cleaning the house thoroughly and adding touches of holiday decor. Especially when we have guests coming over, I always desire to make sure our home is holiday ready so our guests could feel right at home.

guest-bath-makeover

Our bathroom on the first floor needed some attention. It is just a standard bathroom with a full bath but it was not decorated or guest ready at all. When we moved in during the summer, my plan was to use it as a powder room, quick bathroom trips, and for guests when they came by. Overtime, it became the everyday bathroom because most of time is spent downstairs anyway. It became the place to give kids bath and change their clothes frequently. This made it easier than having to go upstairs when we are in a rush. It also became a store all for bath and body products. While this worked well, I did not like how cluttered the bathroom became with all kinds of random ‘necessary’ items. I wanted to organize it but was not quite sure where to begin because there are so many other organization projects going on around here.

Bathroom Before

We’ve had a few guests over for the day and this is the bathroom they used. It was time to get it organized especially as the holidays are approaching and it’s our favorite time to have guests over. We also have a separate guests bathroom in our guest bedroom which is still in the making. But having this one downstairs holiday ready will benefit our guests who do not feel like climbing the steps to get to the other bathroom while we are hanging out downstairs. Plus if guests are only coming for the day, this is the bathroom that makes more sense for them to use. I’m so glad I took the time to decorate and organize this bathroom. When I was done with it I asked my husband if it looked girly with the pops of pink. He said it looked pretty neutral to him – made my day!! Sometimes I even forget that there are four full baths in this house. Now I’m inspired to get going on the next three. 

Make your Bathroom Guest Ready for the Holidays with these Essentials 

1.Decorative Items

Updating bathroom decor will definitely take out the boring and make it more welcoming. I got some “wows’ from my family once they came in and saw the bathroom decorated. And it only took me a couple of planned out items to get the correct look. I think it looks clean, simple, and chic!! 

Tip: Bathroom decor does not need to be complicated or cluttered. Choose pieces that are trendy, beautiful and functional and will still keep your bathroom looking clean. I snagged a few ‘Target’ trendy holiday items that made this possible.

  • A shower curtain: The overall color scheme of the bathroom is drawn from this beautiful shower curtain that I found at Target. My original thought was to go with a white shower curtain but when I saw this one I knew it was coming home with me. Isn’t it beautiful?! Before I put it up I was a bit unsure if the diamonds would be too much but they are not. We really love this curtain. I might just get another one for the kids bathroom upstairs. I’m working on a similar color scheme for the girl’s bedroom.

bath-update

  • Faux flowers: There is nothing like a jar of flowers to add quick decor and beauty to a space. I used one of the gold dipped vases that I DIY-ed a few weeks ago to store the flowers.
  • Decorative plate used as a tray: Necklaces, watches, rings, or whatever nick-nacks can have their own home while the guest visits. Notice the words on the plate. It is beautiful, functional, and very encouraging. Even the toilet brush holder is pretty. It too is a bathroom necessary but of course, I had to find a beautiful one. After all, I wanted the bathroom to look like I spent time making it welcoming and not just thrown together. 
  • I also added this star candle in mercury glass votive: I love the star shape that goes along with the holidays.

guest-bath-trash-can

  • Tooth brush holder: I also used a gold mercury glass votive from Target as a toothbrush holder. I’m really loving these trendy gold and silver mercury glass decorative items.
  • Pretty hand soap dispenser: Encourage guests to wash their hands after using the bathroom by placing a pretty soap dispenser on or beside a hand towel.  
  • Decorative hand towel: I also added an accented hand towel because all I had on hand was white. I love how the gold compliments the rest of the decor.

guest-bathroom-sink

  • I also added a couple bath rugs. I chose to keep the color white because the shower curtain already has the gold accents. Again, they are acting as functional decorations. 

bathroom-rug

2. A Welcome Basket with Extra Bath and Body Supplies

The basket should include items such as body wash, shampoo, lotion, etc. If your guest forgets something, he or she should feel free to use the supplies in the basket. I put a toothbrush and a small tube of toothpaste in the lovely votive above but they could also go into the welcome basket. Tip: Keep the toothbrush in it’s original packaging to keep it free from dust. Plus avoid your guest from feeling awkward about using a toothbrush that is opened (even if it is new). 

guest-bathroom-extra-supplies-tag

To make your guest feel extra special, include a note in the welcome basket to let them know you appreciate their visit and want to make their stay enjoyable.

guest-bathroom-thank-you-sign

Download it here: thanks-for-being-our-guest-printable

thanks-for-being-our-guest-printable

3. Extra Bath Towels, Hand Towels, and Washcloths

I’m not sure what guest brings his own towel when he or she visits friends or family. Have some extra on hand in places where they could easily be found. You may consider areas such as on the edge of the bathtub, on a towel rack, and also in a storage basket.

guest-bathroom-extra-towels

extra-towels-for-guest-bath

3. A Laundry Basket and Hangers

If your guest is staying over for a few days and would love to do some laundry, a laundry basket in the bathroom may be helpful. Also, having a few hangers for hanging clothes might be an added bonus.

guest-bathroom-laundry-essentials

4. First Aid Bin or Kit: You never know when a guest may need to use something from the first aid bin. And if they have kids with them, it is always a good thing to have on hand. Put the necessaries such as bandages, skin cleaning solutions, ointments, essentials, etc.

5.Toilet Paper: Let’s face it, you could never have too much toilet paper on hand. But it’s often the thing that we sometimes run out off and have to make those quick stops at the store to purchase. My husband is the main toilet paper buyer in this house. He always counts the sheets to make sure it’s worth the money. When we first got married and I saw him doing that I was like, “what are you doing?” He explained to me how he always counts the sheets. So now even when we are  out shopping together, I will ask him to chose the toilet paper. On occasion I will pick up some rolls too but I don’t really count the sheets. I just estimate by their looks or choose the regulars and move on.

guest-bathroom-storage

But I have discovered a new brand of toilet tissues at Target that helps solve my non-counting sheet problem. It may become your best friend too if you are like me. It’s Quilted Northern Ultra Soft & Strong® Mega Rolls with extra sheets. It’s fuller and lasts longer which makes for less trips to the store to buy toilet tissue. Don’t you just love a good find?!

quilted-northern-mega-rolls

If your house will be full of guests for the holidays, you will definitely want to keep your guest bathroom perfect and put together. It does not matter if they are staying for a day or a few days. With Quilted Northern Mega Rolls you can stock up and not have to worry about running out of paper for the season (because no one wants their guest to experience a bath tissue run out!) Even better, you can snag these Quilted Northern Mega Rolls on sale by using this Cartwheel offer. You can also enter the sweepstakes to win over $1000 in Target giftcard™. ‘Tis the season for a full house – so make sure the bath tissue roll is full too with Quilted Northern Ultra Soft & Strong® Mega Rolls:) 

#QuiltedHoliday Sweepstakes

quilted-northern-ultra-soft-and-strong-toilet-paperI even added these pretty labels to the extra supplies storage bins for our guests including one with Quilted Northern Mega Rolls. Don’t you just love pretty organization that is also welcoming to others? I got the labels from Target and DIY- ed the writing. It is an easier option as opposed to creating and printing them out. I understand that not everyone may have access to a home printer or may know how to create labels online. You could added these pretty labels to storage bins and customize them to your liking. 

guest-bathroom-northern-quilted-bin

The labels come in white with two different neutral color rims, gold and silver. I used the gold ones for the bins.

tags-for-labels

Use whatever color marker you prefer to write on the labels. You can even use different colors. I used black for all the bins except on the ‘extra supplies’ bin above. I used gold for the writing on that one. Personalize them more by adding dots, stars, lines, etc. The possibilities are endless.

toilet-paper-quilted-northern

It’s pretty obvious what’s in some of the bins, of course. But the labels added that extra touch and clarifies the items in certain bins that they could use. Tip: Be sure to give your guests a walk-through and show them where these extra storage items. If they run out of something that is not visible, they would not be left feeling awkward to call out or search the cabinets for what they need.

guest-bathroom-storage-bins

So these are my five favorite essentials to include in our bathroom to make it guest ready for the holidays. It’s nice to have a separate guest bathroom but if you don’t have one, use your everyday bath and spruce it up a little with these tips. As I mentioned before, this is our everyday bathroom downstairs but it was made guest ready for the holidays just by taking the time to include these essentials. 5-essentials-for-a-holiday-guest-bathroom-including-a-decor-update

How do you prepare your bathroom for guests during the holidays? Will you be stocking up on Quilted Northern Ultra Soft & Strong Mega Rolls to ensure you have enough toilet tissues on hand for the season? I would love to hear your thoughts in the comments!