Teach the story of Moses and Reinforce it with these 5 Simple Objects and Craft Ideas
(This was one of the original posts on this blog – It’s now being updated for easier reading purposes).
Today’s bible crafts are centered around teaching the story of Moses. Moses wrote the first 5 books of the bible: Genesis, Exodus, Leviticus, Numbers, & Deuteronomy but teaching the events surrounding Moses begin in the book of Exodus chapter 2. Since the events are long, I only chose a few crafts to focus on. These crafts can be used for children ages 3 and up.
1). Moses as a Baby in the Basket on the River (Exodus Chapter 2).
To illustrate this scenery, place a doll wrapped with a towel in a basket. Fill a large container or tub of water and lay the basket in it.
2). Moses’ Rod That He Used to Perform Miracles
We made a rod using Popsicle sticks glued together to show Moses’ Rod. It’s small but it demonstrated what I think it should. To go a little further we added some glue and sprinkled it with glitter. This is not necessary; we only made it glittery because our little girl made the rod.
Examples of Moses’ Rod Turning into a Serpent
We used a plastic toy snake to demonstrate how Moses castes his rod down which turned into a serpent (Exodus 4:1-4).
Aaron, Moses’ brother, also casts the rod down before Pharaoh and again, it turned into a serpent (Exodus 7:10-13).
3). The Ten Plagues (Exodus 7:14 through Exodus 12:31).
We made Popsicle Stick puppets to illustrate this part of the story.
To print the printable below in PDF, click on this link The Ten Plagues. Then cut out each piece and glue them unto a Popsicle stick.
Follow the instructions on the above printable to complete the Popsicle Stick puppet craft.
4). Crossing of the Red Sea (Exodus Chapter 14)
Construction Paper Sea Craft
- Layer a blue sheet of construction paper on a flat surface.
- Cut out a rectangular piece of brown construction paper and glue it in the middle of the blue construction paper.
- Draw and cut shapes of ocean water from another sheet of blue construction paper.
- Glue them on opposite sides of the brown construction paper.
- You could also use small toy people to represent the Israelites crossing.
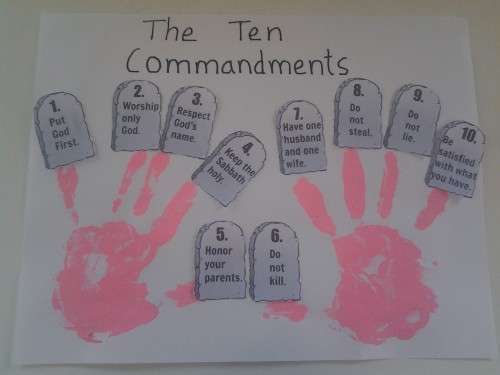
5). The ten commandments in Exodus 20
Hand print 10 Commandment Craft
We made these hand prints 10 Commandments using paint and 10 commandments on stones cut-outs.
Note: Although we made this hand print craft for The Ten Commandments, it’s NOT my original idea. I spotted it somewhere on the internet. I’ve searched the internet to find the original source to give credit to but I just cannot find it anymore. But it’s definitely a great way for explaining the 10 commandments to kids.
To print the printable below in PDF, click this link The Ten Commandments.
Or you can choose to purchase these mini rocks here. These are small cut-outs you can use along with the handprinted art or for popsicle stick puppets. Get these here.

To Make Handprint 10 Commandments
- We used pink acrylic paint to make hand shapes. Let the paint dry.
- Then cut out the commandments from the printable above and glued each one to a finger.

These are all the crafts we did to try to explain Moses to a 3 year old toddler. We hope you enjoy crafting these Bible stories with us and enjoy doing them with your child, children or students if you try them.
The 10 Commandments Puzzle
The Ten Commandments Learning Cards
You can also get these learning cards here for the little ones to practice. They come in black words and also in colorful words, if you prefer. Print them out, and leave all the rocks on the sheets to view as a whole, or cut them out as small individual cards. Print as many as you like with one small purchase. Get them here.

Want More Interactive Bible Story Ideas?
Visit the links below to find similar posts in this series.
Creation Story with Crafts and Snacks
Noah’s Ark with Crafts and Snacks


One thought on “Teaching Bible Stories to Children: Moses Crafts”